
KICKER KEY2004
KICKER KEY2004 4-Channel Smart Ampየሚያነቃቃ የተጠቃሚ መመሪያ
Model: KEY2004 (47KEY2004)
1. መግቢያ
This manual provides detailed instructions for the installation, setup, operation, and maintenance of your KICKER KEY2004 4-Channel Smart Amplifier. The KEY2004 integrates an amplifier with an AI-driven Digital Signal Processor (DSP) to optimize your vehicle's audio system. This product is designed to enhance your listening experience by automatically correcting sound characteristics specific to your vehicle's interior.
2. የደህንነት መረጃ
በምርቱ እና በተሽከርካሪው ላይ ጉዳት ወይም ጉዳት እንዳይደርስ ለመከላከል የሚከተሉትን የደህንነት ጥንቃቄዎች ሁልጊዜ ይከተሉ፡
- ማንኛውንም ጭነት ከመጀመርዎ በፊት የተሽከርካሪውን የባትሪ ኔጌቲቭ ተርሚናል ያላቅቁ።
- መቆንጠጥ ወይም መበላሸትን ለመከላከል ሁሉም ሽቦዎች በትክክል መሄዳቸውን እና ደህንነቱ የተጠበቀ መሆኑን ያረጋግጡ።
- Use appropriate gauge wiring and fuses as specified. Incorrect fusing can lead to fire or equipment damage.
- ስለ ማንኛውም የመጫን ሂደቱ ክፍል እርግጠኛ ካልሆኑ ባለሙያ ጫኚን ያማክሩ።
- ስራውን አያድርጉ ampበእርጥብ ወይም መamp ሁኔታዎች.
- መጫኑን ያስወግዱ amplifier in locations exposed to direct sunlight or excessive heat.
Important Fuse Note: The KICKER KEY2004 amplifier requires a 20A fuse for proper protection. If using an aftermarket wiring kit, verify the included fuse matches this requirement. A 60A fuse, for example, is oversized and will not adequately protect the ampማብሰያ
3. የጥቅል ይዘቶች
Your KICKER KEY2004 package includes the following items:
- KICKER KEY2004 4-Channel Smart Ampማብሰያ
- Auto-EQ Microphone with Selector Switch
- Wiring Harnesses (Power, Speaker, RCA inputs)
- ሃርድዌር ማፈናጠጥ
If purchased as a bundle, the Rockville RWK82 8 Gauge 4 Channel Car Amplifier Wiring Installation Kit includes:
- (2) 17 ft High Grade Twisted Pair 100% Copper RCA Cables
- 17 ft 8 Gauge Translucent Blue SuperFlex Power Cable
- 17 ft 18 Gauge Blue Remote Cable
- 17 ft 16 Gauge Clear Speaker Wire
- 3 ft 8 Gauge SuperFlex Ground Wire
- Gold Plated AGU Heat Resistant Fuse Holder
- 60 Amp AGU Gold Plated Fuse (Note: Replace with 20A fuse for KEY2004)
- 7 ft Split Tube Loom
- Accessories: Wire Ties, Ring Terminals, Butt Connectors, Spades, Grommets
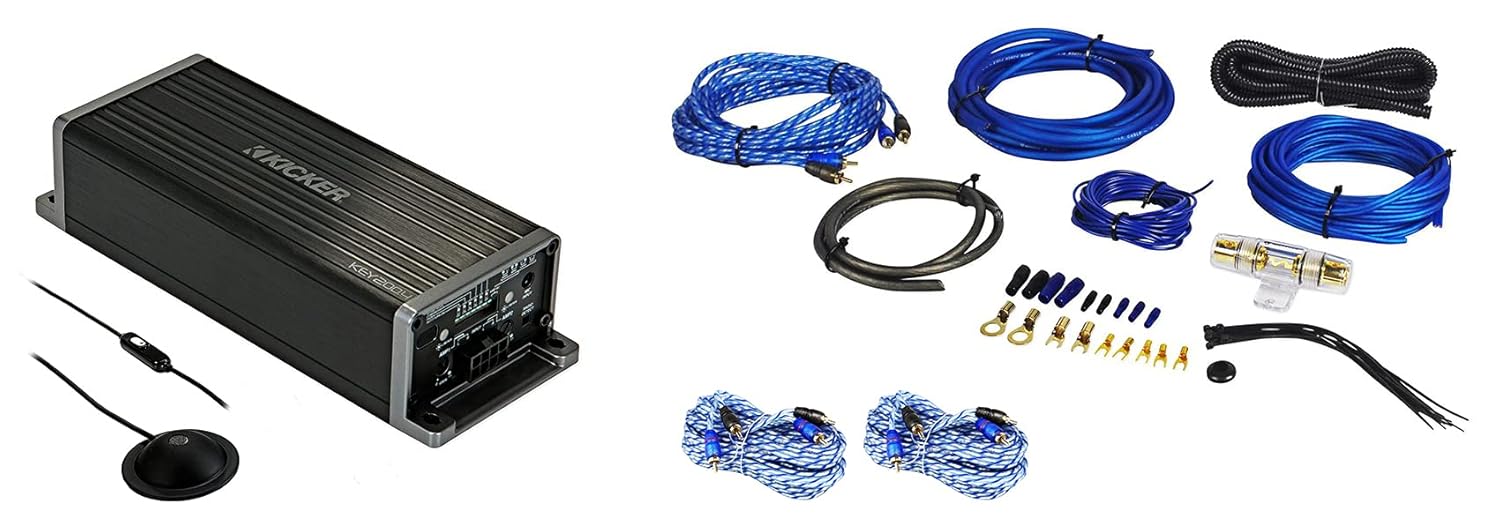
Image: Kicker KEY2004 Smart Amplifier shown alongside the components of the Rockville RWK82 wiring installation kit.

Image: The Kicker KEY2004 amplifier unit with its included Auto-EQ microphone and remote switch.

Image: Various components of the Rockville RWK82 wiring kit, including power cables, RCA cables, fuse holder, and terminals.
4. ምርት አብቅቷልview: KICKER KEY2004 Smart Ampማብሰያ
The KICKER KEY2004 is a compact 4-channel amplifier designed to deliver 50 watts RMS per channel. Its primary innovation is the integrated AI-driven Digital Signal Processor (DSP) with Auto-EQ functionality, which automatically analyzes and corrects your vehicle's acoustic environment for optimal sound quality.
ቁልፍ ባህሪዎች
- Auto-EQ: Utilizes a microphone to analyze and automatically correct the vehicle's acoustic response.
- AI-driven DSP: Advanced digital signal processing for sound optimization.
- FIT2 Technology: Kicker's Fail-Safe Integration Technology for superior input signal compatibility.
- Start/Stop Vehicle Technology Compatible: Designed to work seamlessly with modern vehicle start/stop systems.
- Auto 40-Band Equalizer: Automatically adjusts 40 frequency bands for precise sound tuning.
- ቢ-Amp አቅም፡- Allows for bi-amplification setups (defeasible).
- Auto Compressor: Dynamic range compression (defeasible).
- Kicker EQ Preset: Pre-programmed Kicker sound signature (defeasible).
- Auto Time Alignment: Automatically corrects speaker timing for improved sound staging (defeasible).
- Auto Level Adjustment: Adjusts levels in Bi-Amp ሁነታ ብቻ።
- Auto Speaker Size Detection: Automatically identifies connected speaker sizes.
- 24dB Crossovers: Selectable high-pass filters at 60, 80, or 120Hz (defeasible).
መቆጣጠሪያዎች እና ግንኙነቶች;
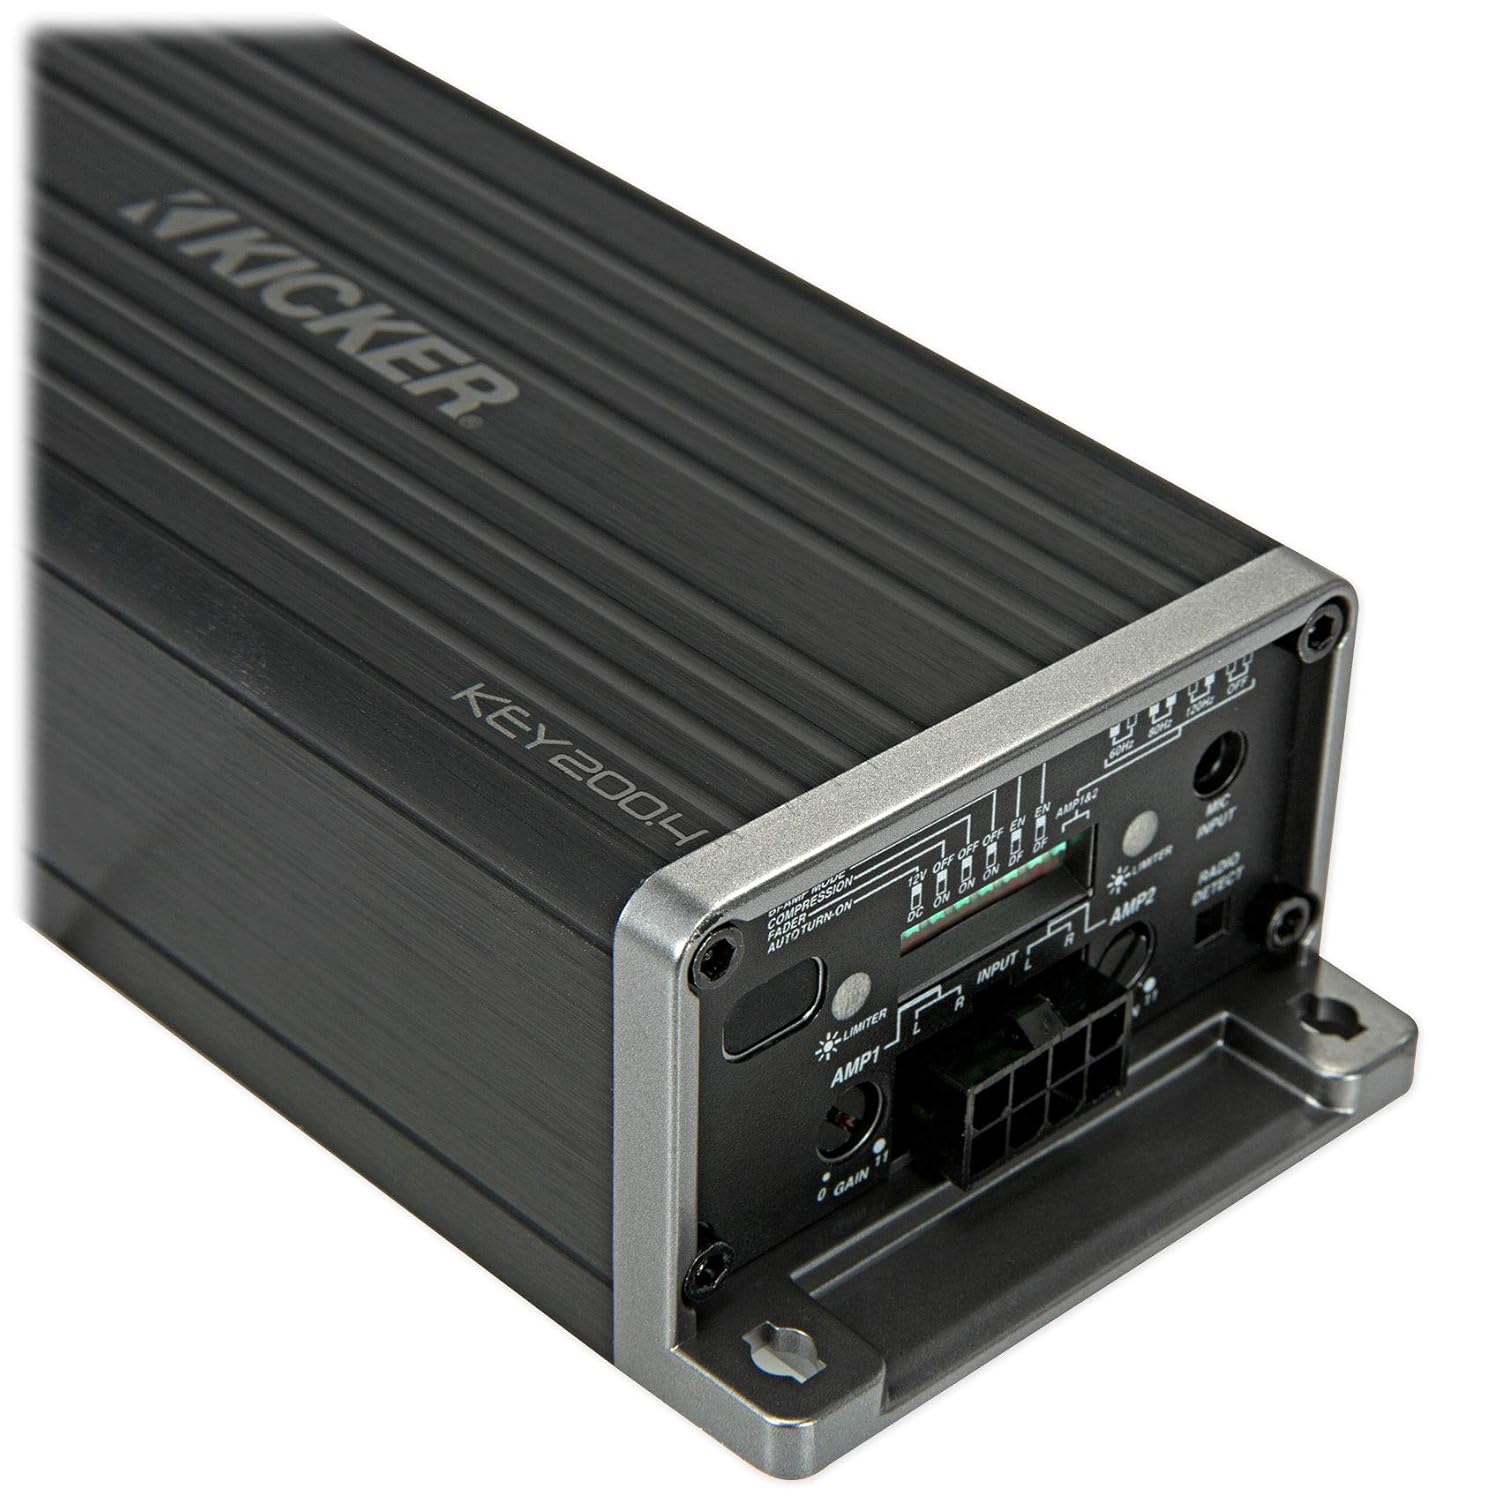
ምስል፡ መቀራረብ view of the Kicker KEY2004 amplifier's input and control panel, showing gain adjustments, input selectors, and various switches.
የ amplifier features input terminals for both high-level (speaker level) and low-level (RCA) signals, gain controls for each channel pair, and switches for crossover settings and other DSP functions. The included microphone connects to a dedicated port for the Auto-EQ process.

Image: The various wiring harnesses provided with the Kicker KEY2004, including the main power/speaker harness and the microphone cable.
5. መጫን
Proper installation is crucial for optimal performance and safety. If you are not comfortable with electrical wiring, seek professional assistance.
5.1 በመጫን ላይ Ampማብሰያ
- Choose a dry, stable location away from heat sources and direct sunlight.
- በአካባቢው በቂ የአየር ዝውውርን ያረጋግጡ ampማብሰያ
- ደህንነቱ በተጠበቀ ሁኔታ ይጫኑት። amplifier using the provided hardware to prevent movement during vehicle operation.
5.2 የወልና ግንኙነቶች
ማንኛውንም ግንኙነት ከማድረግዎ በፊት የተሽከርካሪውን ኔጌቲቭ የባትሪ ተርሚናል ያላቅቁ።
- የኃይል ገመድ; Connect the 8-gauge power cable (from RWK82 kit) directly to the positive terminal of the vehicle's battery. Install the fuse holder within 18 inches (45 cm) of the battery.
- ፊውዝ መጫን; አስገባ ሀ 20A ፊውዝ into the fuse holder. The 60A fuse included in the RWK82 kit is too large for the KEY2004 and must be replaced.
- የመሬት ሽቦ; Connect the 8-gauge ground wire (from RWK82 kit) from the amplifier to a clean, solid metal point on the vehicle chassis. The ground point should be free of paint and corrosion.
- የርቀት ማብሪያ / ማጥፊያ ሽቦ፡ Connect the 18-gauge blue remote wire (from RWK82 kit) from the amplifier to the remote turn-on output of your head unit. If your head unit lacks a remote output, the KEY2004 can use DC offset sensing or audio signal sensing for turn-on.
- የግቤት ምልክት
- RCA (Low-Level) Input: Use the twisted pair RCA cables (from RWK82 kit) to connect the amplifier's RCA inputs to the RCA outputs of your head unit.
- Speaker Level (High-Level) Input: If your head unit does not have RCA outputs, connect the speaker wires from your head unit directly to the amplifier's high-level input harness.
- የድምፅ ማጉያ ሽቦዎች; Connect the 16-gauge clear speaker wires (from RWK82 kit) from the amplifier's speaker outputs to your vehicle's speakers. Ensure correct polarity (+ to + and – to –).

ምስል: ከፍተኛ view of the Kicker KEY2004 amplifier, showing its compact design and heat sink fins.
6. Setup: Auto-EQ and Initial Configuration
The KEY2004's primary feature is its Auto-EQ capability, which automatically tunes your system. Follow these steps for initial setup:
- ማይክሮፎን ያገናኙ፡ Plug the Auto-EQ microphone into the dedicated port on the ampማብሰያ
- የማይክሮፎን አቀማመጥ፡- Place the microphone at the primary listening position (e.g., driver's headrest).
- Set Head Unit Volume: Turn your head unit volume to approximately 75% of its maximum.
- Start Auto-EQ: Press and hold the Auto-EQ button on the amplifier (or the remote switch if applicable) until the LED indicator changes. The amplifier will play a series of test tones.
- እስኪጠናቀቅ ድረስ ይጠብቁ፡- Allow the process to complete. This may take several minutes. The amplifier will indicate completion (refer to the specific LED patterns in the full manual).
- ትርፍ አስተካክል; After Auto-EQ, adjust the amplifier's gain controls to match the output of your head unit. Start with the gain at minimum and slowly increase until you hear distortion, then back off slightly.
- ተሻጋሪ ቅንብሮች፡- Select the desired high-pass filter frequency (60Hz, 80Hz, or 120Hz) using the switches on the amplifier, depending on your speaker size and type.
- አማራጭ ባህሪያት፡ Enable or disable Bi-Amp Capability, Auto Compressor, Kicker EQ Preset, Auto Time Alignment, and Auto Speaker Size Detection as desired. These are defeasible.
The Auto-EQ process should be performed in a quiet environment with the vehicle's engine off.
7. በመስራት ላይ Ampማብሰያ
Once installed and set up, the KICKER KEY2004 operates automatically with your vehicle's audio system. The AI-driven DSP continuously works to maintain optimal sound quality based on the initial Auto-EQ calibration.
- ማብራት/ማጥፋት፡ የ amplifier will turn on and off with your head unit (via remote wire or signal sensing).
- የድምጽ መቆጣጠሪያ፡- Use your head unit's volume control for overall system volume.
- የድምፅ ማስተካከያዎች; While the KEY2004 provides automatic optimization, minor adjustments can still be made via your head unit's tone controls if desired. However, significant changes may negate some benefits of the Auto-EQ.
8. ጥገና
The KICKER KEY2004 amplifier የረጅም ጊዜ አፈጻጸም ለማረጋገጥ አነስተኛ ጥገና ያስፈልገዋል.
- ማጽዳት፡ በየጊዜው መጥረግ ampየሊፋየር ውጫዊ ክፍል ለስላሳ እና ደረቅ ጨርቅ. ኃይለኛ ኬሚካሎችን ወይም ሻካራ ማጽጃዎችን አይጠቀሙ.
- ግንኙነቶች፡ አልፎ አልፎ ሁሉንም የሽቦ ግንኙነቶች ደህንነታቸው የተጠበቀ እና ከዝገት የፀዱ መሆናቸውን ያረጋግጡ።
- የአየር ማናፈሻ; መሆኑን ያረጋግጡ ampየሊፋየር ማቀዝቀዣ ክንፎች ከመጠን በላይ ሙቀትን ለመከላከል አይስተጓጎሉም።
- ፊውዝ ቼክ፡ ከሆነ amplifier stops working, check the fuse in the power line. Replace it only with a fuse of the correct rating (20A).
9. መላ መፈለግ
If you experience issues with your KICKER KEY2004 ampሊፋይ፣ የሚከተሉትን የተለመዱ ችግሮችን እና መፍትሄዎችን ተመልከት።
| ችግር | ሊሆን የሚችል ምክንያት | መፍትሄ |
|---|---|---|
| ኃይል የለም | Blown fuse; loose power/ground wire; no remote turn-on signal. | Check and replace fuse (20A); verify all power and ground connections; check remote wire connection or ensure DC offset/audio sensing is active. |
| ድምጽ የለም | No input signal; loose speaker wires; ampበመከላከያ ሁነታ ላይ ሊፋይ. | Verify RCA/high-level input connections; check speaker wire connections; check amplifier status LED for protect mode indication. |
| የተዛባ ድምጽ | Gain set too high; poor input signal; incorrect Auto-EQ. | ቀንስ amplifier gain; ensure head unit output is clean; re-run Auto-EQ process. |
| Amplifier ከመጠን በላይ ሙቀት | Insufficient ventilation; impedance mismatch. | ያረጋግጡ amplifier is in a well-ventilated area; verify speaker impedance matches ampየሊፊየር ዝርዝሮች. |
10. ዝርዝሮች
| ባህሪ | ዝርዝር መግለጫ |
|---|---|
| የኃይል ማመንጫ (አርኤምኤስ) | 50 watts x 4 channels @ 4 Ohm stereo |
| የድግግሞሽ ምላሽ | 20Hz - 20kHz, + 0 / -1dB |
| የግቤት ትብነት (ከፍተኛ ደረጃ) | 250mV - 10V |
| የምልክት-ወደ-ጫጫታ ሬሾ | > 90ዲቢ፣ አንድ-ሚዛን፣ ድጋሚ፡ ደረጃ የተሰጠው ኃይል |
| ገባሪ መሻገሪያ | 24dB/octave, selectable high pass or all pass @ 60, 80, or 120Hz |
| ልኬቶች (H x W x L) | 1-11/16" x 2-3/4" x 7-3/8" (4.3 x 7 x 18.7 cm) |
| ከፍተኛ አቅርቦት ቁtage | 10 Volts (Operating range typically 10-16V) |
| የመጫኛ አይነት | ራሱን ችሎ የቆመ |
| የሰርጦች ብዛት | 4 |
11. ዋስትና እና ድጋፍ
KICKER products are designed for reliable performance. For specific warranty information, please refer to the warranty card included with your product or visit the official KICKER website. For technical support, contact KICKER customer service.
For the most comprehensive and up-to-date information, including detailed wiring diagrams and advanced setup options, please refer to the official KICKER KEY2004 product manual:
Download Official KICKER KEY2004 Manual (PDF)

Image: Product packaging for the Kicker KEY2004, highlighting key features and a QR code linking to the official product manual.
Ask a question about this manual
Ask about setup, troubleshooting, compatibility, parts, safety, or missing instructions. Manuals+ will review the question and use this page’s manual context to help answer it.