1. ምርት አብቅቷልview
The ARPHA D01 Smart Lock offers advanced security and convenient access to your home. It integrates multiple unlocking methods and smart features for enhanced control and peace of mind.
ቁልፍ ባህሪዎች
- በርካታ የመክፈቻ ዘዴዎች፡- Fingerprint, Pin Password, App Control (Bluetooth), and Mechanical Key.
- ፈጣን የጣት አሻራ መለያ፡ Identifies fingerprints in 0.3 seconds with 360° recognition, storing up to 50 fingerprints.
- ራስ-ቁልፍ Automatically locks the door based on door position when closed, preventing accidental lockouts.
- Operation Record: View unlocking history via the mobile application.
- Advanced Secure Password: Features anti-peep password entry and stores up to 50 pin codes.
- የአስቸኳይ ጊዜ ኃይል USB port for temporary power in case of battery depletion.
- ዝቅተኛ የባትሪ ማንቂያ፡ Provides alerts when batteries are low.
- Anti-Pry Alarm: Activates an alarm if incorrect passwords are entered multiple times.
- የአየር ሁኔታ መቋቋም; Designed to withstand temperatures from -13°F to 131°F with IP65 rating.

Figure 1: Multiple ways to unlock the ARPHA D01 Smart Lock.

Figure 2: The ARPHA D01 Smart Lock, designed to be smart, secure, and reliable.
2. ምን ይካተታል
መጫኑን ከመጀመርዎ በፊት ሁሉም አካላት መኖራቸውን ያረጋግጡ-
- ARPHA D01 Smart Lock (Front and Rear Assemblies)
- Deadbolt Latch
- የመጫኛ ሳህን
- ጠፍጣፋ እና ሣጥን ይምቱ
- መካኒካል ቁልፎች (2)
- የመጫኛ ዊንጮች እና ሃርድዌር
- የተጠቃሚ መመሪያ
- የመጫኛ አብነት
3. የመጫኛ መመሪያ
Follow these steps carefully to install your ARPHA D01 Smart Lock. For a visual guide, please refer to the installation video below.
Video 1: ARPHA D01 Smart Lock Installation Guide. This video provides a step-by-step visual walkthrough of the installation process.
ደረጃ 1: በሩን ያዘጋጁ
- ያለውን የሞት ቦልት ያስወግዱ።
- Use the provided template to mark and drill any necessary holes.
ደረጃ 2: የሙትቦልት ጫን
- Adjust the deadbolt length if necessary (60mm or 70mm backset).
- Insert the deadbolt into the door hole with the word "TOP" facing up.
- Secure the deadbolt with the provided screws.
Step 3: Install the Lock Assemblies
- Install the connection columns onto the rear assembly.
- Adjust the paddle on the rear assembly to the horizontal direction.
- Guide the connection wire from the front assembly through the deadbolt opening.
- Align the front assembly with the door and the deadbolt.
- Install the iron plate (mounting plate) by aligning it with the connection columns and fixing the screws.
Step 4: Connect Wires and Install Batteries
- Connect the wire from the front assembly to the rear assembly.
- Insert 4 AA batteries into the battery compartment of the rear assembly.
Step 5: Lock Calibration
- Long press the RESET button until you hear a "Di" voice.
- Switch the knob from vertical to horizontal direction.
- A "successful" voice prompt indicates calibration is complete.
Step 6: Set Administrator Password
- ዳግም አስጀምር የሚለውን ቁልፍ ተጫን።
- Set your desired administrator password, followed by the '#' key.
- Re-enter the password to confirm.
4. የአሠራር መመሪያዎች
የመክፈቻ ዘዴዎች፡-
4.1 የጣት አሻራ መክፈት
- የተመዘገበ ጣትዎን በጣት አሻራ ዳሳሽ ላይ ያድርጉት።
- የጣት አሻራው ከታወቀ መቆለፊያው ይከፈታል።

Figure 3: Quick fingerprint identification for unlocking.
4.2 የይለፍ ኮድ ክፈት
- Enter your registered 6-8 digit passcode on the touchscreen keypad.
- Press '#' to confirm. The lock will unlock.
- The anti-peep function allows you to enter random digits before or after your actual passcode to prevent others from guessing it.
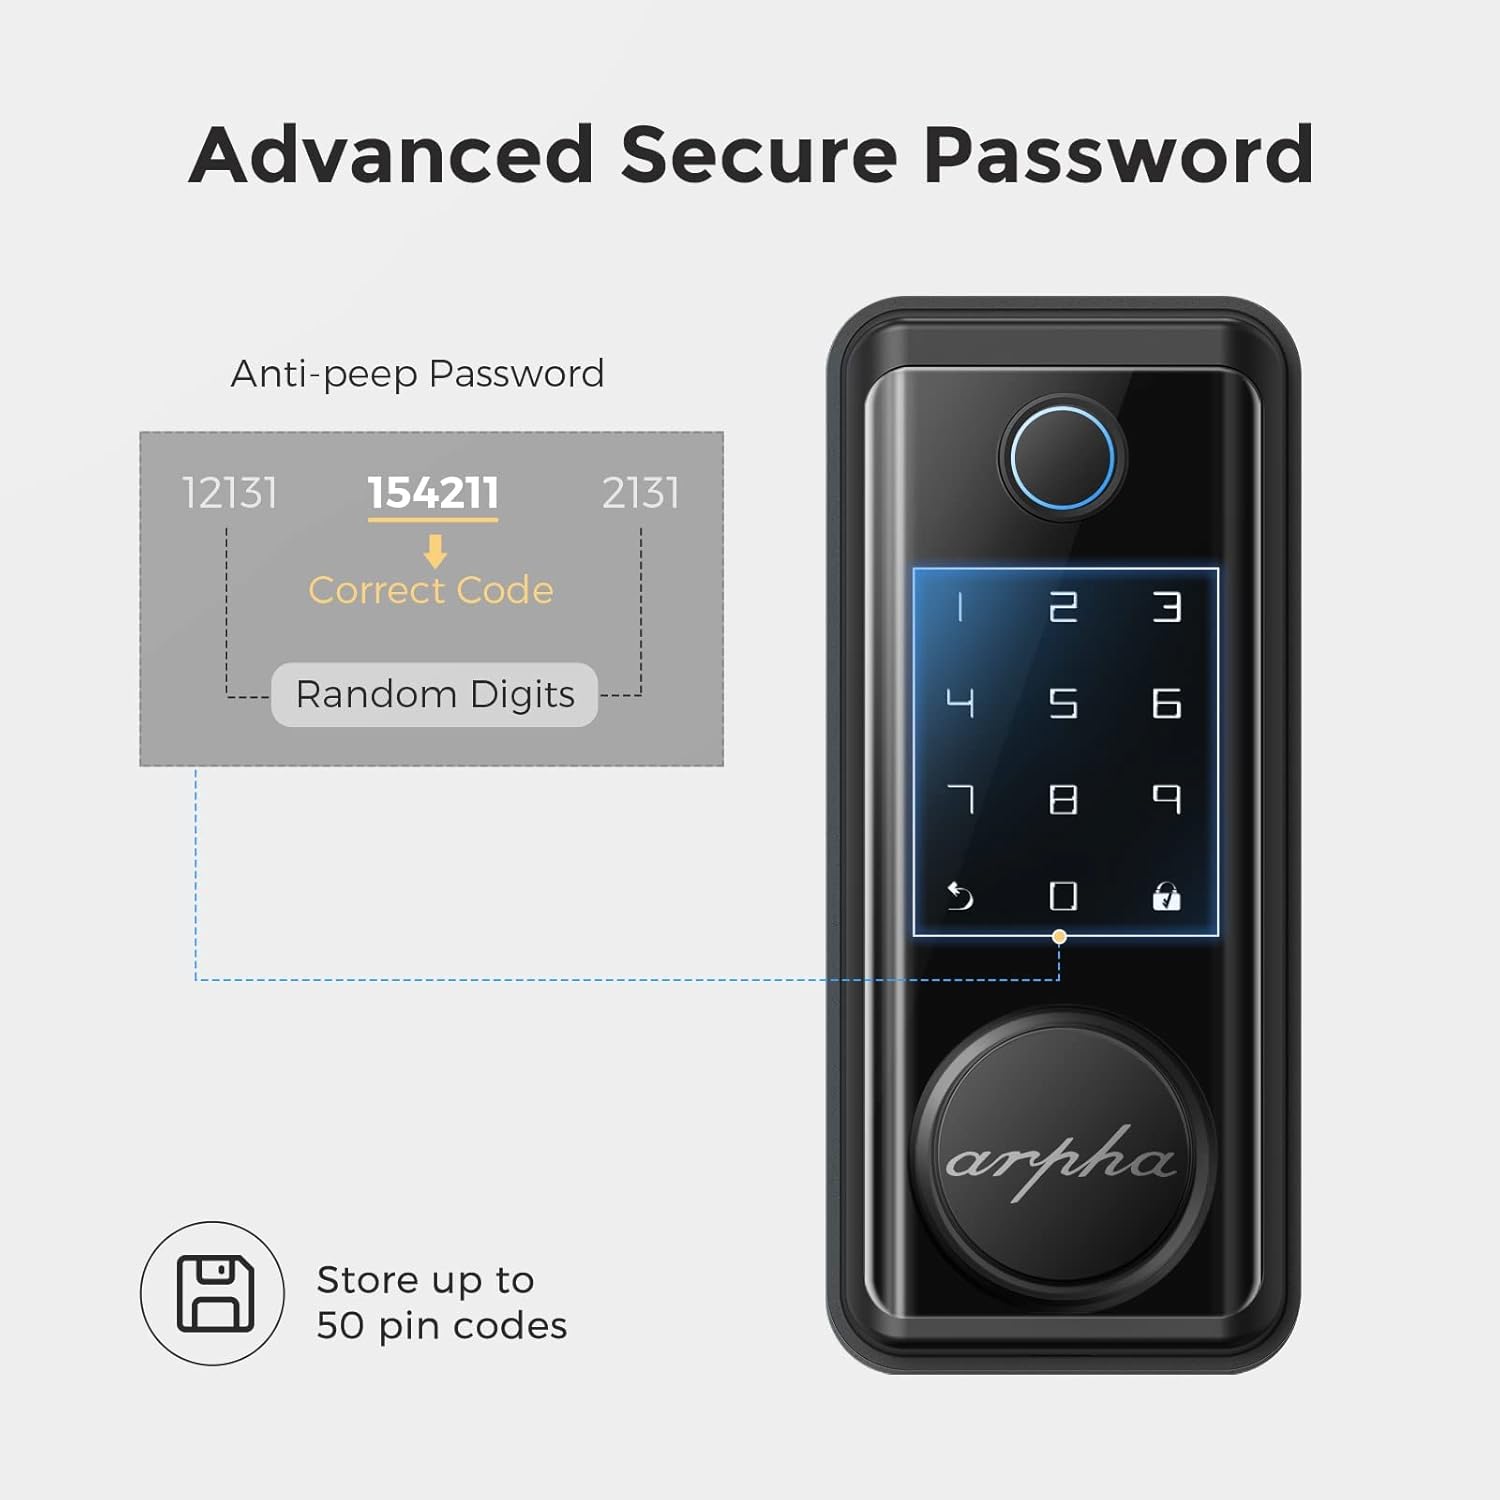
Figure 4: Advanced secure password entry with anti-peep function.
4.3 ሜካኒካል ቁልፍ ክፈት
- Remove the magnetic cover at the bottom of the front assembly to reveal the keyhole.
- Insert the mechanical key and turn to unlock the door.
4.4 App Unlock (Bluetooth)
- Ensure Bluetooth is enabled on your smartphone and you are within range of the lock.
- Open the Tuya Smart app and select your ARPHA D01 Smart Lock.
- Tap and hold the unlock icon in the app to unlock the door.
4.5 የራስ-መቆለፊያ ተግባር
- The lock is equipped with a sensor that detects when the door is closed.
- It will automatically engage the deadbolt after a set period (configurable in the app) once the door is closed.

Figure 5: The auto-lock feature based on door position.
4.6 የአደጋ ጊዜ ኃይል
- In case the batteries are completely drained, connect a power bank to the micro-USB port located at the bottom of the front assembly.
- This will temporarily power the lock, allowing you to use the keypad or fingerprint sensor to gain entry.

Figure 6: USB port for emergency power supply.
5. የመተግበሪያ ባህሪያት
The Tuya Smart app provides comprehensive control and monitoring capabilities for your ARPHA D01 Smart Lock:
- የባትሪ ደረጃ ክትትል; View የአሁኑ የባትሪ መቶኛtage of your lock.
- መዝገቦችን መክፈት፡- Access a detailed log of all unlocking events, including method and time.
- የአባል አስተዳደር፡ Add or remove family members and assign specific access methods (fingerprint, passcode).
- ጊዜያዊ የይለፍ ቃሎች፡- Generate one-time or periodic passwords for guests or service providers.
- ብልህ ትስስር፡ Integrate your smart lock with other smart home devices for automated scenarios.
- ቅንብሮች፡- Customize various lock parameters, including language, navigation volume, and auto-lock duration.

ምስል 7፡ View unlocking records and manage access via the app.

Figure 8: Easily share temporary passwords with guests.
6. ጥገና
- የባትሪ መተካት፡ Replace all 4 AA batteries when the low battery alert is triggered. Use high-quality alkaline batteries for optimal performance.
- ማጽዳት፡ የንክኪ ማያ ገጹን እና የጣት አሻራ ዳሳሹን ለስላሳ እና ደረቅ ጨርቅ ይጥረጉ። የማጽጃ ማጽጃዎችን ወይም ማሟሟቶችን ያስወግዱ።
- የፍጥነት መቆጣጠሪያ Periodically check all mounting screws to ensure they are tight.

Figure 9: Low battery alert on the smart lock.
7. መላ መፈለግ
- ምላሽ የማይሰጥ ቁልፍ፡ Check battery levels. Use emergency USB power if batteries are dead.
- የጣት አሻራ አልታወቀም፡- ጣትዎ ንጹህ እና ደረቅ መሆኑን ያረጋግጡ። ችግሮች ከቀጠሉ የጣት አሻራዎን እንደገና ያስመዝግቡ።
- የይለፍ ኮድ አይሰራም፡- Verify the correct passcode is entered. Ensure the anti-peep function is not causing issues.
- የመተግበሪያ ግንኙነት ችግሮች፡- Ensure Bluetooth is enabled and you are within range. Restart the app and try again.
- ራስ-መቆለፊያ አሳታፊ አይደለም፡- Check door sensor alignment. Verify auto-lock settings in the app.
8. ዝርዝሮች
| ባህሪ | ዝርዝር |
|---|---|
| የምርት ስም | ARPHA |
| የሞዴል ቁጥር | ዲ01 |
| የመቆለፊያ ዓይነት | ባዮሜትሪክ፣ የቁልፍ ሰሌዳ |
| ቁሳቁስ | ዚንክ |
| ቅጥ | ዘመናዊ |
| ልዩ ባህሪያት | Fingerprint, Touchscreen, Smart Lock, Wifi (via gateway, not direct) |
| የግንኙነት ፕሮቶኮል | ብሉቱዝ |
| የመቆጣጠሪያ ዘዴ | መተግበሪያ፣ ንካ |
| የእቃው ክብደት | 3.65 ፓውንድ |
| የጥቅል ልኬቶች | 9.02 x 7.13 x 3.7 ኢንች |
| የአሠራር ሙቀት | -13°F እስከ 131°F |
| የውሃ መከላከያ ደረጃ | IP65 |

Figure 10: ARPHA D01 Smart Lock dimensions.

Figure 11: Weather resistance features of the smart lock.
9. ዋስትና እና ድጋፍ
ARPHA products come with a standard manufacturer's warranty. For detailed warranty information, technical support, or service inquiries, please refer to the contact information provided in your product packaging or visit the official ARPHA webጣቢያ.