1. የደህንነት መረጃ
Before operating your PEXMOR Adult Tricycle, please read and understand all safety instructions. Failure to do so may result in injury or damage to the product.
- በሚያሽከረክሩበት ጊዜ ሁል ጊዜ የራስ ቁር ያድርጉ።
- Ensure all bolts, nuts, and quick-release levers are securely tightened before each ride.
- የጎማውን ግፊት በየጊዜው ይፈትሹ.
- Verify brake functionality before each use.
- Ride in well-lit areas and use reflectors or lights during low visibility conditions.
- የአካባቢ ትራፊክ ህጎችን እና ደንቦችን ያክብሩ።
- ከ 331 ፓውንድ ከፍተኛውን የክብደት ምክር አይበልጡ።
2. የጥቅል ይዘቶች
Your PEXMOR Adult Tricycle package includes the following components:
- Tricycle Frame (main body, rear axle assembly, front fork)
- Wheels (front wheel, 2 rear wheels)
- የእጅ አሞሌ
- የመቀመጫ እና የመቀመጫ ፖስታ
- ፔዳል
- የፊት እና የኋላ መጋረጃዎች
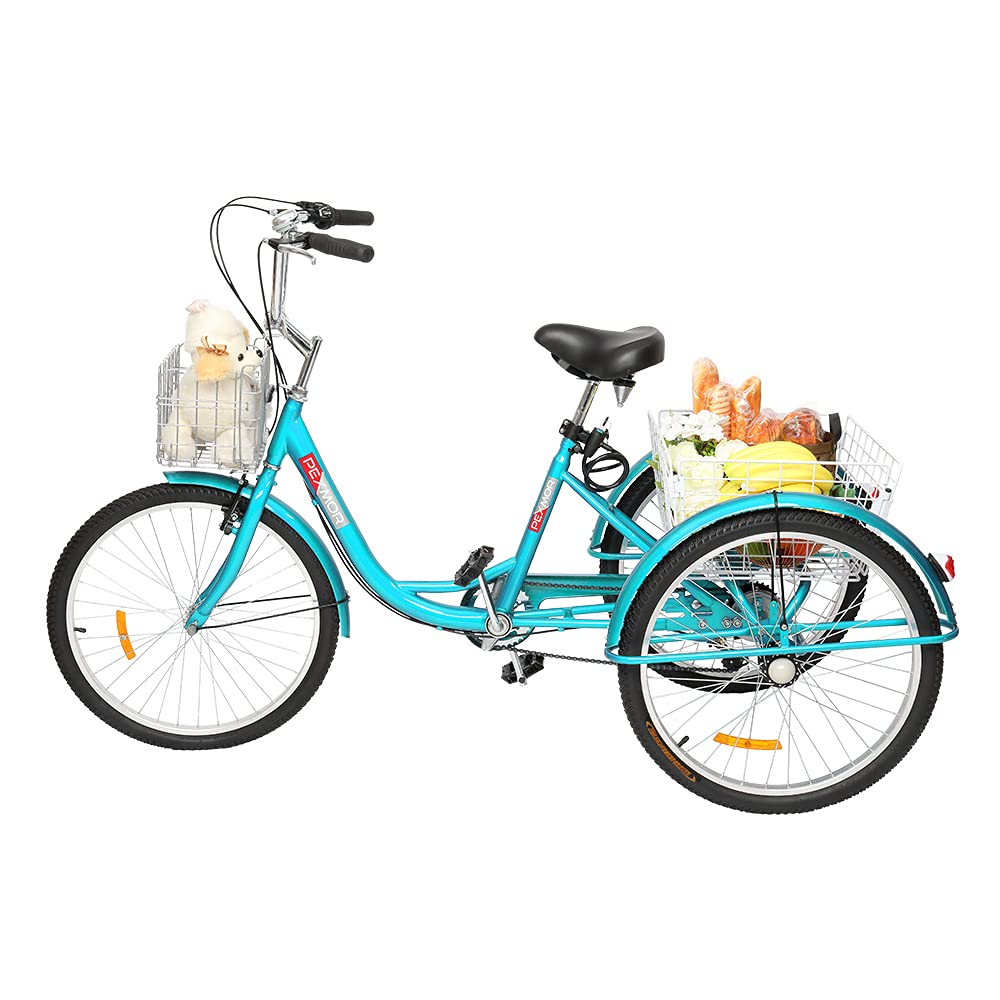
- Front and Rear Baskets
- Chain and Chain Cover
- Reflectors (front, rear, wheel)
- ደወል
- ጠርሙስ መያዣ
- የመሰብሰቢያ መሳሪያዎች (መፍቻዎች፣ የሄክስ ቁልፎች)
- ቆልፍ
3. የመሰብሰቢያ መመሪያዎች
For a visual guide, please refer to the comprehensive assembly video below. Detailed steps are also provided.
Detailed assembly instructions for the PEXMOR Adult Tricycle.
3.1 Rear Axle Assembly
Connect the rear axle to the main frame. Ensure all bolts are securely tightened. (Refer to video timestamp 0:10 - 0:52)
3.2 Rear Wheels Installation
Attach the left and right rear wheels to the axle. Differentiate between left and right wheels by the screw hole and axle shape. Secure with nuts. (Refer to video timestamp 0:52 - 1:52)
The tricycle with both rear wheels installed.
3.3 የፊት ጎማ መትከል
Install the front wheel into the front fork. Ensure it is centered and secured. (Refer to video timestamp 1:52 - 3:05)
3.4 Fenders and Rear Lights Installation
Attach the front and rear fenders. Install the rear lights onto the rear fenders. Ensure the screws are at the highest position to avoid rubbing against the tire. (Refer to video timestamp 3:05 - 4:50)

Rear fender with integrated rear light.
3.5 የእጅ አሞሌ መጫኛ
Insert the handlebar stem into the front fork tube and tighten the bolt. (Refer to video timestamp 4:50 - 5:55)
3.6 Seat Installation
Attach the seat to the seat post and insert it into the frame. Adjust to a comfortable height. (Refer to video timestamp 5:55 - 6:55)
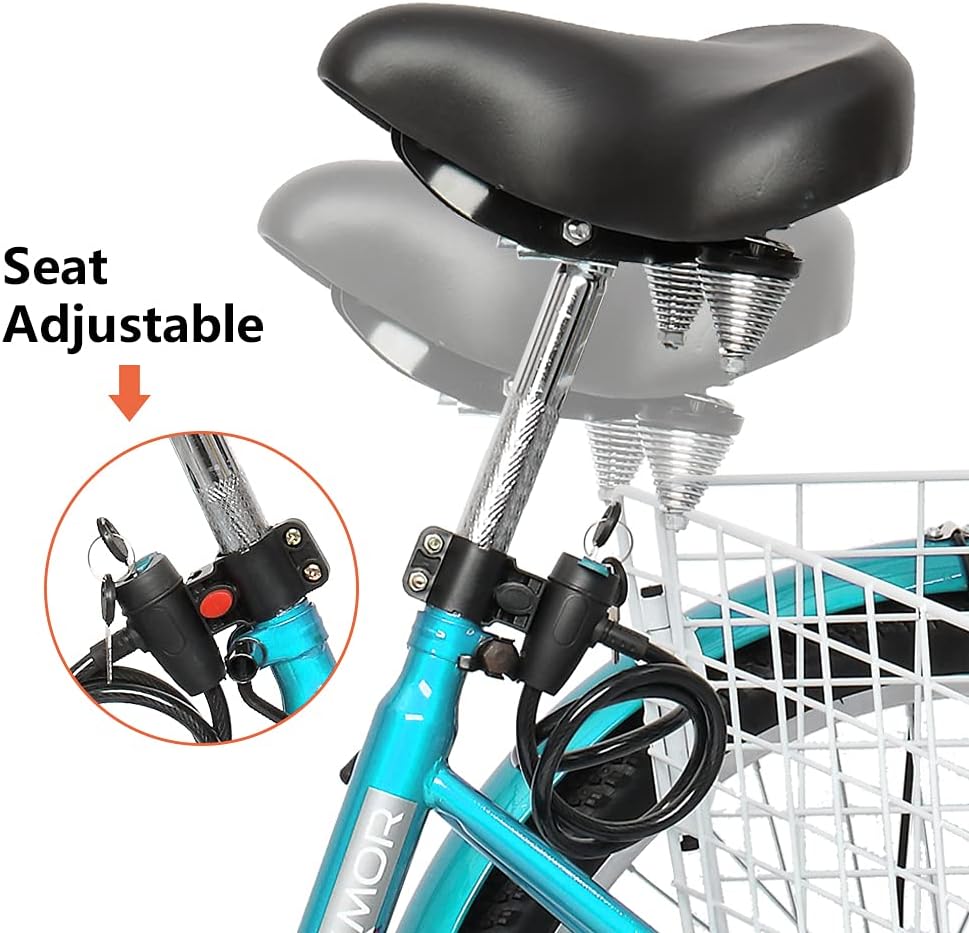
The seat height can be adjusted for rider comfort.
3.7 ሰንሰለት መትከል
Install the chain, ensuring it passes through the smallest free wheel in an 'S' line. Use the chain tool if necessary. (Refer to video timestamp 6:55 - 7:45)

The 7-speed derailleur system for smooth gear changes.
3.8 Pedals Installation
Differentiate between the left (L) and right (R) pedals. Tighten the right pedal clockwise and the left pedal counter-clockwise. (Refer to video timestamp 7:45 - 8:40)

Durable pedals with integrated reflectors for visibility.
3.9 የብሬክ ማስተካከያ
Adjust the rear brake cable and front brake cable for optimal stopping power. Ensure the brake levers are easily accessible and responsive. (Refer to video timestamp 8:40 - 10:20)
3.10 Front Basket Installation
Assemble the front basket and attach it to the handlebar. (Refer to video timestamp 10:20 - 11:40)

The foldable front basket provides convenient storage.
3.11 Rear Basket Installation
Assemble the rear basket and securely attach it to the rear frame of the tricycle. (Refer to video timestamp 11:40 - 12:55)

Spacious rear basket for carrying groceries or personal items.
3.12 Reflectors and Bell Installation
Install the front, rear, and wheel reflectors for enhanced visibility. Attach the bell to the handlebar. (Refer to video timestamp 12:55 - 13:35)
3.13 Bottle Holder Installation
Mount the bottle holder to the designated screw points on the frame. (Refer to video timestamp 13:35 - 14:00)
4. የአሠራር መመሪያዎች
4.1 7-Speed Gear System
Your tricycle is equipped with a flexible rear derailleur offering 7 variable speeds. Use the trigger shifter on the handlebar to change gears smoothly. This allows you to adapt to different terrains and control your speed effectively.
4.2 Safe Brake System
The tricycle features both front V-brakes and rear brakes. This all-wheel brake system provides effective control over speed and ensures safety, especially when descending hills or in emergency situations.
4.3 ሊስተካከል የሚችል ቁመት
The seat and handlebar heights are adjustable. Customize these to your preference for a comfortable riding posture. Ensure the quick-release mechanisms are securely fastened after adjustment.
4.4 Basket Usage
The tricycle includes both a foldable front basket and a large rear basket. These are designed for carrying groceries, supplies, or personal items. Distribute weight evenly to maintain stability.
5. ጥገና
መደበኛ ጥገና የሶስትዮሽ ብስክሌትዎን ረጅም ጊዜ እና ደህንነቱ የተጠበቀ አሠራር ያረጋግጣል።
- ጎማዎች፡- Check tire pressure weekly. Maintain pressure within the range indicated on the tire sidewall.
- ሰንሰለት፡ Lubricate the chain every few weeks or after riding in wet conditions. Keep it clean and free of debris.
- ብሬክስ፡ Inspect brake pads for wear and replace if necessary. Ensure brake cables are not frayed and are properly tensioned.
- Bolts and Nuts: Periodically check all fasteners for tightness. Loose components can affect safety and performance.
- ማጽዳት፡ Clean the tricycle regularly with mild soap and water. Avoid high-pressure washers on bearings and electrical components.
6. መላ መፈለግ
ሊያጋጥሙህ ለሚችሉ የተለመዱ ጉዳዮች መፍትሄዎች እነኚሁና፡
- ችግር፡ ብሬክስ ስፖንጅ ወይም ውጤታማ እንዳልሆነ ይሰማቸዋል.
መፍትሄ፡- Check brake cable tension. Adjust the barrel adjusters on the brake levers or at the calipers/V-brakes. Ensure brake pads are correctly aligned and not worn out. - ችግር፡ Gears are not shifting smoothly or skipping.
መፍትሄ፡- Check the shifter cable tension. Adjust the derailleur limit screws (H and L) if necessary. Ensure the chain is clean and lubricated. - ችግር፡ Tires frequently lose air.
መፍትሄ፡- Check for punctures in the inner tube. Ensure the tire valve is tight. If punctures are found, repair or replace the inner tube. - ችግር፡ Squeaking or grinding noises during riding.
መፍትሄ፡- Inspect moving parts for lubrication needs (e.g., chain, pedals). Check for loose components or rubbing parts (e.g., fenders against tires).
7. ዝርዝሮች
| የብስክሌት አይነት | ባለሶስት ሳይክል |
| የዕድሜ ክልል (መግለጫ) | አዋቂ |
| የምርት ስም | PEXMOR |
| የፍጥነት ብዛት | 7 |
| ቀለም | አረንጓዴ |
| የጎማ መጠን | 26 ኢንች |
| የክፈፍ ቁሳቁስ | ቅይጥ ብረት |
| የእገዳ ዓይነት | ከፊት ፣ ከኋላ |
| ልዩ ባህሪ | Basket, Foldable |
| የተካተቱ አካላት | Basket, Lock |
| ከፍተኛው የክብደት ምክር | 331 ፓውንድ £ |
| ስብሰባ ያስፈልጋል | አዎ |
8. ዋስትና እና ድጋፍ
This product comes with a limited warranty. For specific warranty details, claims, or technical support, please refer to the documentation included in your product packaging or contact PEXMOR customer service directly. Keep your purchase receipt for warranty validation.