
መግቢያ
The Phanteks Eclipse G360A is a high-performance mid-tower gaming chassis designed for optimal airflow and component compatibility. It features an ultra-fine performance mesh front panel for superior cooling and dust filtration, integrated Digital-RGB lighting, and extensive support for modern gaming hardware including large GPUs and advanced liquid cooling solutions. This manual provides detailed instructions for setting up, operating, and maintaining your Eclipse G360A chassis.
ማዋቀር እና መጫን
1. የቦክስ ማስወጣት እና ይዘቶች
Carefully remove the chassis from its packaging. Verify that all components and accessories are present. The package should include the Eclipse G360A chassis, pre-installed 120mm D-RGB fans, and an accessory box containing screws, zip ties, and the user manual.
2. የክፍሎች ተኳሃኝነት
- Motherboard ድጋፍ፡ ATX, micro-ATX, mini-ITX, E-ATX (up to 280mm wide).
- የጂፒዩ ርዝመት፡ Up to 400 mm (15.7 in).
- የሲፒዩ ማቀዝቀዣ ቁመት: Up to 162 mm (6.3 in).
- የPSU ርዝመት፡ Up to 220 mm (280 mm depending on HDD cage location).
- ማከማቻ፡ 2x 3.5" internal (included), 3x 2.5" internal (2 included).

ምስል 1 - ውስጣዊ view highlighting 400mm GPU clearance, supporting high-end graphics cards.

Figure 2: Multiple storage options for 2.5" and 3.5" drives, with flexible mounting points.
3. የመጫኛ ደረጃዎች
- ቻሲስን ያዘጋጁ: Remove the tempered glass side panel by unscrewing the thumb screws. The front panel can be detached for easier fan/radiator installation.
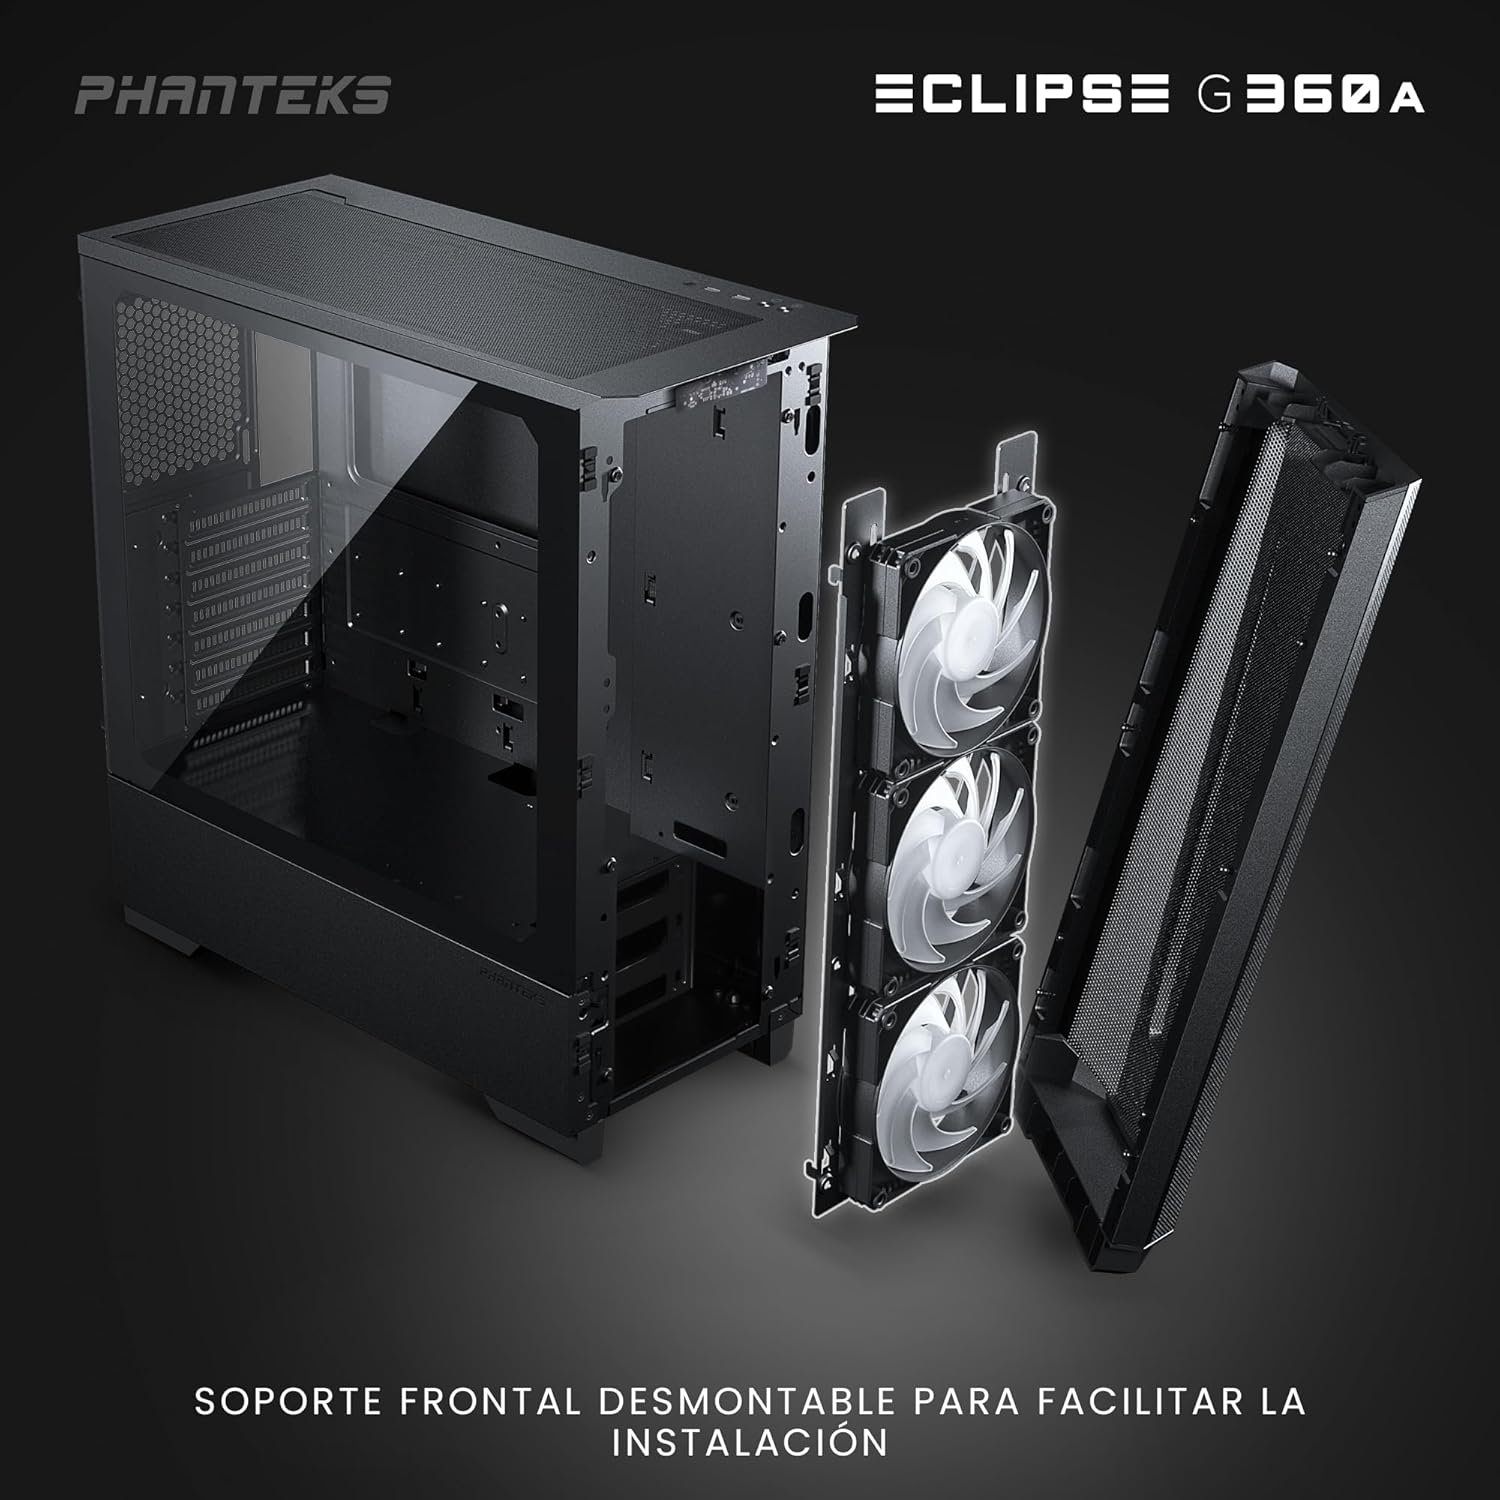
Figure 3: Detachable front panel and fan bracket for simplified installation.
- Motherboard ጫን፡- Secure your motherboard to the standoffs using the provided screws.
- የማጠራቀሚያ ተሽከርካሪዎችን ጫን Mount 2.5" SSDs to the dedicated locations behind the motherboard tray or on the PSU shroud. Install 3.5" HDDs into the drive cages located under the PSU shroud.
- የኃይል አቅርቦት ዩኒት (PSU) ይጫኑ፡ Slide the PSU into its designated compartment at the bottom rear of the chassis and secure it with screws.
- ግራፊክስ ካርድ (ጂፒዩ) ጫን፦ Insert your graphics card into the PCIe slot on the motherboard. The chassis supports vertical GPU mounting with an optional bracket (PH-VGPUKT4.0_03).
- Install Cooling Components: The G360A supports various fan and radiator configurations.
- የደጋፊ ድጋፍ፡ Front: 3x 120mm (3 pre-installed) or 2x 140mm; Top: 3x 120mm or 2x 140mm; Rear: 1x 120mm.
- የራዲያተር ድጋፍ; Front: Up to 360mm or 280mm; Top: Up to 360mm; Rear: 120mm. Note: Front and top 360mm radiators cannot be installed simultaneously.

Figure 4: Detailed fan and radiator placement options for optimal cooling.
- የኬብል አስተዳደር Utilize the 36mm (1.4 in) cable management space behind the motherboard tray to route and secure cables for a clean build and improved airflow.
የአሠራር መመሪያዎች
1. የፊት ግቤት/ውስጥ ፓነል ተግባራት
The front I/O panel provides convenient access to essential controls and ports:
- የኃይል ቁልፍ፡- ስርዓቱን ያበራል ወይም ያጠፋል.
- 2 x የዩኤስቢ 3.0 ወደቦች፡ የዩኤስቢ መሳሪያዎችን ለማገናኘት.
- ማይክሮፎን/የጆሮ ማዳመጫ ጥምር ጃክ፡ ለድምጽ ግብአት እና ውፅዓት።
- D-RGB Mode Button: Cycles through pre-programmed lighting effects.
- D-RGB Color Button: Changes the color of the D-RGB lighting.

Figure 5: Front I/O panel with easy-access controls for power, USB, audio, and D-RGB lighting.
2. Digital-RGB Lighting Control
The Eclipse G360A features integrated D-RGB lighting with pre-installed 120mm D-RGB fans and an LED strip along the tempered glass panel. The lighting can be controlled in two ways:
- በእጅ ቁጥጥር Use the D-RGB Mode and Color buttons on the front I/O panel to cycle through various effects and colors without software.
- የእናትቦርድ ማመሳሰል፡ The D-RGB controller can be connected to a compatible motherboard's D-RGB header (e.g., ASUS Aura Sync, MSI Mystic Light Sync, GIGABYTE RGB Fusion, ASRock Polychrome Sync, Razer Chroma). This allows for software control and synchronization with other D-RGB components in your system. Refer to your motherboard manual for D-RGB header location and software instructions.
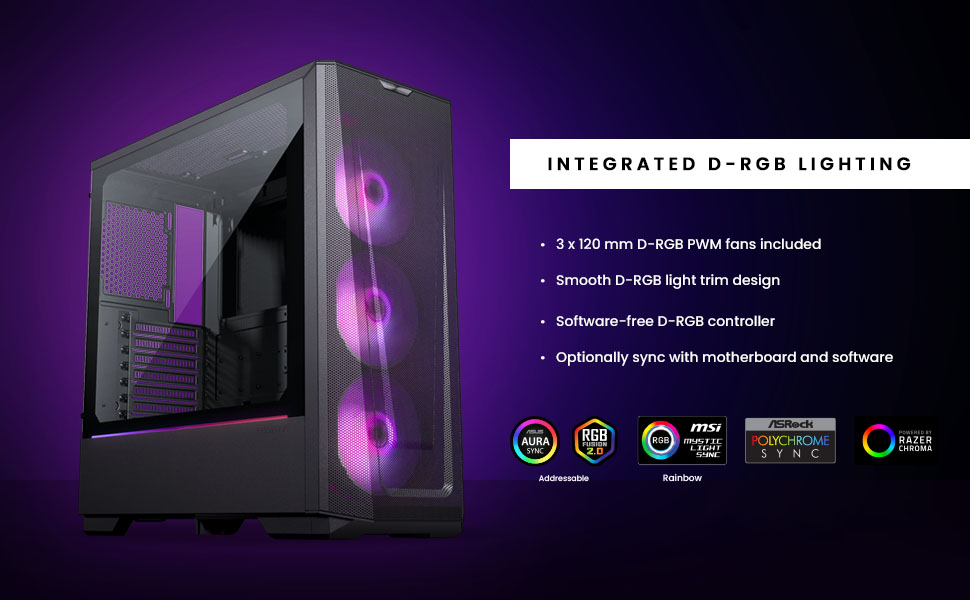
Figure 6: Integrated D-RGB lighting and compatibility with major motherboard synchronization software.
ጥገና
1. Cleaning the Ultra-fine Performance Mesh
The front panel's ultra-fine mesh acts as a dust filter. To maintain optimal airflow and prevent dust buildup, regularly clean the mesh:
- Gently detach the front panel.
- Use a soft brush or compressed air to remove accumulated dust from the mesh.
- Wipe the mesh with a slightly damp cloth if necessary, ensuring it is completely dry before reattaching.

Figure 7: The ultra-fine performance mesh design, crucial for airflow and dust filtration.
2. General Chassis Cleaning
For general cleaning of the chassis exterior and interior:
- ስርዓቱ መብራቱን እና መሰካቱን ያረጋግጡ።
- Use a microfiber cloth to wipe down exterior surfaces.
- For interior dust, use compressed air to blow dust out of components and the chassis.
- Clean the tempered glass panel with a glass cleaner and a soft cloth.
መላ መፈለግ
የተለመዱ ጉዳዮች እና መፍትሄዎች
| ጉዳይ | ሊሆን የሚችል ምክንያት | መፍትሄ |
|---|---|---|
| ስርዓቱ አይበራም። | የተበላሹ የኃይል ግንኙነቶች፣ የተበላሸ የ PSU፣ የተሳሳተ የፊት ፓነል ራስጌ ግንኙነት። | Check all power cables (24-pin, 8-pin CPU, GPU). Verify front panel power switch connection to motherboard. Test PSU if possible. |
| D-RGB lighting not working or incorrect. | Loose D-RGB cable connection, incorrect D-RGB header, software conflict. | Ensure D-RGB cables are securely connected. If using motherboard sync, verify connection to a 3-pin 5V D-RGB header (not 4-pin 12V RGB). Try manual control via case buttons. Reinstall or update motherboard RGB software. |
| ደካማ የአየር ፍሰት ወይም ከፍተኛ ሙቀት. | Dust buildup, incorrect fan orientation, obstructed airflow. | Clean front mesh and other dust filters. Ensure fans are oriented correctly (intake/exhaust). Check for cable obstructions inside the case. |
| የፊት ዩኤስቢ ወደቦች አይሰሩም። | Loose USB 3.0 header cable connection to motherboard. | Verify the USB 3.0 cable from the front panel is securely connected to the motherboard's USB 3.0 header. |
ዝርዝሮች
| ባህሪ | ዝርዝር |
|---|---|
| የሞዴል ስም | Eclipse G360A |
| የሞዴል ቁጥር | PH-EC360ATG_DBK02 |
| የቅጽ ምክንያት | ማዕከላዊ ማማ |
| ልኬቶች (WxDxH) | 455 x 200 x 465 ሚሜ / 17.9 x 7.87 x 18.3 ኢንች |
| ቁሳቁስ(ዎች) | Steel Chassis, Tempered Glass |
| Motherboard ድጋፍ | ATX, micro-ATX, mini-ITX, E-ATX (up to 280mm wide) |
| የፊት I/O | 2x USB 3.0, Microphone/Headphone Combo, Power Button, D-RGB Mode, D-RGB Color |
| የማስፋፊያ ቦታዎች | 7 |
| የውስጥ 3.5 ኢንች ድራይቭ ቤይ | 2 (2x ተካትቷል) |
| የውስጥ 2.5 ኢንች ድራይቭ ቤይ | 3 (2x ተካትቷል) |
| ቀድሞ የተጫኑ አድናቂዎች | 3x 120mm D-RGB (Front) |
| Fan Support (120mm) | Front: 3x; Top: 3x; Rear: 1x |
| Fan Support (140mm) | Front: 2x; Top: 2x |
| Radiator Support (120mm) | ፊት ለፊት: እስከ 360 ሚሜ; ከፍተኛ: እስከ 360 ሚሜ; የኋላ: 120 ሚሜ |
| Radiator Support (140mm) | Front: Up to 280mm; Top: Up to 360mm |
| ከፍተኛው የጂፒዩ ርዝመት | 400 ሚሜ / 15.7 ኢንች |
| ከፍተኛው የሲፒዩ ማቀዝቀዣ ቁመት | 162 ሚሜ / 6.3 ኢንች |
| የኬብል አስተዳደር ቦታ | 36 ሚሜ / 1.4 ኢንች |
| ከፍተኛው የ PSU ርዝመት | 220 mm / 280 mm (depends on HDD Cage location) |
ዋስትና እና ድጋፍ
የዋስትና መረጃ
Phanteks products are manufactured to the highest quality standards. For detailed warranty terms and conditions, please refer to the warranty card included with your product or visit the official Phanteks webጣቢያ. ዋስትናው በተለምዶ የቁሳቁሶችን ጉድለቶች እና በመደበኛ አጠቃቀም ላይ ያሉ የአሰራር ጉድለቶችን ይሸፍናል።
የደንበኛ ድጋፍ
Should you encounter any issues or have questions regarding your Phanteks Eclipse G360A chassis, please contact Phanteks customer support. You can find contact information, FAQs, and additional resources on the official Phanteks webጣቢያ፡