
KIMILAR TTYZJ1209
የኪሚላር 2024 ፀረ-ስርቆት ቪዲዮ የበር ደወል መጫኛ መመሪያ መመሪያ
መግቢያ
This manual provides comprehensive instructions for the installation and use of your KIMILAR 2024 Anti-Theft Video Doorbell Mount. This product is designed to securely hold your video doorbell on inward-opening doors without requiring drilling, offering enhanced security and convenience for various settings including homes, rentals, and offices.
የጥቅል ይዘቶች
- 1 x Anti-Theft Video Doorbell Mount Shell
- 1 x የሚስተካከለው የመጫኛ ቅንፍ
- 1 x Handle Screw
- 1 x Alloy Gasket
- 1 x Screwdriver
- 4 x ዊቶች
- 1 x Pad (for doorbell cushioning)
- 1 x የመጫኛ መመሪያ
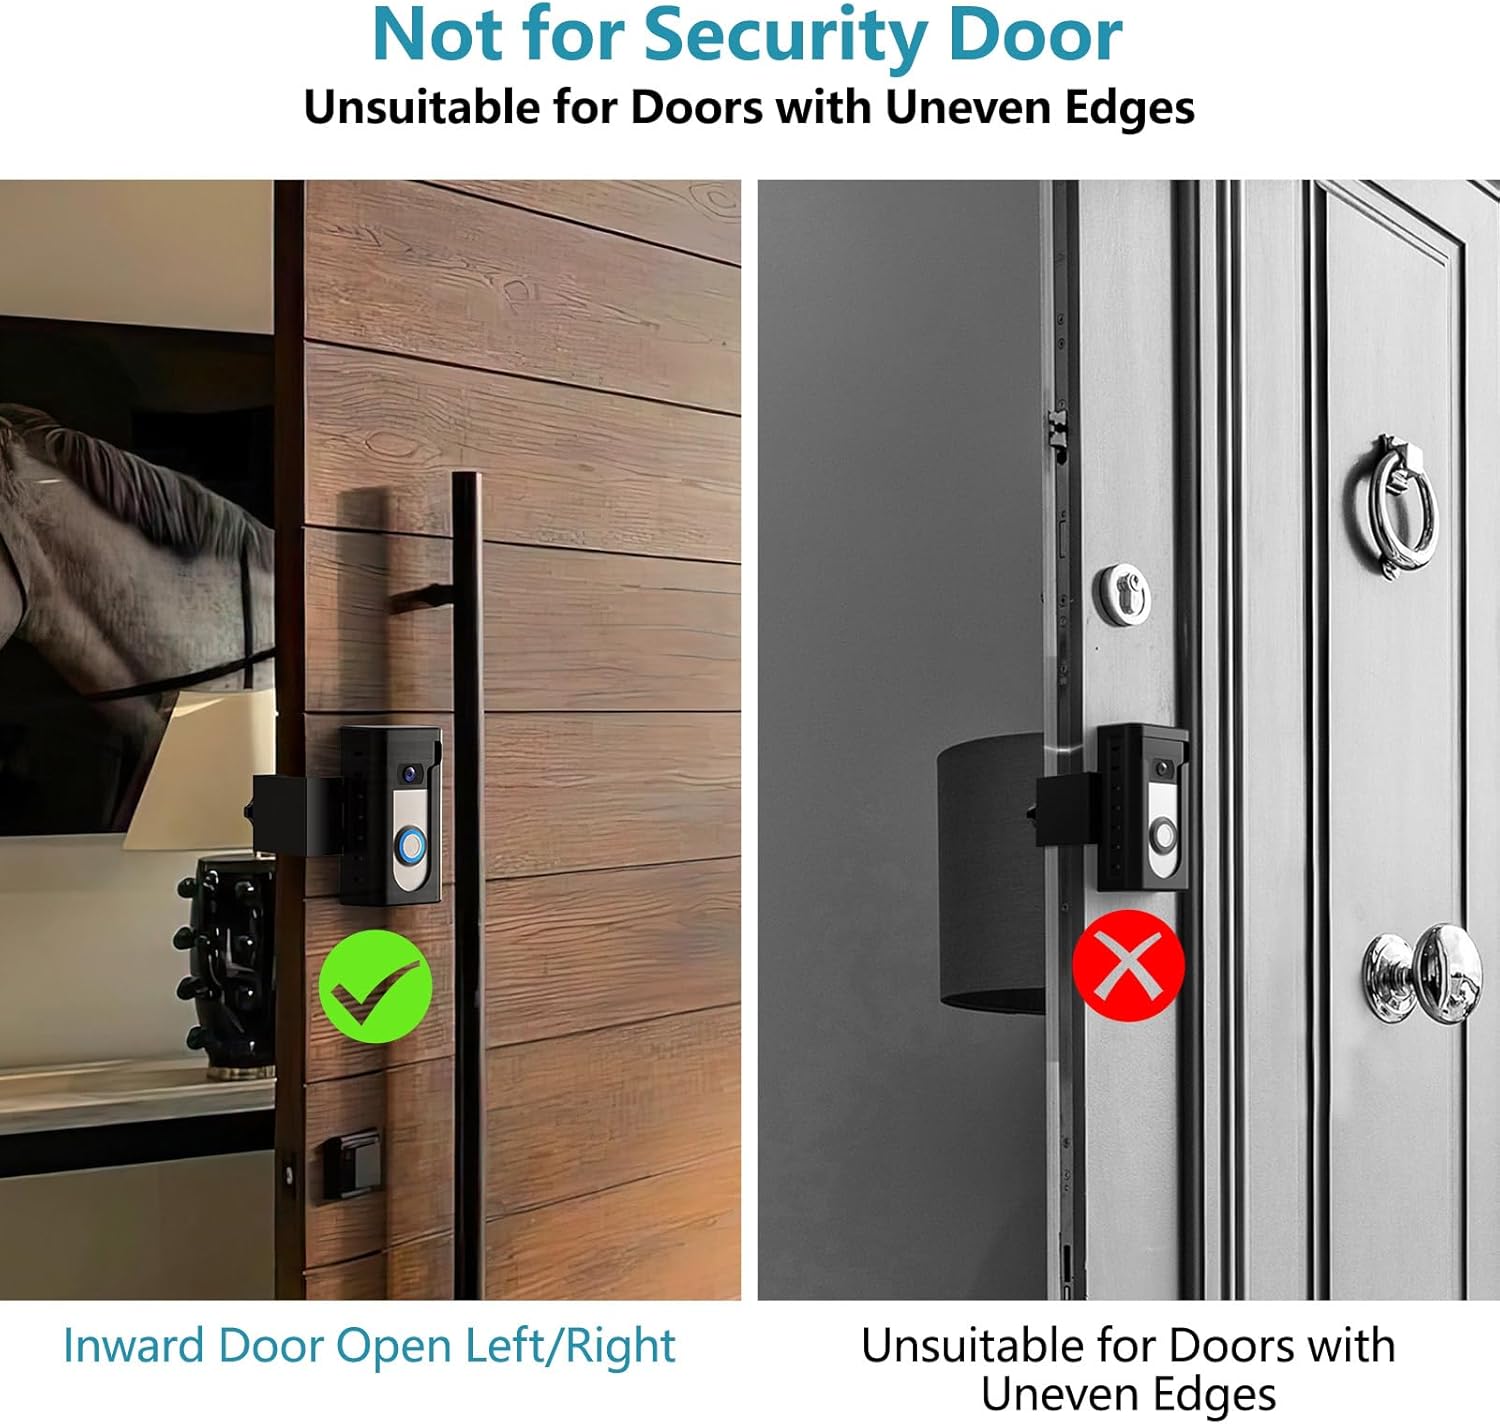
Image: All components included in the KIMILAR Anti-Theft Video Doorbell Mount package.
ተኳኋኝነት
Compatible Doorbells:
The mount is compatible with most video doorbells, including Video Doorbell /2 /3 /3 Plus /4 /(2020 Release)/ Battery Doorbell Plus. It is ተኳሃኝ አይደለም with Video Doorbell Pro/Pro 2 and Blink 2025 version.
The maximum size of the doorbell that can be placed inside the mount is 2.55 inches Wide x 5.11 inches High x 1.14 inches Depth.
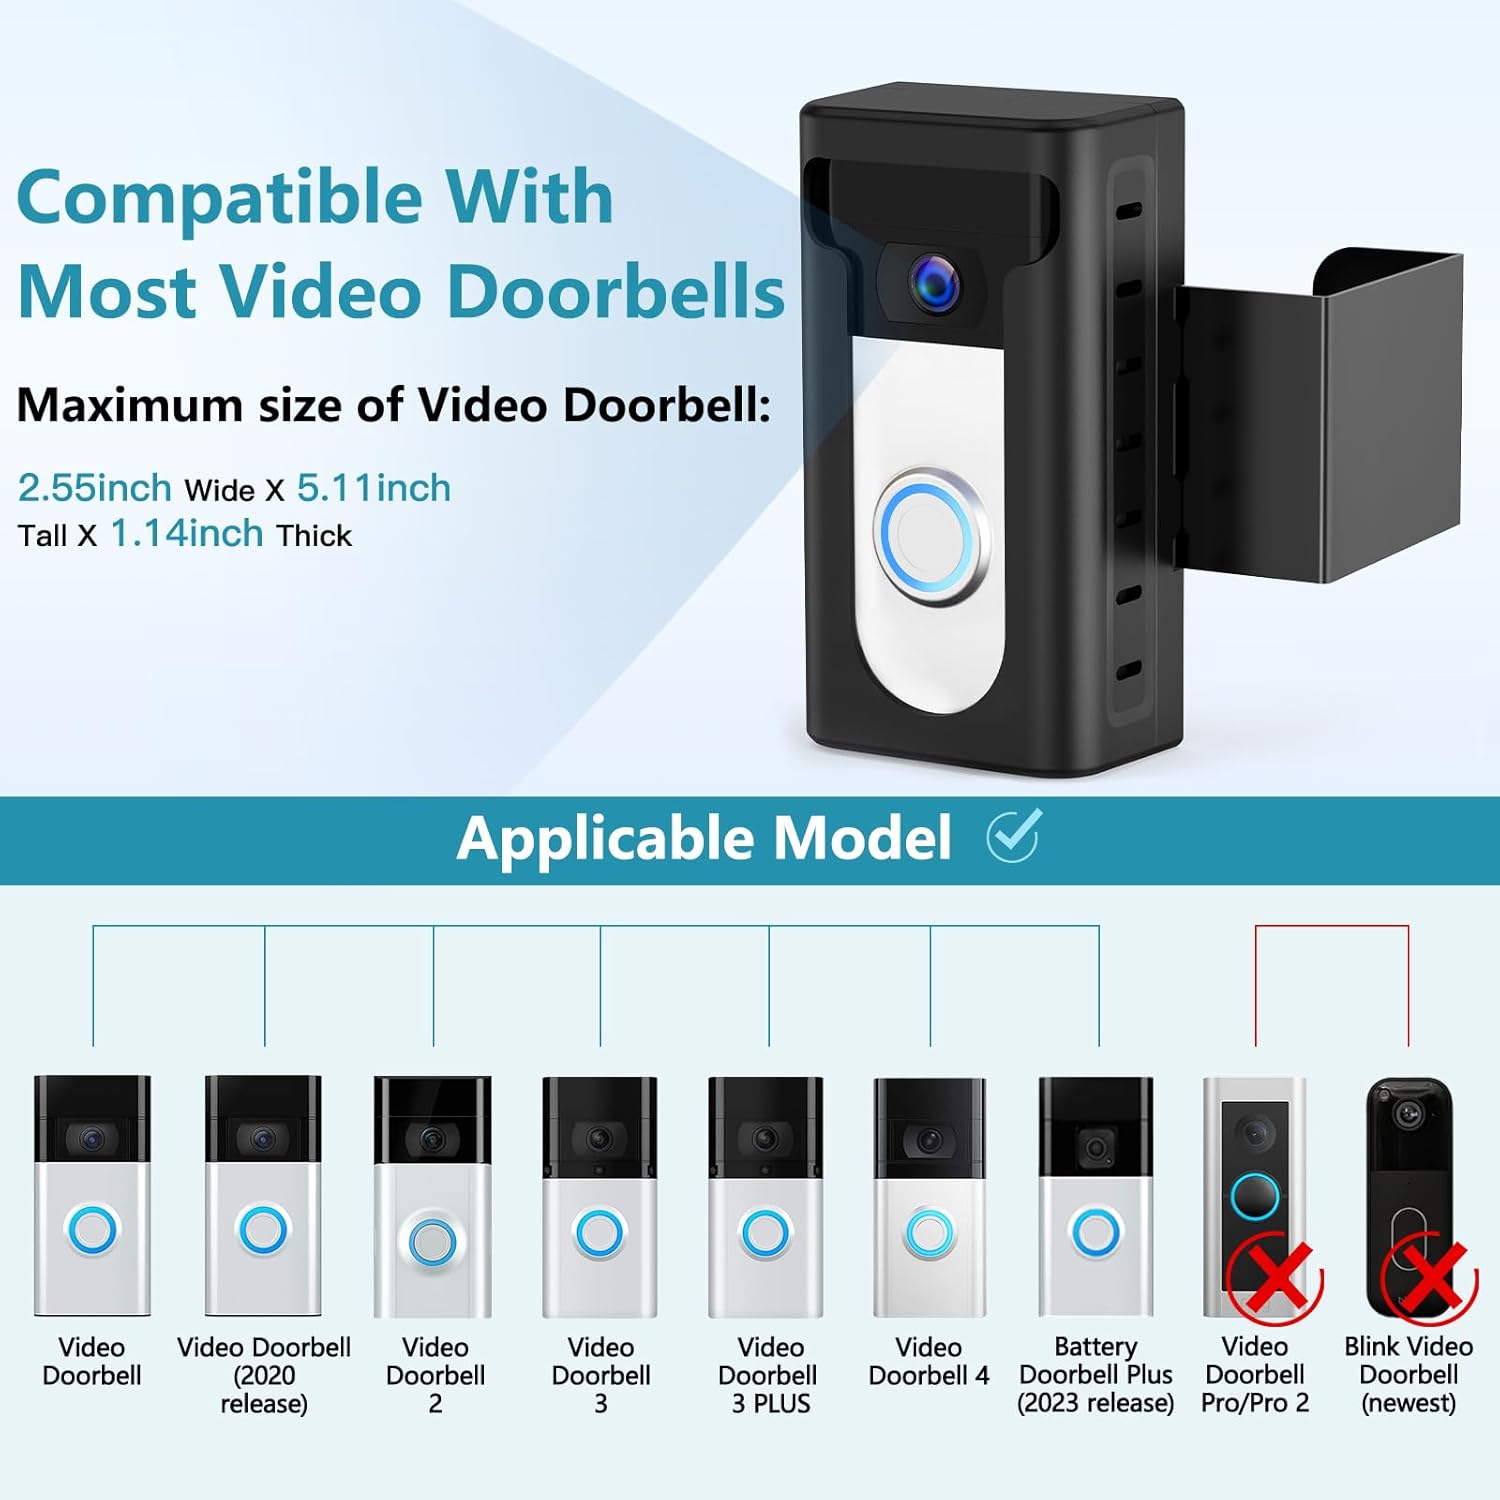
Image: Visual guide to compatible video doorbell models and size limitations.
ተስማሚ በሮች;
- Suitable for most inward-opening doors.
- Door thickness must be between 0.59 inches and 2.36 inches.
- Door gap width must be more than 0.06 inches.
- The edge of the door must be flat.
- Not suitable for security doors or doors with uneven edges.

Image: Illustrations detailing door thickness and gap width for proper installation.
ምስል፡ ዘጸamples of doors that are compatible and incompatible with the mount.
ማዋቀር እና መጫን
Follow these steps to install your KIMILAR Anti-Theft Video Doorbell Mount. No drilling is required.
የመጫኛ ቪዲዮ መመሪያ፡
Video: Official installation guide for the KIMILAR Anti-Theft Video Doorbell Mount, demonstrating each step.
- Prepare the Mount Shell: If your doorbell is loose inside the shell, cut the provided pad into small pieces and glue them onto the back cover of the mount to ensure a snug fit.

Image: Visual steps for preparing the mount and inserting the doorbell.
- Insert the Video Doorbell: Place your video doorbell into the mount shell. Ensure it fits securely.
- Secure the Back Cover: Align the two ends of the connector on the back cover and snap-lock them together. Use the provided screws and screwdriver to fix the security screw at the bottom of the shell. Ensure the doorbell is securely fastened.
- የመጫኛ ቅንፍ አያይዝ፡ Insert the metal bracket into the back of the doorbell shell.
- Mount on the Door: Position the assembled mount on the edge of your inward-opening door.
- አስተካክል እና ደህንነቱ የተጠበቀ; Install the M5*50 thumb screw and alloy gasket. Adjust the handle screw to secure the doorbell mount firmly to the door. Do not overtighten the screws, as this may prevent the door from closing normally.

Image: Illustration of the adjustable feature for optimal positioning on the door.
ባህሪያት እና ጥቅሞች
- ፀረ-ስርቆት ንድፍ; The updated 2024 design provides full protection for your doorbell, making it difficult to remove without authorization.
- No Motion Sensor Blockage: Features a T-shaped opening design that ensures the doorbell's motion sensor remains unobstructed.
- ቁፋሮ የሌለበት መጫኛ፡- Ideal for renters or those who prefer not to drill holes, preserving the integrity of your door.
- ሊስተካከል የሚችል አካል ብቃት; The mount can be adjusted to fit various door thicknesses and positions, ensuring optimal camera view.

Image: Key features of the mount, including anti-theft and unobstructed sensor design.
ጥገና
To ensure the longevity and optimal performance of your doorbell mount, regular maintenance is recommended:
- ማጽዳት፡ Wipe the mount periodically with a soft, damp አቧራና ቆሻሻን ለማስወገድ ጨርቅ። ሻካራ ማጽጃዎችን ያስወግዱ።
- ጥብቅነትን ያረጋግጡ፡ Periodically check the handle screw to ensure it remains securely tightened. Adjust if necessary to maintain stability.
- ለአለባበስ መርምር፡- Examine the mount for any signs of wear or damage. If any components are compromised, contact customer support for assistance.
መላ መፈለግ
| ችግር | ሊሆን የሚችል ምክንያት | መፍትሄ |
|---|---|---|
| Door does not close properly after installation. | The handle screw is overtightened, or the door gap is too small. | Loosen the handle screw slightly. Ensure your door gap is greater than 0.06 inches before installation. |
| Doorbell is loose inside the mount. | Insufficient padding for the doorbell. | Use the provided pads (cut into smaller pieces if needed) to create a snug fit for your doorbell inside the shell. |
| Mount feels unstable on the door. | Handle screw is not tightened enough, or door edges are uneven. | Tighten the handle screw until the mount is firm. This mount is not suitable for doors with uneven edges. |
| የእንቅስቃሴ ዳሳሽ ታግዷል። | Doorbell is not correctly positioned within the T-shaped opening. | Ensure the doorbell's sensor area aligns with the T-shaped opening of the mount. |
ዝርዝሮች
- የሞዴል ስም፡- ኪሚላር
- የሞዴል ቁጥር፡- TTYZJ1209
- ቀለም፡ ጥቁር
- የመጫኛ አይነት፡ Door Mount (No-Drill)
- ተስማሚ የበር ውፍረት; 0.59-2.36 ኢንች
- Minimum Door Gap Width: > 0.06 ኢንች
- Max Doorbell Dimensions: 2.55" (ወ) x 5.11" (H) x 1.14" (መ)
- ቁሳቁስ፡ Not specified (typically durable plastic/metal)
- የእቃው ክብደት፡ 10.8 አውንስ (0.31 ኪሎ ግራም)
- የጥቅል መጠኖች: 13.86 x 5.43 x 3.23 ኢንች
ዋስትና እና ድጋፍ
For any problems or inquiries regarding your KIMILAR Anti-Theft Video Doorbell Mount, please contact us via the "Contact Seller" entrance on Amazon. We are committed to providing customer satisfaction.
አምራች፡ ኪሚላር
መጀመሪያ የሚገኝ ቀን፡- ዲሴምበር 12፣ 2022
Ask a question about this manual
Ask about setup, troubleshooting, compatibility, parts, safety, or missing instructions. Manuals+ will review the question and use this page’s manual context to help answer it.