1. ምርት አብቅቷልview
The Fuers H.265+ 8-Channel Security DVR Recorder (Model A1008CH) is a versatile surveillance solution designed for home and business security. This DVR supports various camera types including HD-CVBS, TVI, CVI, XVI, AHD, and IP analog cameras, allowing for flexible system expansion. It features H.265+ video compression for efficient storage and comes with a pre-installed 1TB hard drive for 24/7 recording.
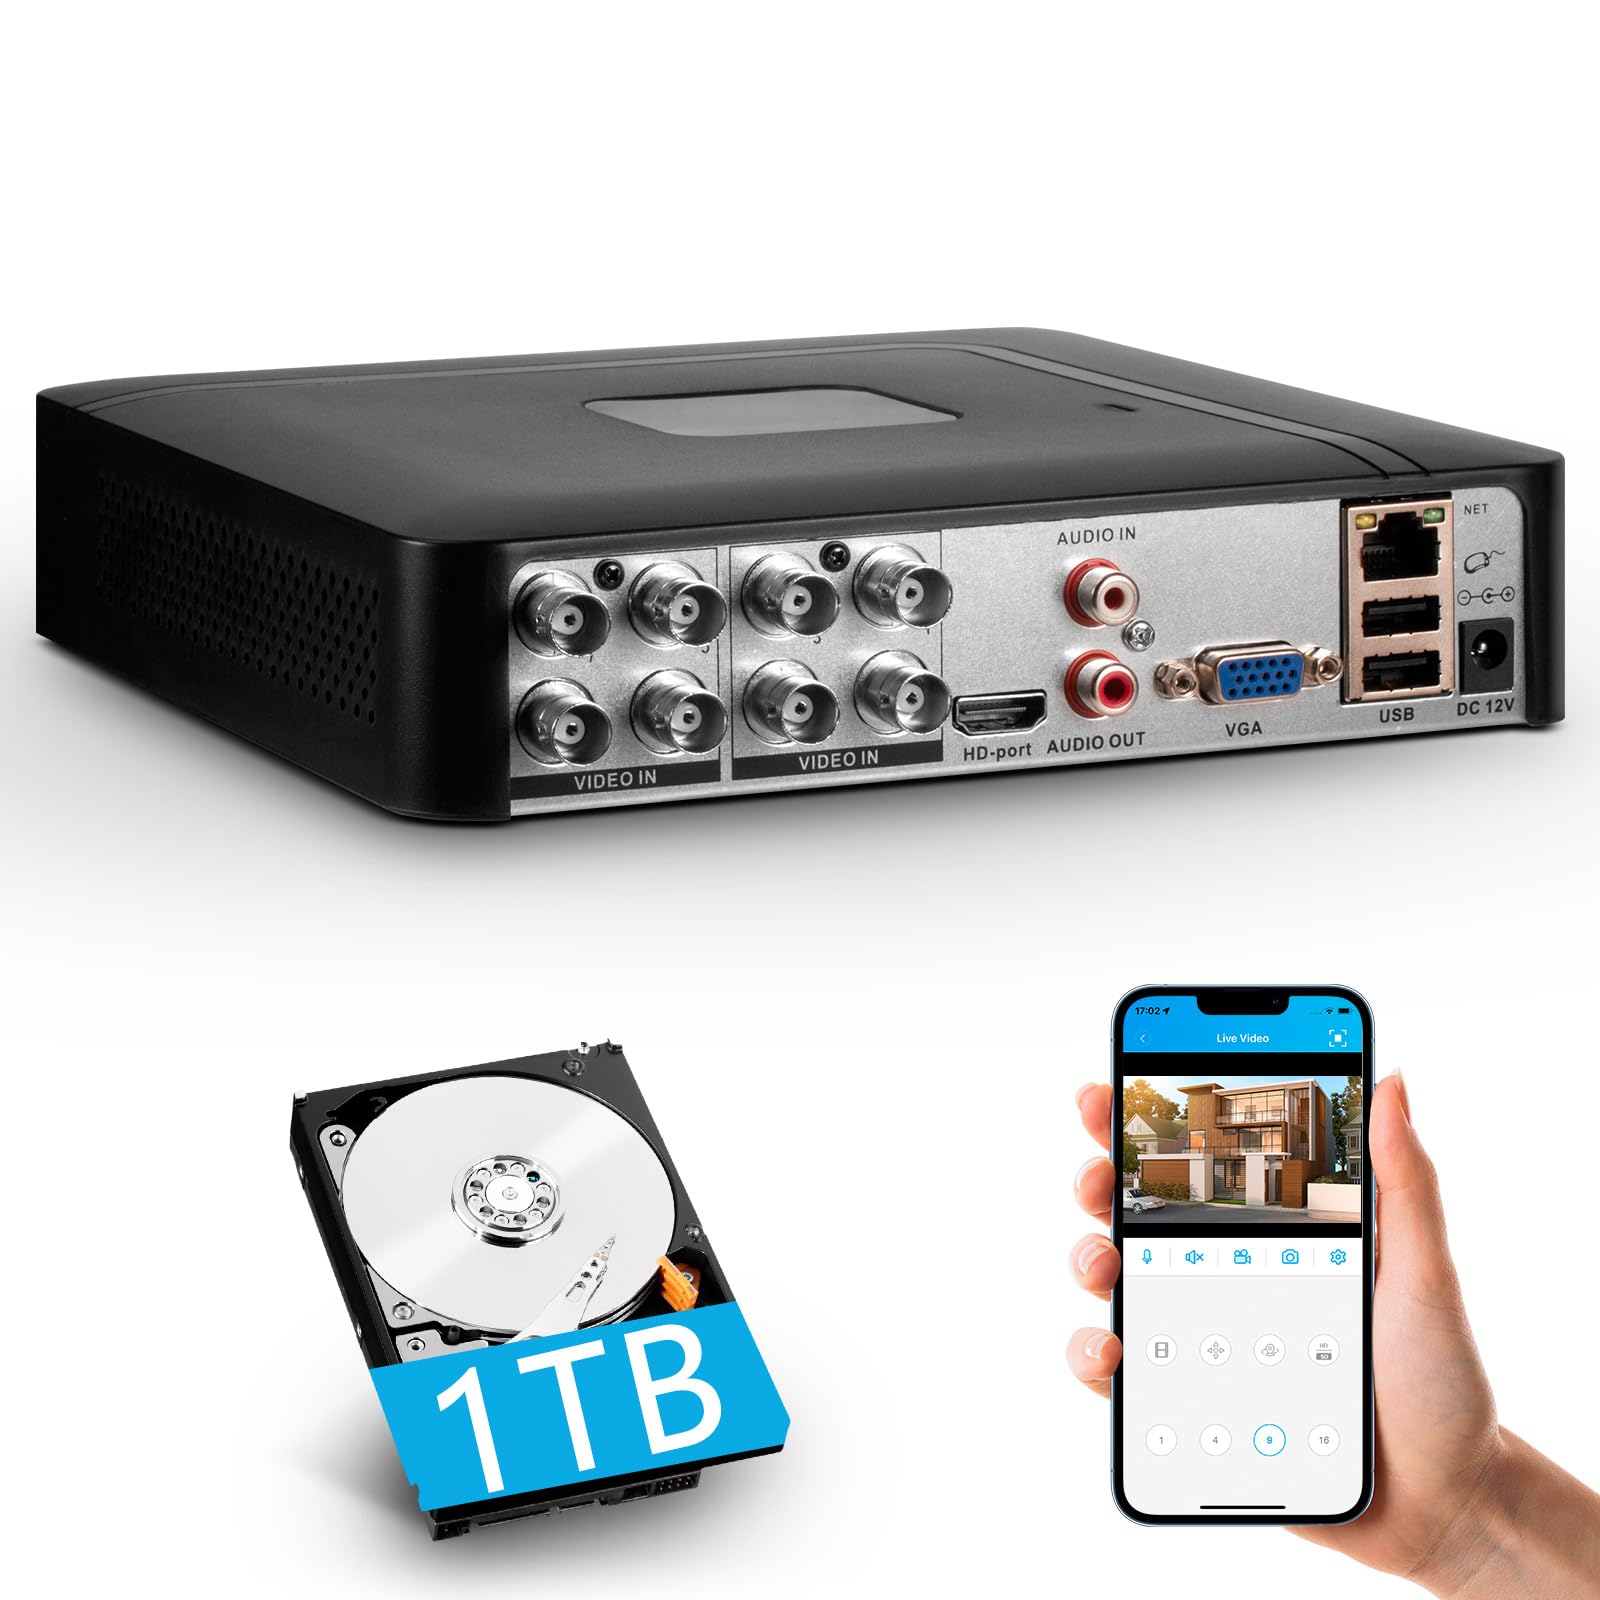
Image 1.1: Fuers H.265+ 8-Channel Security DVR Recorder.
ቁልፍ ባህሪዎች
- የ8-ቻናል ስርዓት፡ Supports up to 8 cameras simultaneously, compatible with HD-TVI, CVBS, CVI, XVI, AHD, and IP cameras.
- ኤች.265+ የቪዲዮ መጭመቂያ፡ Offers extended recording time and saves up to 50% storage space compared to H.265 systems.
- Pre-installed 1TB HDD: Security-grade hard drive for continuous surveillance recording. Expandable up to 14TB via SATA port.
- የርቀት መዳረሻ፡ View and manage your system remotely using the free iCSee App (iOS/Android) or VMS Client (Windows/Mac).
- የማሰብ ችሎታ ያለው እንቅስቃሴ ማወቅ; Receive mobile push notifications for detected motion types, including person and face detection.
- ተሰኪ እና አጫውት ማዋቀር፡- Easy connection with simultaneous VGA/HDMI output.
2. ማዋቀር እና መጫን
2.1 በሳጥኑ ውስጥ ያለው
ከመጀመርዎ በፊት ሁሉም አካላት መኖራቸውን ያረጋግጡ-
- 1x A1008 8CH DVR
- 1x 1TB HDD (Pre-installed on DVR)
- 1x DVR የኃይል አስማሚ
- 1 x የዩኤስቢ መዳፊት
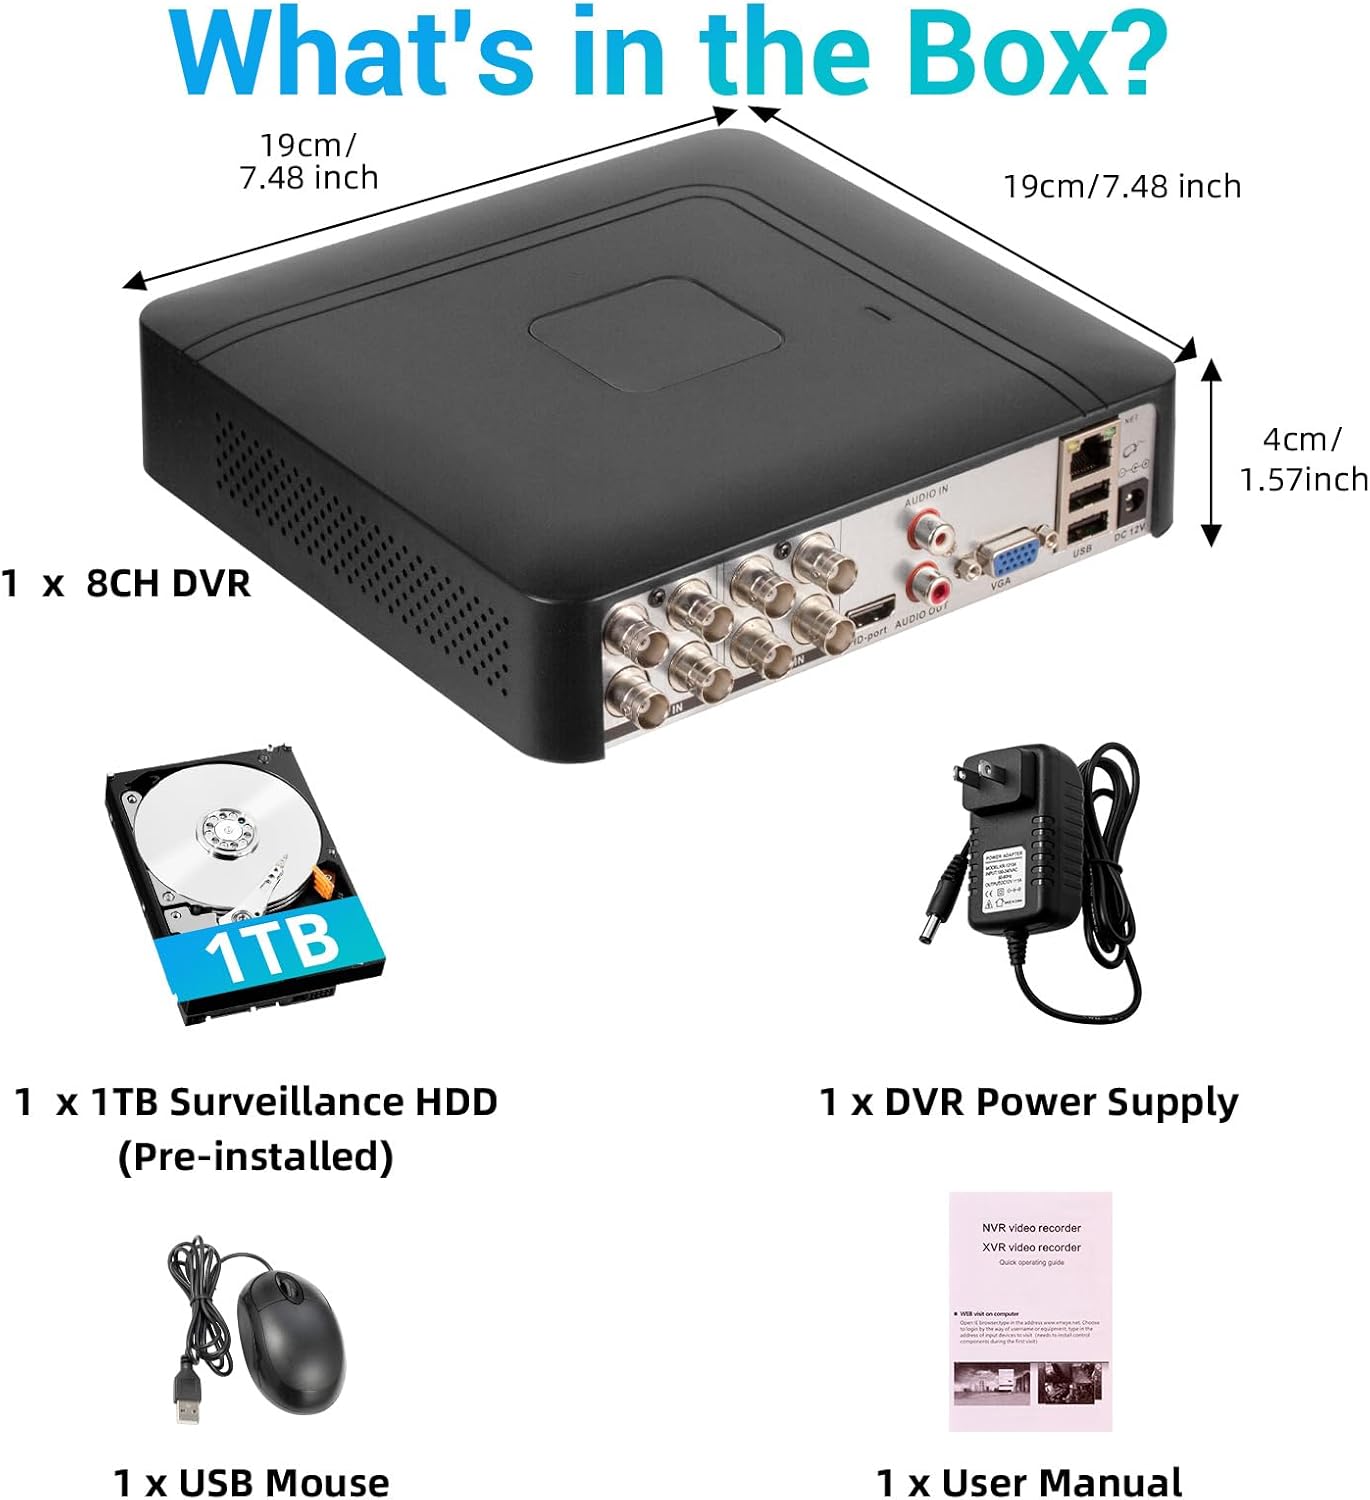
ምስል 2.1፡ የምርት ፓኬጁ ይዘቶች።
2.2 Hard Drive Installation (if not pre-installed or for upgrade)
The DVR comes with a pre-installed 1TB HDD. If you need to replace or upgrade the hard drive (up to 14TB), follow these steps:
- Unscrew the bottom cover of the DVR unit.
- በጥንቃቄ ሐasing.
- Connect the SATA data cable and power cable from the DVR to the new hard drive.
- Secure the hard drive within the casing using the provided screws.
- Close the DVR casing and secure it with screws.

Image 2.2: Hard drive installation and expansion options.
2.3 Connecting the DVR System
የእርስዎን DVR ስርዓት ለማገናኘት እነዚህን ደረጃዎች ይከተሉ፡-
- ካሜራዎችን ማገናኘት; Connect your security cameras to the 'VIDEO IN' ports on the back of the DVR using BNC cables.
- ተያያዥ ሞኒተር፡ የኤችዲኤምአይ ወይም የቪጂኤ ወደብ በመጠቀም ሞኒተርን ከዲቪአር ጋር ያገናኙ።
- የዩኤስቢ መዳፊትን ያገናኙ፡ የተካተተውን የዩኤስቢ መዳፊት በDVR ላይ ካሉት የዩኤስቢ ወደቦች በአንዱ ላይ ይሰኩ።
- Connect Network (Optional for Remote Access): ለሩቅ viewing and notifications, connect an Ethernet cable from your router to the 'NET' port on the DVR.
- አብራ፡ Connect the DVR power adapter to the 'DC 12V' port and then plug it into a power outlet.

Image 2.3: Connecting cameras and network to the DVR.
2.4 Initial Setup and Channel Type Selection
Upon first power-on, the system may prompt for initial setup. You may need to select the appropriate channel type for your cameras.
- Right-click on the screen to access the Main Menu.
- ሂድ ወደ ስርዓት > ዲጂታል > የቻናል አይነት.
- Select the configuration that matches your camera setup:
- First row: Supports 8 XVI, CVBS, AHD, TVI, CVI coaxial cameras.
- Second row: Supports 8 XVI, CVBS, AHD, TVI, CVI coaxial + 4 IP cameras.
- Third row: Supports 16 1080P IP cameras.
- Fourth row: Supports 16 5MP IP cameras.
- ጠቅ ያድርጉ OK to apply changes. The system may restart.

Image 2.4: DVR Channel Type selection screen.
3. የአሠራር መመሪያዎች
3.1 ቀጥታ ስርጭት View እና መቅዳት
Once the DVR is powered on and cameras are connected, you should see the live feed on your connected monitor. The system is configured for 24/7 recording to the pre-installed 1TB hard drive.

Image 3.1: Live view of multiple camera feeds.
3.2 Remote Access via Mobile App
To access your DVR remotely, download the free iCSee App (for iOS/Android) or VMS Client (for Windows/Mac).
- Download the iCSee App from your device's app store.
- መተግበሪያውን ይክፈቱ እና መለያ ከሌለዎት መለያ ይመዝገቡ።
- In the DVR's main menu, navigate to መረጃ > ሥሪት to find the DVR's QR code.
- Use the iCSee app to scan the QR code to add your device.
- አንዴ ከተጨመረ በኋላ፣ ይችላሉ view live feeds, playback recordings, and receive alerts from anywhere with an internet connection.

Image 3.2: Steps for remote access via mobile app.
3.3 Playback Recorded Footage
እንደገናview የተቀዳ ቪዲዮ፡
- Right-click on the screen to access the Main Menu.
- ይምረጡ መዝገብ > መልሶ ማጫወት.
- Choose the desired channel(s) and date/time range for playback.
- ጠቅ ያድርጉ መልሶ ማጫወት ጀምር ወደ view ፎፉtage.

Image 3.3: Playback interface with timeline.
3.4 Motion Detection Alerts
The DVR supports intelligent motion detection, including person and face detection. When motion is detected, you can receive instant mobile push notifications.
- Configure motion detection settings in the DVR's ማንቂያ ምናሌ.
- Ensure your mobile app is properly linked and notifications are enabled.

Image 3.4: Human and face detection in action.
4. ጥገና
4.1 ሃርድ ድራይቭ አስተዳደር
The pre-installed 1TB hard drive provides ample storage. Due to H.265+ compression, storage is optimized. If more storage is needed, you can replace the internal HDD with a larger one (up to 14TB). Regularly check the hard drive status in the DVR's system settings to ensure optimal performance.
4.2 አጠቃላይ እንክብካቤ
- Keep the DVR in a cool, dry, and well-ventilated area.
- Avoid exposing the unit to direct sunlight, extreme temperatures, or moisture.
- Clean the exterior of the DVR with a soft, dry cloth. Do not use liquid cleaners.
- ሁሉም የኬብል ግንኙነቶች ደህንነታቸው የተጠበቀ መሆኑን ያረጋግጡ።
5. መላ መፈለግ
5.1 በሞኒተር ላይ የቪዲዮ ውፅዓት የለም
- Check if the DVR is powered on and the power adapter is securely connected.
- Verify the HDMI or VGA cable connection between the DVR and the monitor.
- ሞኒተሩ በትክክለኛው የግብዓት ምንጭ (HDMI/VGA) ላይ መዋቀሩን ያረጋግጡ።
5.2 ካሜራዎች አይታዩም
- Check all camera power and video cable connections.
- Verify that the camera type (AHD, TVI, CVI, etc.) is compatible with the DVR.
- Ensure the correct channel type is selected in the DVR settings (refer to Section 2.4).
- Test cameras individually if possible to isolate the issue.
5.3 Remote Access Not Working
- Confirm the DVR is connected to the internet via an Ethernet cable.
- የራውተርዎን የበይነመረብ ግንኙነት ያረጋግጡ።
- የ iCSee መተግበሪያ ወደ የቅርብ ጊዜው ስሪት መዘመኑን ያረጋግጡ።
- Verify that the DVR was added correctly to the app by scanning the QR code.
- For some networks, you might need to adjust router settings (e.g., port forwarding), consult your network administrator or ISP.
6. ዝርዝሮች
| ባህሪ | ዝርዝር |
|---|---|
| የምርት ስም | ቃጫዎች |
| የሞዴል ቁጥር | A1008CH |
| የሰርጦች ብዛት | 8 |
| የግንኙነት ቴክኖሎጂ | ኤችዲኤምአይ፣ ዩኤስቢ፣ ቪጂኤ |
| ተስማሚ መሣሪያዎች | Desktop, Tablet, Camera, Smartphone |
| የምርት ልኬቶች | 7.48"ኤል x 7.48" ዋ x 1.57" ኤች |
| የማህደረ ትውስታ ማከማቻ አቅም | 1 TB (Pre-installed) |
| Hard-Drive Size | 1 TB (Expandable up to 14 TB) |
| የሚዲያ ቅርጸት ዲጂታል ቪዲዮ | H.265 + |
| የቪዲዮ ግቤት | AHD, CVI, HDMI, HDTVI, IP Input, VGA |
| ዩፒሲ | 765142240850 |
7. ዋስትና እና ድጋፍ
7.1 የምርት ዋስትና
This Fuers DVR Recorder is covered by a standard manufacturer's warranty. Please refer to the warranty card included with your product or visit the official Fuers webለዝርዝር የዋስትና ውሎች እና ሁኔታዎች ጣቢያ። ለዋስትና ጥያቄዎች የግዢ ደረሰኝዎን እንደ ግዢ ማረጋገጫ ያቆዩት።
7.2 የቴክኒክ ድጋፍ
For technical assistance, troubleshooting, or any questions regarding your Fuers DVR, please contact Fuers customer support. Contact information can typically be found on the product packaging, the official Fuers webጣቢያ፣ ወይም በእርስዎ ቸርቻሪ በኩል።
የመስመር ላይ መርጃዎች፡-
- ን ይጎብኙ Fuers Store on Amazon ለምርት መረጃ እና ዝማኔዎች.