Chief KRA221SXRH Expansion Arm Kit Instruction Manual
Model: KRA221SXRH
1. መግቢያ
This manual provides detailed instructions for the installation and use of the Chief KRA221SXRH Expansion Arm Kit. This kit is designed to expand existing Chief K1C series monitor arm installations, allowing for additional monitor configurations.
The KRA221SXRH facilitates upgrading a single-arm K1C120SXRH to a dual-arm K1C220SXRH setup or adding a third and/or fourth arm to a multi-workstation configuration when used with the KRA226 grommet plate accessory.
2. የደህንነት መረጃ
Read all instructions carefully before installation. Failure to do so may result in personal injury or property damage.
Ensure that the mounting surface can safely support the combined weight of the arm kit, monitors, and any attached accessories.
Do not overtighten screws. Overtightening can cause damage to the product or mounting surface.
ትናንሽ ክፍሎችን ከልጆች ያርቁ.
If you have any doubts about the installation process, consult a qualified professional.
3. የጥቅል ይዘቶች
Verify that all components are present and undamaged before proceeding with installation. If any parts are missing or damaged, contact Chief customer support.
Expansion Arm (KRA221SXRH)
ሃርድዌር ማፈናጠጥ
የትምህርት መመሪያ (ይህ ሰነድ)
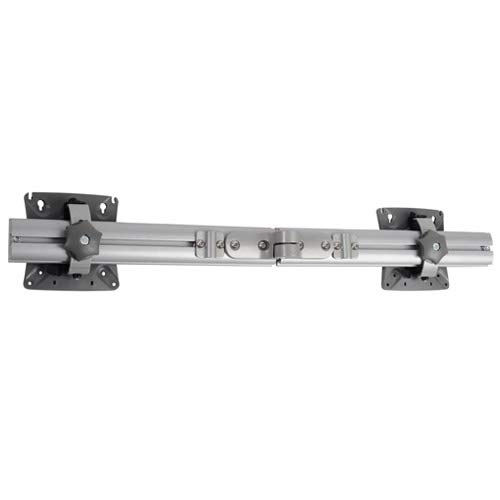
Image: Components of the Chief KRA221SXRH Expansion Arm Kit. This image displays the primary arm component and associated mounting hardware.
4. ማዋቀር እና መጫን
This section outlines the steps to install the KRA221SXRH Expansion Arm Kit. Ensure you have all necessary tools and an existing Chief K1C series mount in place.
4.1. Expanding a Single-Arm K1C120SXRH to a Dual-Arm K1C220SXRH
Prepare the Existing Mount: Ensure your existing K1C120SXRH single-arm mount is securely installed.
Attach the Expansion Arm: Locate the designated attachment point on the existing K1C mount's pole or central hub. Align the KRA221SXRH expansion arm with this point.
Secure the Arm: Use the provided mounting hardware (screws, washers, etc.) to firmly attach the expansion arm. Refer to the specific diagrams in your K1C base mount manual for precise screw locations and torque specifications.
Mount the Second Monitor: Attach your second monitor to the newly installed expansion arm using the VESA mounting plate.
የኬብል አስተዳደር Route monitor cables through the integrated cable management channels of both arms for a clean setup.
4.2. Adding a Third or Fourth Arm (Requires KRA226 Grommet Plate)
For configurations requiring three or four arms, the Chief KRA226 Grommet Plate Accessory is necessary. This accessory provides additional mounting points for expansion arms in a center-of-table setup.
Install KRA226 Grommet Plate: If not already installed, follow the instructions provided with the KRA226 grommet plate to securely mount it to your workstation.
Attach Expansion Arms: Identify the available mounting points on the KRA226 grommet plate. Attach the KRA221SXRH expansion arms to these points using the provided hardware.
ተራራ ማሳያዎች፡- Secure your monitors to the expansion arms.
አስተካክል እና ደህንነቱ የተጠበቀ; Make any necessary adjustments to monitor height, tilt, and swivel. Ensure all connections are tight and secure.
5. ማስተካከያዎች
Once installed, the KRA221SXRH expansion arm allows for various adjustments to optimize your viewልምድ.
የከፍታ ማስተካከያ; የአንገቱን ክላይን ይፍቱamp on the main pole (if applicable to your K1C base mount), adjust the arm to the desired height, and retighten the clamp.
Tilt and Swivel: Use the adjustment knobs or screws on the monitor head to set the desired tilt and swivel angles for your monitor.
ክንድ ማራዘሚያ/መመለስ፡ The arm can be extended or retracted to bring the monitor closer or further away from the user.
ማሽከርከር፡ Monitors can typically be rotated from landscape to portrait orientation.
Always ensure that adjustments are made smoothly and that all locking mechanisms are securely fastened after positioning to prevent accidental movement.
6. ጥገና
Regular maintenance ensures the longevity and safe operation of your Chief KRA221SXRH Expansion Arm Kit.
ማጽዳት፡ Clean the arm surfaces with a soft, damp ጨርቅ. ማጠናቀቂያውን ሊጎዱ የሚችሉ ማጽጃዎችን ወይም ፈሳሾችን ያስወግዱ።
ቅባት፡ No lubrication is typically required for the moving parts of this arm kit.
የክብደት ገደቦች፡- Do not exceed the maximum weight capacity specified for your K1C series monitor arm and the expansion kit.
7. መላ መፈለግ
ችግር
ሊሆን የሚችል ምክንያት
መፍትሄ
Arm feels loose or wobbly.
የመጫኛ ዊንጮች በቂ ጥብቅ አይደሉም።
Check and retighten all mounting screws on the expansion arm and the main K1C mount.
ሳግስን ይቆጣጠሩ ወይም ቦታ አይይዝም።
Weight capacity exceeded or tension adjustment needed.
Ensure monitor weight is within limits. Adjust the tension mechanism on the monitor head if available (refer to your K1C base mount manual).
Difficulty attaching expansion arm.
Incorrect alignment or missing hardware.
Review installation steps. Ensure correct orientation and that all necessary hardware is used. Confirm compatibility with your existing K1C mount.
If you encounter issues not listed here, please contact Chief customer support for assistance.
8. ዝርዝሮች
ሞዴል፡ KRA221SXRH
የምርት ዓይነት፡- Expansion Arm Kit
ተኳኋኝነት Chief K1C series monitor arms (e.g., K1C120SXRH, K1C220SXRH)
ቀለም፡ ጥቁር
የእቃው ክብደት፡ በግምት 11.5 ፓውንድ (5.2 ኪ.ግ)
የምርት መጠኖች: በግምት 17.5 x 6.5 x 33.75 ኢንች (44.45 x 16.51 x 85.73 ሴሜ)
ልዩ ባህሪያት፡ Designed for expanding existing K1C installations, supports multi-monitor configurations with KRA226 accessory.
9. ዋስትና እና ድጋፍ
For information regarding warranty coverage, please refer to the official Chief website or the warranty documentation included with your original K1C series monitor arm. Chief provides customer support for product inquiries, technical assistance, and troubleshooting.
Chief PDR Series Large Flat Panel Dual Arm Wall Mount Installation Instructions Detailed installation instructions for the Chief PDR Series Dual Arm Wall Mount, designed for large flat panel displays. Covers mounting to the wall, attaching the display, cable management, tension adjustments, and swing arm configurations. Includes safety warnings, product specifications, and contact information.
Chief Thinstall Large Tilt Universal Mount Installation Guide Comprehensive installation instructions for the Chief Thinstall™ Large Tilt Universal Mount (LTTU). This guide provides detailed steps for wall plate mounting, display attachment, tilt adjustment, and cable management, ensuring safe and proper setup of your display.