1. መግቢያ እና በላይview
This manual provides detailed instructions for the installation, operation, maintenance, and troubleshooting of the ASRock 760GM-HDV Rev: 1.01 Desktop Motherboard. This motherboard is designed for AMD AM3/AM3+ processors and supports DDR3 memory, offering a reliable foundation for personal computer systems.
Key features include an AMD 760G/SB710 chipset, support for up to 32GB DDR3 RAM, and integrated graphics with HDMI, VGA, and DVI outputs. It also provides USB and SATA 3GB/s connectivity.
2. ማዋቀር እና መጫን
Before beginning installation, ensure your workspace is clean, well-lit, and static-free. Always handle the motherboard by its edges and use an anti-static wrist strap to prevent electrostatic discharge (ESD) damage.
2.1 የእናትቦርድ አቀማመጥ
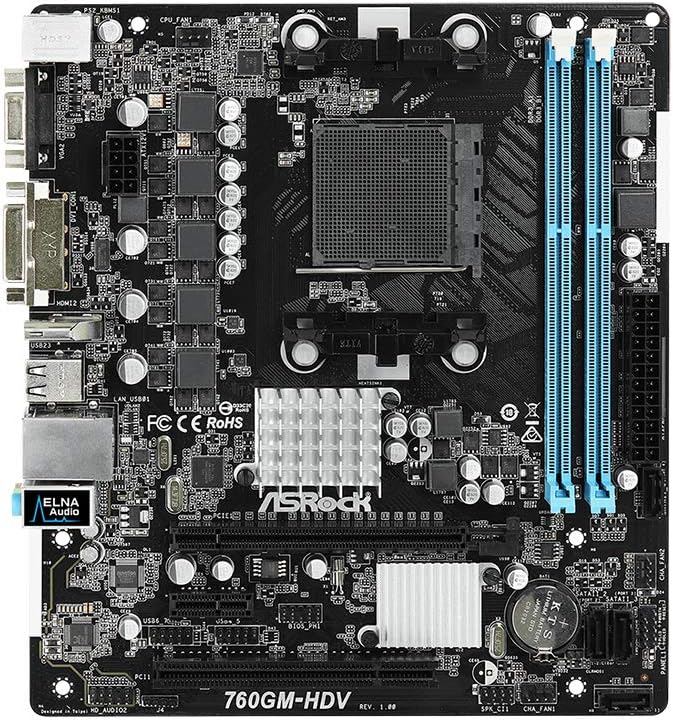
ምስል 1፡ ከፍተኛ view of the ASRock 760GM-HDV motherboard, showing the CPU socket, RAM slots, PCIe slots, and various connectors.
2.2 የአካላት መጫኛ ደረጃዎች
- ጉዳዩን ያዘጋጁ: Install the I/O shield into the rear opening of your computer case. Ensure standoffs are correctly aligned and installed for the Micro ATX form factor.
- ሲፒዩ ጫን፡- Open the CPU socket lever. Carefully align your AMD AM3/AM3+ processor with the socket, ensuring the golden triangle on the CPU matches the triangle on the socket. Gently place the CPU into the socket without force. Close the lever to secure the CPU.
- የሲፒዩ ማቀዝቀዣውን ይጫኑ፡- Apply thermal paste to the CPU (if not pre-applied on the cooler). Mount the CPU cooler according to its manufacturer's instructions, ensuring it is securely fastened and the fan cable is connected to the CPU_FAN header on the motherboard.
- RAM ጫን Open the clips on both ends of the DDR3 DIMM slots. Align the memory module's notch with the slot's key. Press down firmly on both ends of the module until the clips snap into place. This motherboard supports dual-channel DDR3 memory.
- ማዘርቦርዱን ይጫኑ፡ ማዘርቦርዱን በጥንቃቄ ወደ መያዣው ውስጥ ያስገቡ፣ የዊንች ቀዳዳዎቹን ከግጭት ጋር ያስተካክሉ። ማዘርቦርዱን በዊንችዎች ያስጠብቁ።
- የኃይል አቅርቦትን ማገናኘት; Connect the 24-pin ATX power connector and the 4-pin ATX 12V power connector from your power supply to the corresponding ports on the motherboard.
- የማጠራቀሚያ መሳሪያዎችን ያገናኙ; Connect SATA data cables from your hard drives or SSDs to the SATA 3GB/s ports on the motherboard. Connect power cables from the power supply to your storage devices.
- የፊት ፓነል ገመዶችን ያገናኙ; Connect the power button, reset button, HDD LED, power LED, and front USB/audio headers from your case to the corresponding pins on the motherboard. Refer to the motherboard's silkscreen labels for correct orientation.
- የማስፋፊያ ካርዶችን ይጫኑ፡- If using a dedicated graphics card or other PCIe expansion cards, insert them into the appropriate PCIe slots and secure them with the case's retention mechanism.
3. የአሠራር መመሪያዎች
3.1 Initial Power-On and BIOS Access
- After all components are installed and connected, connect your monitor, keyboard, and mouse to the appropriate ports.
- ስርዓትዎን ያብሩ። በማስነሻ ሂደት ወቅት፣ ደጋግመው ይጫኑ ዲኤል or F2 ወደ ባዮስ/UEFI ማዋቀር መገልገያ ለመግባት ቁልፍ።
- In the BIOS, you can configure boot order, system time, and various hardware settings. Save changes before exiting.
3.2 ማገናኛ ፔሪፈራል
The ASRock 760GM-HDV motherboard offers a range of rear I/O ports for connecting external devices:

ምስል 2፡ Rear I/O panel of the ASRock 760GM-HDV motherboard, showing PS/2, VGA, DVI, HDMI, USB, LAN, and audio ports.
- PS/2 ወደቦች፡ For connecting legacy PS/2 keyboards and mice.
- VGA, DVI, HDMI Ports: For connecting displays. Use one port at a time for integrated graphics output.
- የዩኤስቢ ወደቦች፡ For connecting USB devices such as keyboards, mice, external drives, and printers.
- LAN ወደብ፡ የኢተርኔት ገመድ በመጠቀም ከገመድ አውታረ መረብ ጋር ለመገናኘት።
- ኦዲዮ ጃክስ፡ ድምጽ ማጉያዎችን፣ የጆሮ ማዳመጫዎችን እና ማይክሮፎኖችን ለማገናኘት።
3.3 የአሽከርካሪዎች መጫኛ
After installing your operating system, install the necessary drivers for the motherboard's chipset, integrated graphics, audio, and LAN. These drivers are typically provided on a support CD or can be downloaded from the ASRock official webጣቢያ ለእርስዎ የተለየ ሞዴል።
4. ጥገና
- አቧራ ማጽዳት; Regularly clean dust from inside your computer case, especially around the CPU cooler, chipset heatsink, and fan vents. Use compressed air and ensure the system is powered off and unplugged.
- የ BIOS ዝመናዎች; ASRockን በየጊዜው ያረጋግጡ website for BIOS updates. BIOS updates can improve system stability, compatibility, and performance. Follow the update instructions carefully to avoid system damage.
- የአካላት ፍተሻዎች፡- Ensure all cables are securely connected and no components are loose. Check for any signs of physical damage or overheating.
5. መላ መፈለግ
- ምንም ኃይል/ፖስት የለም፡
- Verify all power cables (24-pin ATX, 4-pin 12V) are securely connected.
- ሲፒዩ እና ራም በትክክል መቀመጡን ያረጋግጡ።
- አስፈላጊ በሆኑ ክፍሎች (ሲፒዩ፣ አንድ ራም ዱላ፣ ጂፒዩ የተቀናጀ ግራፊክስ ከሌለ) ብቻ ለማስነሳት ይሞክሩ።
- Clear CMOS by removing the CMOS battery for a few minutes or using the clear CMOS jumper.
- ማሳያ የለም፡
- Ensure the monitor is connected to the correct video output (motherboard's integrated graphics or a dedicated graphics card).
- የመከታተያ ኃይል እና የግቤት ምርጫን ያረጋግጡ።
- If using a dedicated graphics card, ensure it is properly seated and has power.
- ኦፕሬቲንግ ሲስተም አይነሳም;
- Check boot order in BIOS to ensure the correct drive is selected.
- Verify SATA data and power connections to the boot drive.
- Run a diagnostic check on the storage drive.
6. ዝርዝሮች
| ባህሪ | ዝርዝር መግለጫ |
|---|---|
| አምራች | ASRock |
| የሞዴል ቁጥር | 760GM-HDV |
| ቺፕሴት ዓይነት | AMD 760G / SB710 |
| ሲፒዩ ሶኬት | AM3 / AM3+ |
| ተስማሚ ፕሮሰሰሮች | AMD Athlon, AMD Sempron (AM3/AM3+ series) |
| RAM ማህደረ ትውስታ ቴክኖሎጂ | DDR3 |
| የራም ማህደረ ትውስታ ከፍተኛው መጠን | 32 ጊባ |
| የማህደረ ትውስታ ሰዓት ፍጥነት | እስከ 3400 ሜኸ (ኦሲ) |
| የተዋሃዱ ግራፊክስ | AMD Radeon HD 3000 (on 760G chipset) |
| የቪዲዮ ውፅዓት ወደቦች | ቪጂኤ፣ DVI፣ HDMI |
| SATA ወደቦች | SATA 3GB/s |
| የዩኤስቢ ወደቦች | USB 2.0 (rear and internal headers) |
| LAN | Gigabit LAN |
| የቅጽ ምክንያት | ማይክሮ ATX |
| ዋና የኃይል አያያዥ | 24-ሚስማር ATX |
| የሲፒዩ ኃይል አገናኝ | 4-pin ATX 12V |
7. ዋስትና እና ድጋፍ
ለዝርዝር የዋስትና መረጃ፣ እባክዎን ከምርትዎ ጋር የተካተተውን የዋስትና ካርድ ይመልከቱ ወይም ኦፊሴላዊውን ASRock ይጎብኙ website. ASRock provides technical support for its products. For assistance, please visit the ASRock support page or contact their customer service department.
ASRock ኦፊሴላዊ Webጣቢያ፡ www.asrock.com


