1. መግቢያ
This manual provides detailed instructions for the installation, operation, and maintenance of the SINOTIMER TM919A-2 LCD Digital Programmable Timer Switch. This device is designed for automatic control of electrical appliances based on programmed time schedules, offering daily and weekly programming options.
2. የምርት ባህሪዎች
- Weekly 7-day programmable digital time switch.
- ባለብዙ ጥራዝtage options (5V, 12V, 24V, 110V, 220V, 85-265V). This specific model is 220V.
- Detachable battery design for backup power.
- 35mm DIN rail mounting for easy installation.
- LCD display for clear time and program viewing
- 16 ON/OFF programs per day or week.
- Manual override function.
- High capacity 16A switching contact.
3. የደህንነት መረጃ
WARNING: Risk of electric shock. Installation should only be performed by a qualified electrician or competent person.
- ከመጫኑ ወይም ከመጠገኑ በፊት ኃይል መቋረጡን ያረጋግጡ።
- Do not exceed the maximum load capacity of 16A.
- ትክክለኛውን ጥራዝ ያረጋግጡtage supply for the specific model (220V for TM919A-2).
- መሳሪያውን ከእርጥበት እና ከከፍተኛ የሙቀት መጠን ያርቁ።
4. ምርት አብቅቷልview እና አካላት
The SINOTIMER TM919A-2 features an LCD display, control buttons, and wiring terminals for power input and load control.

ምስል 4.1፡ ፊት ለፊት view of the SINOTIMER TM919A-2 Digital Timer Switch, showing the LCD display, control buttons (P, D+, H+, M+, RESET, MANUAL), and wiring terminals.

ምስል 4.2፡ The timer switch with its transparent protective cover opened, revealing the control buttons for programming and manual operation.
የመቆጣጠሪያ አዝራሮች;
- ፒ (ፕሮግራም): Enters program setting mode.
- D+ (Day): Adjusts day of the week or program day.
- H+ (Hour): Adjusts hour or program hour.
- M+ (Minute): Adjusts minute or program minute.
- ዳግም አስጀምር ሁሉንም ቅንብሮች ወደ ፋብሪካ ነባሪዎች ዳግም ያስጀምራል።
- መመሪያ፡ Toggles output ON/AUTO/OFF.
5. ማዋቀር እና መጫን
5.1 የሽቦ ዲያግራም
Refer to the wiring diagram on the side of the device and the illustration below for correct connection. Ensure all connections are secure.

ምስል 5.1፡ ጎን view of the timer switch displaying the wiring diagram. Terminals 1 and 2 are for power input (L and N). Terminals 3, 4, and 5 are for the relay output (Common, Normally Open, Normally Closed).
- Terminals 1 & 2 (L, N): Connect to the main power supply (220V AC for this model).
- Terminal 3 (NO - Normally Open): Connects to the load when the timer is ON.
- ተርሚናል 4 (COM - Common): Connects to one side of the load and the power supply.
- Terminal 5 (NC - Normally Closed): Connects to the load when the timer is OFF (less common for typical applications).
5.2 Initial Power-up and Reset
Upon first power-up or after a long period without power, the LCD display may be blank. The internal battery provides backup for settings. If the display is unresponsive or shows garbled characters, press the ዳግም አስጀምር button using a pointed object (e.g., a pen tip). This will clear all settings and restore the timer to its default state.
5.3 የአሁኑን ሰዓት እና ቀን ማቀናበር
- የሚለውን ይጫኑ P አንድ ጊዜ አዝራር። ማሳያው የአሁኑን የጊዜ ቅንብር ያሳያል።
- ተጫን D+ የአሁኑን የሳምንቱን ቀን ለማዘጋጀት.
- ተጫን H+ የአሁኑን ሰዓት ለማዘጋጀት.
- ተጫን M+ የአሁኑን ደቂቃ ለማዘጋጀት.
- የሚለውን ይጫኑ P button again to exit time setting mode and return to normal operation.
6. የአሠራር መመሪያዎች
6.1 የማብራት/የማጥፋት ዑደቶችን ፕሮግራሚንግ
The timer supports up to 16 ON/OFF programs. Each program consists of an ON time and an OFF time.
- የሚለውን ይጫኑ P button repeatedly until "1 ON" appears on the display. This is the first ON program.
- ተጫን D+ to select the day(s) for this program. Options include individual days, weekdays, weekends, or all 7 days.
- ተጫን H+ to set the desired hour for the "ON" event.
- ተጫን M+ to set the desired minute for the "ON" event.
- ተጫን P again. "1 OFF" will appear. This is the first OFF program.
- Repeat steps 2-4 to set the day(s), hour, and minute for the "OFF" event.
- መጫኑን ይቀጥሉ P to cycle through "2 ON", "2 OFF", up to "16 ON", "16 OFF". If you do not need all 16 programs, simply press P until the display returns to the current time.
- To save and exit programming mode, press the P የአሁኑ ጊዜ እስኪታይ ድረስ አዝራሩን ይጫኑ።
6.2 በእጅ መሻር
የ ማንዋል አዝራሩን በመጠቀም የተጫኑትን ቅንብሮች ለጊዜው ወይም በቋሚነት እንዲቀይሩ ያስችልዎታል።
- ተጫን ማንዋል once: Toggles between ON/AUTO/OFF modes.
- በርቷል ፕሮግራሙ ያለማቋረጥ በርቷል፣ ፕሮግራሞችን ችላ ይላል።
- ጠፍቷል ፕሮግራሙ ያለማቋረጥ ይጠፋል፣ ፕሮግራሞችን ችላ ይላል።
- ራስ-ሰር The timer operates according to the programmed ON/OFF cycles. This is the standard operating mode.
7. ጥገና
7.1 የባትሪ መተካት
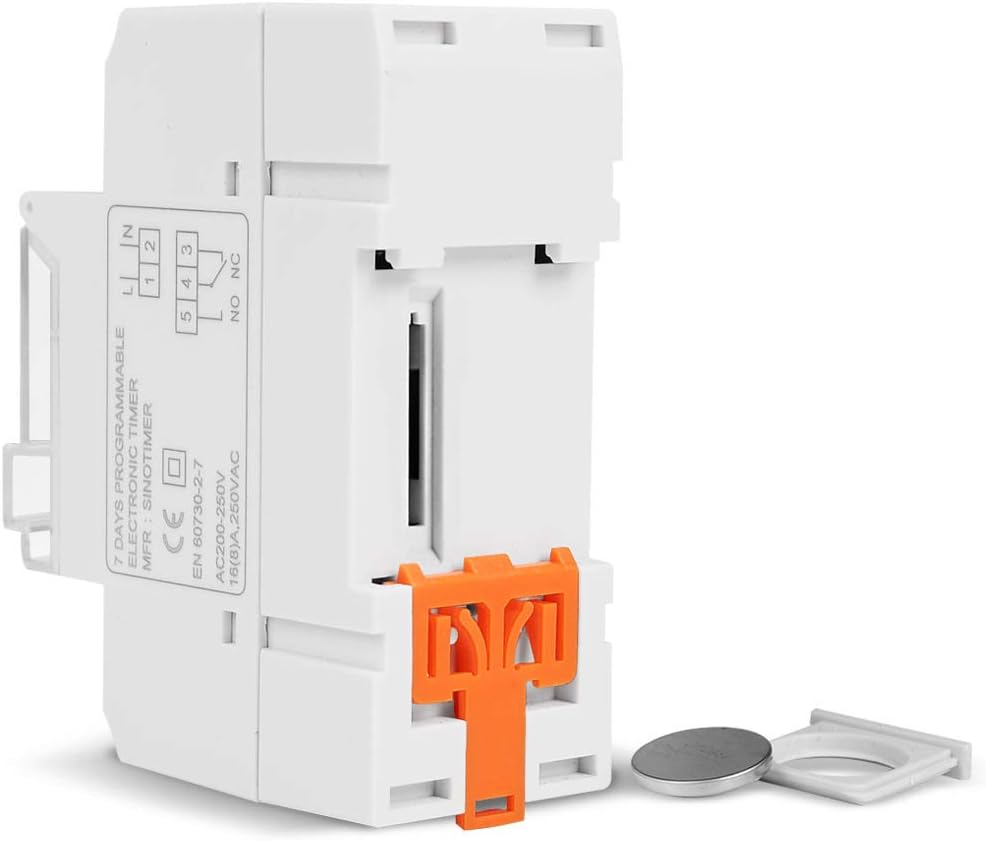
The timer includes a detachable CR2032 lithium battery to maintain time and program settings during power outages. If the display becomes dim or resets frequently, the battery may need replacement.

ምስል 7.1፡ The timer switch shown with its battery compartment open and a CR2032 lithium battery, indicating the detachable battery design.
- Disconnect power to the timer before attempting battery replacement.
- Locate the battery compartment, typically on the side or back of the unit.
- የድሮውን CR2032 ባትሪ በጥንቃቄ ያስወግዱት።
- አዲስ የ CR2032 ባትሪ ያስገቡ፣ ይህም ትክክለኛውን ፖላራይቲ (+ ወደ ላይ) ያረጋግጣል።
- የባትሪውን ክፍል ይዝጉ.
- Reconnect power and reset the current time and day if necessary.
8. መላ መፈለግ
- ማሳያው ባዶ ነው ፦
- Check power supply connections (Terminals 1 & 2).
- Ensure the internal battery is charged or replaced if old.
- የሚለውን ይጫኑ ዳግም አስጀምር አዝራር።
- ፕሮግራሞች እየሰሩ አይደሉም፦
- ሰዓት ቆጣሪው መብራቱን ያረጋግጡ አውቶማቲክ mode (check the display for "AUTO"). Press ማንዋል ወደ ዑደት ሁነታዎች.
- የአሁኑ ሰዓት እና ቀን በትክክል መዋቀሩን ያረጋግጡ።
- የON/OFF ፕሮግራሞች በትክክል መግባታቸውን እና ለተፈለገው ቀን መንቃታቸውን ያረጋግጡ።
- Confirm wiring to the load (Terminals 3, 4, 5) is correct.
- ሰዓት ቆጣሪው ባልተጠበቀ ሁኔታ ዳግም ይጀምራል፦
- The internal battery may be low or depleted. Replace the CR2032 battery.
- Ensure stable power supply to the unit.
9. ዝርዝሮች
| ባህሪ | ዝርዝር መግለጫ |
|---|---|
| ሞዴል | TM919A-2 |
| የኃይል አቅርቦት | 220V AC (as per model) |
| የኃይል ፍጆታ | 4.5 ቪኤ (ከፍተኛ) |
| የሙቀት ክልል | -20 ° ሴ እስከ +50 ° ሴ |
| ማሳያ | LCD |
| Switching Contact | 1 መለወጫ መቀየሪያ |
| ፕሮግራሞች | 16 ON/OFF per day or week |
| ሃይስቴሬሲስ | 2 sec/day (at 25°C) |
| አቅም | 16 ኤ |
| የሰዓት ቆጣሪ ክልል | ከ 1 ደቂቃ እስከ 168 ሰአታት |
| ዝቅተኛው ክፍተት | 1 ደቂቃ |
| Black-out Memory | 60 days (with internal battery) |
| የእቃው ክብደት | 0.15 ኪግ (5.3 አውንስ) |
| በመጫን ላይ | 35 ሚሜ የዲን ባቡር |
| የስክሪን መጠን | 1.2 ኢንች |
ምስል 9.1፡ Dimensional drawing of the SINOTIMER TM919A-2, showing measurements in centimeters for height, width, and depth.
10. ዋስትና እና ድጋፍ
Specific warranty information for the SINOTIMER TM919A-2 is not provided in the product details. For warranty claims or technical support, please contact your retailer or the manufacturer directly. Keep your purchase receipt as proof of purchase.


