1. መግቢያ
Welcome to the user manual for your Ulefone Armor X9 Rugged Phone. This guide provides essential information on setting up, operating, maintaining, and troubleshooting your device. The Ulefone Armor X9 is designed for durability and performance, featuring robust protection and advanced functionalities.
Key features of your Ulefone Armor X9 include:
- IP68/IP69K Grade 360 All Round Protection: አስቸጋሪ አካባቢዎችን ለመቋቋም የተሰራ።
- አንድሮይድ 11 ኦፕሬቲንግ ሲስተም፡- Enjoy the latest Android experience.
- 4GB RAM + 128GB ROM: Ample memory and storage for your applications and data.
- 16MP Triple Rear Camera: ከፍተኛ ጥራት ያላቸውን ፎቶዎች እና ቪዲዮዎች ያንሱ።
- Massive 5580mAh Battery Capacity: የተራዘመ የአጠቃቀም ጊዜ።
- Triple Navigation System: የተሻሻለ የአቀማመጥ ትክክለኛነት።
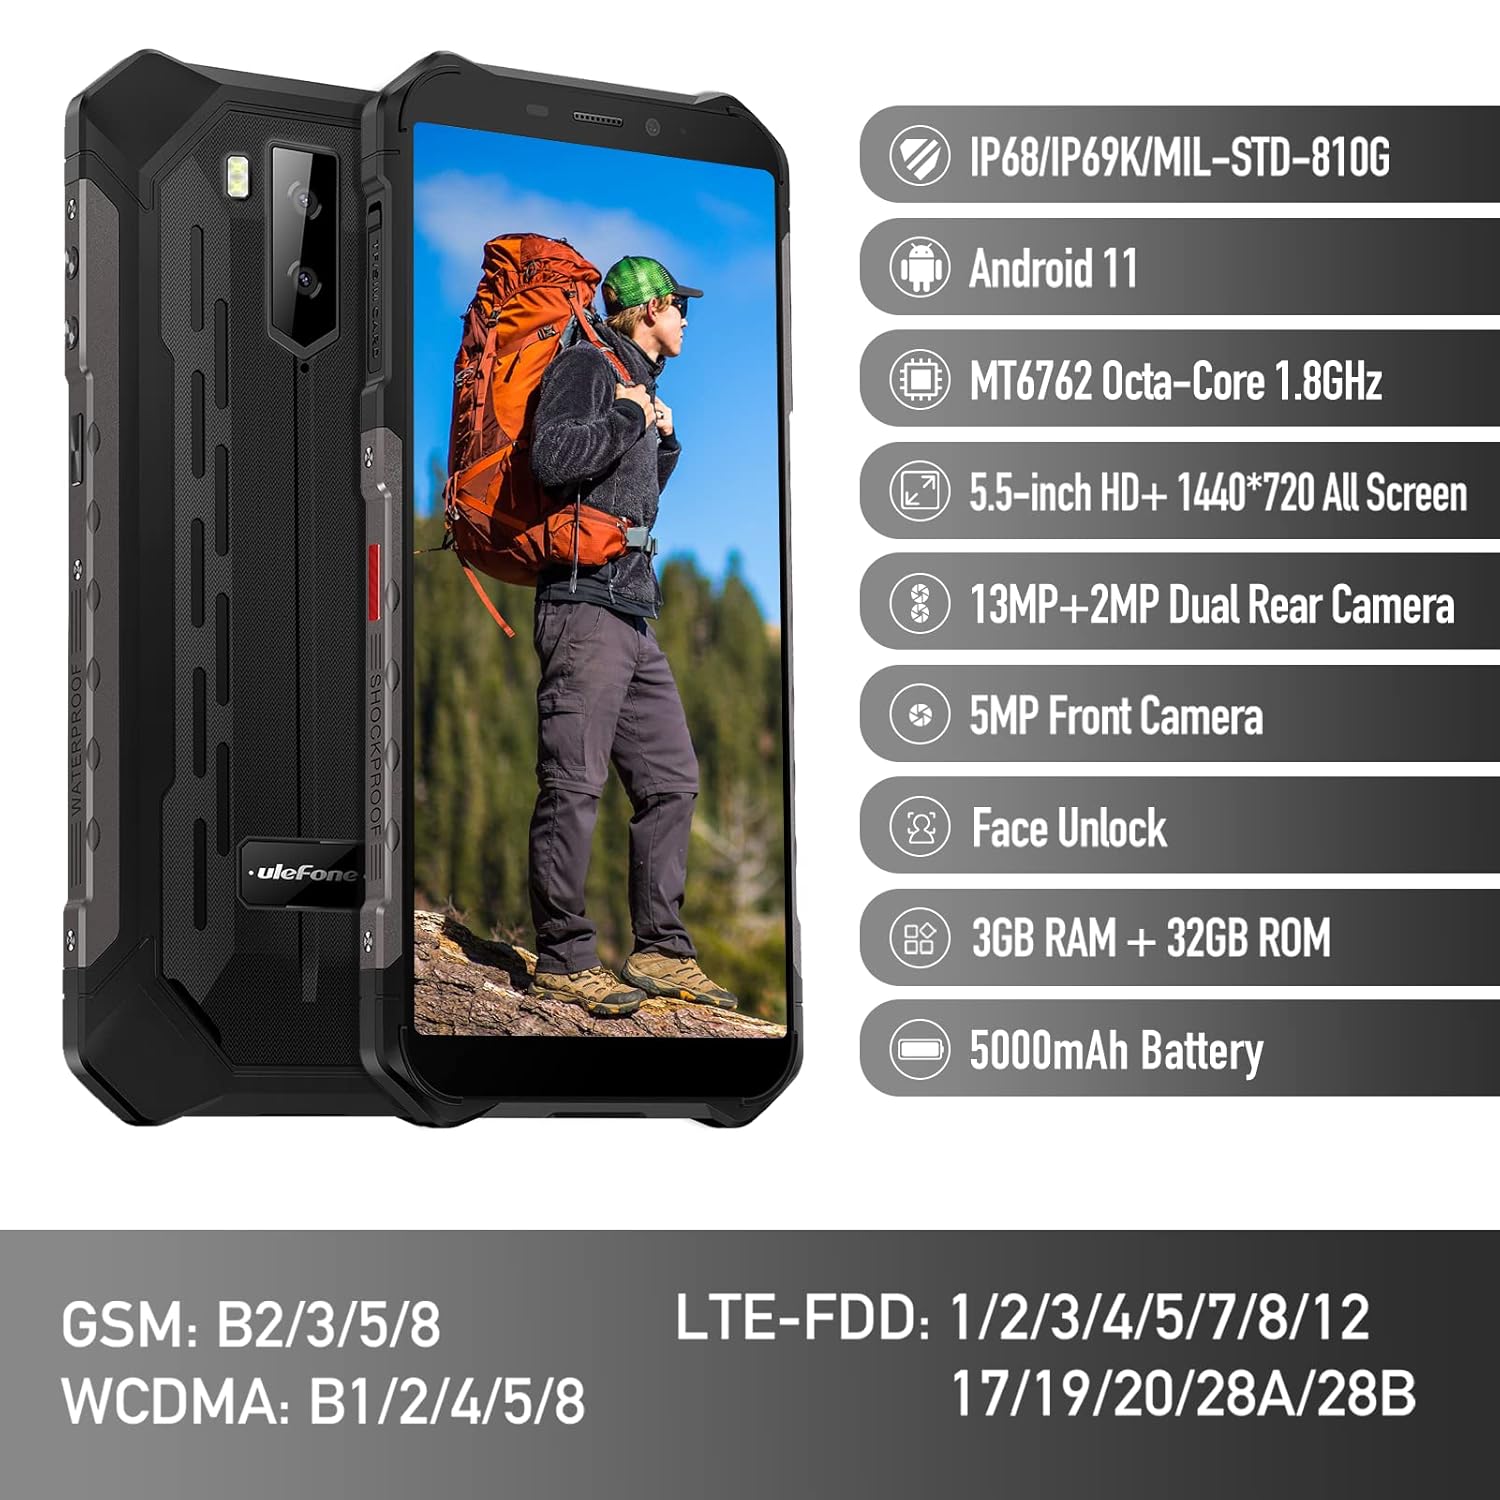
Figure 1: Ulefone Armor X9 Rugged Phone overview, highlighting its robust design and core specifications like IP68/IP69K rating, Android 11, Octa-Core processor, 5.5-inch HD+ screen, 13MP+2MP dual rear camera, 5MP front camera, Face Unlock, 3GB RAM + 32GB ROM, and 5000mAh battery.
2. ማዋቀር
2.1. ሲም ካርድ እና TF ካርድ መጫን
The Ulefone Armor X9 supports dual SIM cards and a TF (microSD) card for expandable storage. Follow these steps to install them:
- የሲም ካርዱን ትሪ ከስልኩ ጎን ያግኙት።
- ትሪውን ለመክፈት የቀረበውን የሲም ማስወጫ መሳሪያ ይጠቀሙ።
- Carefully place your Nano-SIM cards into the designated slots (SIM1 and SIM2).
- If using a TF card, place it into the dedicated TF card slot. Note that some configurations may share a slot between SIM2 and the TF card.
- Gently push the tray back into the phone until it is flush with the device body. Ensure the tray is properly sealed to maintain water and dust resistance.

Figure 2: Illustration of the dual SIM and TF card tray, showing how to insert SIM1, SIM2, and a TF card into the Ulefone Armor X9.
2.2. የመነሻ ኃይል መሙላት
Before first use, it is recommended to fully charge your Ulefone Armor X9. Use the provided USB cable and power adapter.
- የዩኤስቢ ገመዱን በስልክዎ ላይ ካለው የኃይል መሙያ ወደብ ያገናኙ።
- የዩኤስቢ ገመድ ሌላኛውን ጫፍ ከኃይል አስማሚ ጋር ያገናኙ።
- የኃይል አስማሚውን ወደ ግድግዳ መውጫ ይሰኩት.
- የኃይል መሙያ አመልካች በማያ ገጹ ላይ ይታያል። የባትሪው አዶ እስኪሞላ ድረስ ስልኩ እንዲሞላ ይፍቀዱለት።
2.3. ማብራት / ማጥፋት
- ለማብራት፡- Press and hold the Power button (usually on the right side) until the Ulefone logo appears.
- ለማጥፋት፡- የኃይል አማራጮች ምናሌ በማያ ገጹ ላይ እስኪታይ ድረስ የኃይል አዝራሩን ተጭነው ይያዙ። "ፓወር አጥፋ" የሚለውን ይምረጡ እና ያረጋግጡ።
- ዳግም ለመጀመር፡- ከኃይል አማራጮች ምናሌ ውስጥ "ዳግም አስጀምር" ን ይምረጡ እና ያረጋግጡ.
3. የአሠራር መመሪያዎች
3.1. መሰረታዊ ዳሰሳ (አንድሮይድ 11)
Your Ulefone Armor X9 runs on Android 11, offering an intuitive user interface. Common gestures and navigation include:
- ወደ ላይ ያንሸራትቱ የመተግበሪያ መሳቢያውን ይድረሱበት።
- ወደ ታች ያንሸራትቱ፡ የማሳወቂያ ፓነልን ይክፈቱ እና ፈጣን ቅንብሮችን ይክፈቱ።
- መታ ያድርጉ፡ አንድ ንጥል ይምረጡ ወይም መተግበሪያ ይክፈቱ።
- ሎንግ ፕሬስ የአውድ ምናሌዎችን ይድረሱ ወይም አዶዎችን ያንቀሳቅሱ።
- መቆንጠጥ-ለማጉላት፡ ምስሎችን አሳንስ ወይም አሳንስ እና web ገጾች.

Figure 3: Screenshots of the Android 11 interface on the Ulefone Armor X9, showing settings menus, quick toggles, and the sound recorder application.

Figure 4: The 5.5-inch 18:9 All Screen display of the Ulefone Armor X9, showcasing its immersive viewing experience with an image of a skier.
3.2. የካሜራ አጠቃቀም
Your phone is equipped with a 16MP Triple Rear Camera and a Front Camera. To use the camera:
- "ካሜራ" የሚለውን መተግበሪያ ከመነሻ ማያ ገጽዎ ወይም ከመተግበሪያ መሳቢያዎ ይክፈቱ።
- ፎቶ ለማንሳት የመዝጊያ አዝራሩን መታ ያድርጉ።
- እንደ አስፈላጊነቱ በፎቶ እና በቪዲዮ ሁነታዎች መካከል ይቀያይሩ።
- Tap the icon to switch between the front and rear cameras.
- ለተሻለ ውጤት የተለያዩ የካሜራ ሁነታዎችን እና ቅንብሮችን ያስሱ።
3.3. ግንኙነት
The Ulefone Armor X9 supports various connectivity options:
- ዋይ ፋይ፡ ከሚገኙ አውታረ መረቦች ጋር ለመገናኘት ወደ ቅንብሮች > አውታረ መረብ እና ኢንተርኔት > ዋይ ፋይ ይሂዱ።
- ብሉቱዝ፡ Go to Settings > Connected devices > Bluetooth to pair with Bluetooth devices.
- ጂፒኤስ፡ The phone features AGPS for accurate location services. Ensure location services are enabled in Settings > Location.
- ዩኤስቢ፡ Connect your phone to a computer using a USB cable for data transfer or charging.
3.4. የፊት ክፈት
For convenient and secure unlocking, your Ulefone Armor X9 supports Face Unlock:
- ወደ ቅንብሮች > ደህንነት > የፊት ክፈት ይሂዱ።
- ፊትዎን ለመመዝገብ በስክሪኑ ላይ ያሉትን መመሪያዎች ይከተሉ።
- Ensure good lighting and hold the phone at eye level during registration.
- አንዴ ከተመዘገቡ በኋላ፣ የፊት ካሜራውን በመመልከት ስልክዎን መክፈት ይችላሉ።
4. ጥገና
4.1. ጽዳት እና እንክብካቤ
To maintain the performance and appearance of your rugged phone:
- ስክሪኑን እና ገላውን ለስላሳ፣ ከተሸፈነ ጨርቅ ይጥረጉ።
- ለጠንካራ ቆሻሻ በትንሹ መamp ጨርቅ. ኃይለኛ ኬሚካሎችን ወይም ገላጭ ቁሳቁሶችን ያስወግዱ.
- Ensure all port covers are securely closed to maintain water and dust resistance, especially after charging or using headphones.

Figure 5: The Ulefone Armor X9's 360° All Protection Design, showcasing its superior materials and superb durability against impacts and harsh conditions.
4.2. Water and Dust Resistance (IP68/IP69K)
The Ulefone Armor X9 is rated IP68/IP69K, meaning it is resistant to dust and water immersion. However, this resistance is not permanent and may decrease over time with normal wear. To ensure optimal protection:
- Do not intentionally submerge the phone in water for extended periods or beyond specified depths.
- Avoid exposing the phone to high-pressure water or extreme temperatures.
- Ensure all port covers are tightly sealed before exposure to water or dust.
- ስልኩ እርጥብ ከሆነ፣ ባትሪ ከመሙላትዎ ወይም ማንኛውንም ወደቦች ከመክፈትዎ በፊት በደንብ ያድርቁት።
4.3. የባትሪ እንክብካቤ
የ5580mAh ሊቲየም ፖሊመር ባትሪዎን ዕድሜ ለማራዘም፦
- የባትሪውን አፈጻጸም ሊያሳጣው ስለሚችል ከፍተኛ ሙቀትን (ሙቅ ወይም ቀዝቃዛ) ያስወግዱ።
- Use only the original charger and cable or certified compatible accessories.
- ባትሪው በተደጋጋሚ እንዲፈስ አይፍቀዱ. በጣም ዝቅተኛ ደረጃዎች ከመድረሱ በፊት ያስከፍሉት.
5. መላ መፈለግ
If you encounter issues with your Ulefone Armor X9, try the following troubleshooting steps:
5.1. ስልክ አይበራም።
- ባትሪው መሙላቱን ያረጋግጡ። ስልኩን ከቻርጀር ጋር ቢያንስ ለ30 ደቂቃዎች ያገናኙት።
- እንደገና እንዲጀመር ለማስገደድ የኃይል ቁልፉን ለ10-15 ሰከንድ ተጭነው ይቆዩ።
5.2. የመሙላት ጉዳዮች
- Verify that the charging cable and adapter are working correctly. Try a different charger if available.
- የኃይል መሙያ ወደቡ ንጹህ እና ከቆሻሻ የጸዳ መሆኑን ያረጋግጡ።
- Make sure the charging cable is fully inserted into the port. Some rugged phone ports may require a firm connection due to protective covers.
5.3. SIM/TF Card Not Detected
- Ensure the SIM/TF card is correctly inserted into the tray and the tray is fully seated.
- ስልኩን እንደገና ያስጀምሩት።
- Check if the SIM card is active with your network provider.
5.4. App Crashes or Freezing
- ችግር ያለበትን መተግበሪያ ዝጋ እና እንደገና ክፈት።
- የመተግበሪያውን መሸጎጫ እና ዳታ ያጽዱ (ቅንብሮች > መተግበሪያዎች > [የመተግበሪያ ስም] > ማከማቻ እና መሸጎጫ)።
- መተግበሪያው ወደ የቅርብ ጊዜው ስሪት መዘመኑን ያረጋግጡ።
- ስልኩን እንደገና ያስጀምሩት።
5.5. የፋብሪካ ዳግም ማስጀመር
ችግሮቹ ከቀጠሉ፣ የፋብሪካ ዳግም ማስጀመር ሊፈታ ይችላል። ማስጠንቀቂያ፡ ይህ በስልክዎ ላይ ያለውን ሁሉንም ውሂብ ይሰርዛል። ከመቀጠልዎ በፊት አስፈላጊ ውሂብን ያስቀምጡ።
- ወደ ቅንብሮች> ስርዓት> ዳግም አስጀምር አማራጮች ይሂዱ።
- "ሁሉንም ውሂብ አጥፋ (የፋብሪካ ዳግም ማስጀመር)" ን ይምረጡ።
- ውሳኔዎን ያረጋግጡ እና ከተጠየቁ የእርስዎን ፒን/ይለፍ ቃል ያስገቡ።
6. ዝርዝሮች
Below are the detailed specifications for the Ulefone Armor X9:

Figure 6: Details of the Ulefone Armor X9's Octa-Core Processor, highlighting its power-efficient yet powerful performance, along with 3GB RAM and 32GB ROM, and support for up to 256GB TF card extendable storage.
| ባህሪ | ዝርዝር መግለጫ |
|---|---|
| ስርዓተ ክወና | አንድሮይድ 11.0 |
| ራም | 3 ጊባ (Note: Feature bullets mention 4GB RAM, please verify actual model) |
| የማህደረ ትውስታ ማከማቻ አቅም | 32 ጊባ (Expandable with TF card up to 256GB. Feature bullets mention 128GB ROM, please verify actual model) |
| የሲፒዩ ሞዴል | MT6762 Octa-ኮር 1.8GHz (Note: Specifications list 'Snapdragon', but image indicates MT6762. Please verify actual model) |
| የምርት ልኬቶች | 15.8 x 7.75 x 1.38 ሴ.ሜ |
| የእቃው ክብደት | 472 ግ |
| ባትሪዎች | 1 ሊቲየም ፖሊመር ባትሪ (5580mAh፣ ተካትቷል) |
| የገመድ አልባ ግንኙነት | Cellular, Bluetooth, USB, Wi-Fi |
| ጂፒኤስ | AGPS |
| ልዩ ባህሪያት | Rear Camera, Face Unlock, IP68/IP69K, MIL-STD-810G |
| ማሳያ | 5.5-inch HD+ 1440*720 All Screen |
| የኋላ ካሜራ | 13MP+2MP Dual Rear Camera (Note: Feature bullets mention 16MP Triple Rear Camera, please verify actual model) |
| የፊት ካሜራ | 5 ሜፒ የፊት ካሜራ |
| ቀለም | ጥቁር |
| አምራች | ኡሌፎን |
Note: Specifications are based on available product data and may vary slightly. Please refer to your product packaging for the most accurate information. There are discrepancies between feature bullets, specifications, and image text regarding RAM, ROM, CPU, and camera megapixels. This manual uses the most frequently cited or detailed information, with notes for clarification.
7. ዋስትና እና ድጋፍ
7.1. የዋስትና መረጃ
Your Ulefone Armor X9 is covered by a manufacturer's warranty. The specific terms and duration of the warranty may vary by region and retailer. Please refer to the warranty card included in your product packaging or contact your point of purchase for detailed information regarding warranty coverage and claims.
7.2. የደንበኛ ድጋፍ
For technical assistance, troubleshooting beyond this manual, or warranty inquiries, please contact Ulefone customer support or your authorized dealer. You can typically find contact information on the official Ulefone webጣቢያ ወይም በምርትዎ ሰነድ ውስጥ።
- Visit the official Ulefone website for FAQs, software updates, and support contact details.
- ድጋፍ ሰጪን ሲያነጋግሩ የግዢ ደረሰኝዎን እና የምርት መለያ ቁጥርዎን በእጅዎ ያስቀምጡ።


