1. መግቢያ
This manual provides detailed instructions for the installation, operation, and maintenance of the Supermicro X13SEI-F Server Motherboard. This motherboard is designed for high-performance server applications, supporting Intel Xeon processors with an LGA4677 socket and DDR5 memory.
Please read this manual thoroughly before attempting to install or operate the motherboard to ensure proper setup and to prevent damage to the components.
2. የደህንነት መረጃ
በመሳሪያው ላይ ጉዳት እና ጉዳት እንዳይደርስ ለመከላከል የሚከተሉትን የደህንነት ጥንቃቄዎች ይከተሉ፡
- ማንኛውንም ክፍል ከመጫንዎ ወይም ከማስወገድዎ በፊት የኃይል ገመዱን ሁልጊዜ ከኃይል አቅርቦቱ ያላቅቁ።
- Wear an anti-static wrist strap when handling the motherboard and other components to prevent electrostatic discharge (ESD).
- Ensure the installation environment is dry and free from static electricity.
- ማዘርቦርዱን ለእርጥበት ወይም ለከፍተኛ የሙቀት መጠን አያጋልጡ።
- ስሱ ክፍሎችን ከመንካት ለመቆጠብ የእናትቦርዱን ጠርዝ በጠርዙ ይያዙት።
- ከኃይል ግንኙነቶች ጋር የተያያዙ የተወሰኑ የደህንነት መመሪያዎችን ለማግኘት የኃይል አቅርቦት አሃዱን መመሪያ ይመልከቱ።
3. የጥቅል ይዘቶች
ሁሉም እቃዎች መኖራቸውን እና በጥሩ ሁኔታ ላይ መሆናቸውን ያረጋግጡ። ማንኛውም እቃ ከተበላሸ ወይም ከጠፋ፣ አቅራቢዎን ያነጋግሩ።
- Supermicro X13SEI-F Server Motherboard
- I / O ሺልድ
- የSATA ኬብሎች (መጠኑ ሊለያይ ይችላል)
- Quick Reference Guide / User Manual (this document)
- Driver CD/DVD or USB drive (or download instructions)
4. ምርት አብቅቷልview
The Supermicro X13SEI-F is a high-performance server motherboard featuring the LGA4677 socket, designed to support Intel Xeon Scalable processors. It offers robust memory capabilities with 8 DDR5 DIMM slots, supporting up to 4800MHz memory speed. The board also includes multiple PCIe slots for expansion.
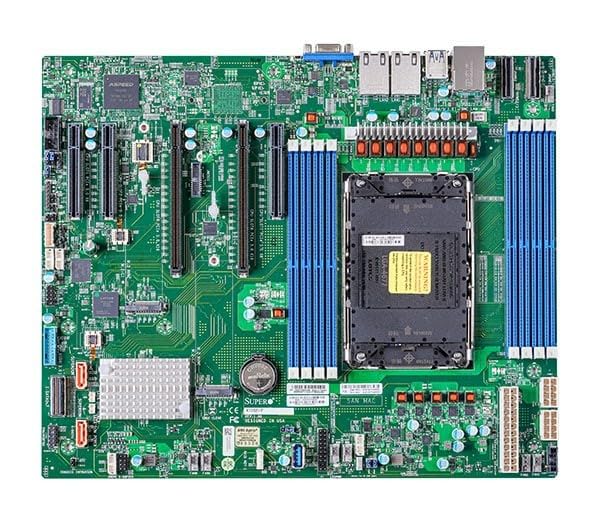
Figure 1: Supermicro X13SEI-F Server Motherboard. This image displays the overall layout of the motherboard, including the CPU socket, DIMM slots, and various connectors.
4.1 ቁልፍ ባህሪያት
- ሲፒዩ ሶኬት LGA4677 for Intel Xeon Scalable Processors
- ቺፕሴት ኢንቴል C621
- ማህደረ ትውስታ፡ 8x DDR5 DIMM slots, up to 4800MHz
- የማስፋፊያ ቦታዎች፡ Multiple PCIe slots (specific configuration depends on model variant)
- ማከማቻ፡ Support for various storage interfaces (SATA, NVMe - specific details in specifications)
- አውታረ መረብ፡ Integrated LAN controllers
5. ማዋቀር እና መጫን
Before beginning installation, ensure your system case is compatible with the motherboard's form factor and that you have all necessary components.
5.1 CPU Installation (LGA4677)
- የ LGA4677 ሶኬት በማዘርቦርድ ላይ ያግኙ።
- Carefully open the CPU socket retention mechanism according to the instructions provided with your CPU or motherboard.
- Align the CPU with the socket, ensuring the triangular mark on the CPU matches the mark on the socket. Do not force the CPU into the socket.
- ሲፒዩን ቀስ ብለው ወደ ሶኬቱ ዝቅ ያድርጉት።
- Close the CPU socket retention mechanism until it locks securely.
- የሲፒዩ ማቀዝቀዣውን በአምራቹ መመሪያ መሰረት ይጫኑ።
5.2 ራም መጫን (DDR5)
- Locate the 8 DDR5 DIMM slots on the motherboard.
- በDIMM ማስገቢያው በሁለቱም ጫፎች ላይ የማቆያ ክሊፖችን ይክፈቱ።
- በዲዲ5 ሜሞሪ ሞጁል ላይ ያለውን የዲኤምኤም ማስገቢያ ቁልፍ ካለው ቁልፍ ጋር አሰልፍ።
- Insert the memory module firmly into the slot until the retention clips snap into place. Ensure both clips are closed.
- For optimal performance, refer to the motherboard's manual for recommended memory population order.
5.3 የ PCIe ካርድ መጫኛ
- Identify the appropriate PCIe slot for your expansion card (e.g., GPU, RAID card).
- ተጓዳኝ የማስፋፊያ ማስገቢያ ሽፋኑን ከቻሲስዎ ያስወግዱ።
- Align the PCIe card with the slot and press down firmly until it is fully seated.
- ካርዱን በዊንች ወይም በማቆያ ክሊፕ ከቻሲስ ጋር ያያይዙት።
5.4 የማከማቻ መሣሪያ ጭነት
- SATA ድራይቮች፡ Connect SATA data cables from the motherboard's SATA ports to your SATA hard drives or SSDs. Connect power cables from the PSU to the drives.
- NVMe M.2 Drives: Locate the M.2 slots. Insert the M.2 drive at an angle, then push it down and secure it with the provided screw or retention mechanism.
5.5 የኃይል ግንኙነቶች
- ባለ 24-ፒን ATX የኃይል ማገናኛን ከኃይል አቅርቦትዎ ወደ ማዘርቦርዱ ዋና የኃይል ሶኬት ያገናኙ።
- Connect the 8-pin (or 4+4 pin) EPS 12V CPU power connector(s) to the corresponding sockets near the CPU.
- ሁሉም የኃይል ግንኙነቶች ደህንነታቸው የተጠበቀ መሆኑን ያረጋግጡ።
5.6 የፊት ፓነል ግንኙነቶች
Connect the front panel cables (Power LED, HDD LED, Power Switch, Reset Switch, USB, Audio) from your chassis to the corresponding headers on the motherboard. Refer to the motherboard's silkscreen labels or the detailed manual for exact pin configurations.
6. የአሠራር መመሪያዎች
6.1 የመጀመሪያ ቡት
- After completing all hardware installations, connect the monitor, keyboard, and mouse.
- Connect the power cord to the power supply and turn on the power switch on the PSU.
- Press the power button on your chassis.
- The system should power on, and you should see the BIOS/UEFI POST screen.
6.2 የባዮስ/UEFI ማዋቀር
የባዮስ/UEFI ማዋቀር መገልገያውን ለማስገባት፣ ይጫኑ ዲኤል or F2 key repeatedly during the POST process. Within the BIOS/UEFI, you can configure:
- የማስነሻ ትእዛዝ
- የስርዓት ጊዜ እና ቀን
- CPU and memory settings
- Storage configurations (RAID, AHCI)
- የደጋፊ ፍጥነት መቆጣጠሪያ
- የደህንነት ቅንብሮች
Save changes before exiting the BIOS/UEFI.
6.3 የስርዓተ ክወና ጭነት
Insert your operating system installation media (USB drive or DVD) and set it as the primary boot device in the BIOS/UEFI. Follow the on-screen instructions to install your preferred operating system. After installation, install all necessary drivers from the Supermicro website or the provided driver media.
7. ጥገና
7.1 ጽዳት
- Regularly clean dust from the motherboard and system components using compressed air.
- ከማጽዳትዎ በፊት ስርዓቱ መብራቱን እና መሰኪያውን ነቅሎ ያረጋግጡ።
- በንጥረ ነገሮች ላይ በቀጥታ ፈሳሽ ማጽጃዎችን ከመጠቀም ይቆጠቡ.
7.2 የጽኑ ዝማኔዎች
ሱፐርማይክሮን በየጊዜው ይፈትሹ website for updated BIOS/UEFI firmware. Firmware updates can improve system stability, performance, and compatibility. Follow the specific instructions provided by Supermicro for updating the firmware to avoid system damage.
8. መላ መፈለግ
ይህ ክፍል ሊያጋጥሙህ ለሚችሉ የተለመዱ ጉዳዮች መፍትሄዎችን ይሰጣል።
8.1 የኃይል አቅርቦት የለም / ፖስት የለም (የራስ-ሙከራ ኃይልን በራስ-ሰር መሞከር)
- የኃይል ግንኙነቶችን ይፈትሹ; Ensure the 24-pin ATX and 8-pin EPS 12V power connectors are securely seated.
- የ PSU ማረጋገጫ፦ የኃይል አቅርቦት አሃዱን (PSU) በሌላ ስርዓት ወይም የPSU ሞካሪ ይሞክሩ።
- ክፍሎችን እንደገና ያስቀምጡ፦ ሲፒዩን፣ ራም ሞጁሎችን እና ማንኛውንም የማስፋፊያ ካርዶችን እንደገና ያዋህዱ።
- CMOS አጽዳ፡ Refer to the motherboard manual for instructions on how to clear the CMOS (Complementary Metal-Oxide-Semiconductor) settings, which can resolve boot issues.
- ዝቅተኛ ውቅር፡ Try booting with only the CPU, one RAM stick, and the necessary power connections.
8.2 ምንም የማሳያ ውጤት የለም
- ግንኙነትን ተቆጣጠር፡ Ensure the monitor is properly connected to the graphics output (either integrated or discrete GPU) and is powered on.
- ግራፊክስ ካርድ፡ If using a discrete graphics card, ensure it is fully seated in its PCIe slot and has all necessary power connectors from the PSU.
- የተዋሃዱ ግራፊክስ; If your CPU supports integrated graphics, try connecting the monitor to the motherboard's video output to rule out a discrete GPU issue.
8.3 ስርዓተ ክወናው አይነሳም
- የማስነሻ ቅደም ተከተል፡ Check the BIOS/UEFI settings to ensure the correct boot device (e.g., SSD, HDD) is selected as the primary boot option.
- Drive Connections: Verify that your storage drives are properly connected (data and power).
- የስርዓተ ክወና ጭነት፡ If the OS is newly installed, ensure the installation process completed successfully and all drivers are installed.
9. ዝርዝሮች
| ባህሪ | ዝርዝር |
|---|---|
| የምርት ስም | ሱፐር ማይክሮ |
| የሞዴል ስም | MBD-X13SEI-F-B |
| ሲፒዩ ሶኬት | LGA 4677 |
| ተስማሚ ፕሮሰሰሮች | Intel Xeon Scalable |
| ቺፕሴት ዓይነት | ኢንቴል C621 |
| RAM ማህደረ ትውስታ ቴክኖሎጂ | DDR5 |
| የማህደረ ትውስታ ፍጥነት | 4800 ሜኸ |
| የራም ስሎቶች | 8x DDR5 DIMM slots |
| የምርት ልኬቶች (LxWxH) | 16 x 12 x 5 ኢንች |
| የእቃው ክብደት | 3.19 ፓውንድ |
| መጀመሪያ የሚገኝ ቀን | ጥር 20 ቀን 2023 |
Note: Specifications are subject to change without notice. For the most current information, please refer to the official Supermicro product page.
10. የዋስትና እና የቴክኒክ ድጋፍ
10.1 የዋስትና መረጃ
Supermicro products are covered by a limited warranty. For detailed warranty terms and conditions, including duration and coverage, please visit the official Supermicro website or consult the warranty card included with your product. Keep your proof of purchase for warranty claims.
10.2 የቴክኒክ ድጋፍ
For technical assistance, driver downloads, BIOS updates, and further product information, please visit the official Supermicro support webጣቢያ፡
https://www.supermicro.com/support
Before contacting support, please have your motherboard model number (MBD-X13SEI-F-B) and serial number ready.


