1. መግቢያ
This manual provides instructions for the safe operation, maintenance, and troubleshooting of your FLEX 24V Brushless Cordless 1/2-Inch Hammer Drill Turbo Mode Kit, model FX1271T-2B. Please read this manual thoroughly before using the tool to ensure proper and safe operation.
The FLEX FX1271T-2B is a powerful 24V brushless cordless hammer drill designed for demanding drilling and driving applications. It features a 1/2-inch full-metal ratcheting chuck, two-speed settings, a Turbo Mode for increased speed, and an anti-kickback safety feature. This kit includes the drill, a 2.5Ah Lithium-Ion Battery, a 5.0Ah Lithium-Ion Battery, and a 160W Fast Charger.
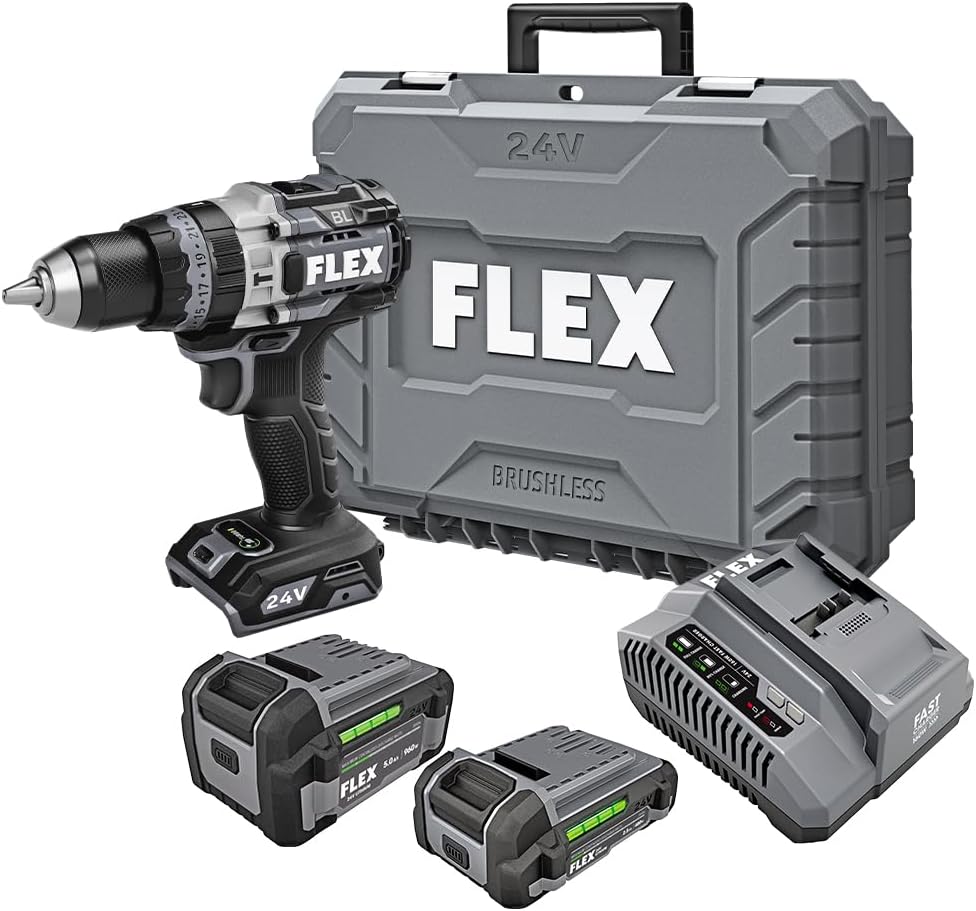
Figure 1: FLEX 24V Brushless Cordless 1/2-Inch Hammer Drill Kit (FX1271T-2B) including drill, two batteries, charger, and carrying case.
2. አጠቃላይ የደህንነት መመሪያዎች
ማስጠንቀቂያ፡ ሁሉንም የደህንነት ማስጠንቀቂያዎች፣ መመሪያዎችን፣ ምሳሌዎችን እና ከዚህ የሃይል መሳሪያ ጋር የቀረቡ ዝርዝሮችን ያንብቡ። ከዚህ በታች የተዘረዘሩትን ሁሉንም መመሪያዎች አለመከተል የኤሌክትሪክ ንዝረት, የእሳት አደጋ እና / ወይም ከባድ ጉዳት ሊያስከትል ይችላል.
2.1 የስራ አካባቢ ደህንነት
- የስራ ቦታን ንፁህ እና በደንብ ያብሩ። የተዝረከረኩ ወይም ጨለማ ቦታዎች አደጋዎችን ይጋብዛሉ።
- እንደ ተቀጣጣይ ፈሳሾች፣ ጋዞች ወይም አቧራ ባሉ ፈንጂዎች ውስጥ የኃይል መሳሪያዎችን አይጠቀሙ። የኃይል መሳሪያዎች አቧራውን ወይም ጭሱን ሊያቀጣጥሉ የሚችሉ ብልጭታዎችን ይፈጥራሉ.
- የኤሌክትሪክ መሳሪያ በሚሰሩበት ጊዜ ልጆችን እና ተመልካቾችን ያርቁ። ትኩረትን የሚከፋፍሉ ነገሮች መቆጣጠር እንዲችሉ ሊያደርግዎት ይችላል.
2.2 የኤሌክትሪክ ደህንነት
- የኃይል መገልገያ መሰኪያዎች ከመውጫው ጋር መዛመድ አለባቸው. በምንም መንገድ መሰኪያውን በጭራሽ አይቀይሩት። ምንም አይነት አስማሚ መሰኪያዎችን በመሬት ላይ (መሬት ላይ ያለው) የሃይል መሳሪያዎች አይጠቀሙ። ያልተስተካከሉ መሰኪያዎች እና ተዛማጅ ማሰራጫዎች የኤሌክትሪክ ንዝረት አደጋን ይቀንሳሉ.
- እንደ ቱቦዎች፣ ራዲያተሮች፣ ሬንጅዎች እና ማቀዝቀዣዎች ካሉ በመሬት ላይ ካሉ ወይም መሬት ላይ ካሉ ነገሮች ጋር የሰውነት ንክኪን ያስወግዱ። ሰውነትዎ መሬት ላይ ወይም መሬት ላይ ከሆነ የኤሌክትሪክ ንዝረት የመጋለጥ እድሉ ይጨምራል።
- የኤሌክትሪክ መሳሪያዎችን ለዝናብ እና እርጥብ ሁኔታዎች አያጋልጡ. ውሃ ወደ ሃይል መሳሪያ መግባቱ የኤሌክትሪክ ንዝረት አደጋን ይጨምራል።
2.3 የግል ደህንነት
- ሁልጊዜ የዓይን መከላከያ ይልበሱ. የደህንነት መነጽሮችን፣ መነጽሮችን ወይም የፊት መከላከያን ይጠቀሙ።
- መሣሪያውን ለረጅም ጊዜ ሲጠቀሙ የመስሚያ መከላከያ ይልበሱ።
- በትክክል ይለብሱ. ልቅ ልብስ ወይም ጌጣጌጥ አይለብሱ። ጸጉርዎን እና ልብሶችዎን ከሚንቀሳቀሱ ክፍሎች ያርቁ.
- ነቅተው ይቆዩ፣ ምን እየሰሩ እንደሆነ ይመልከቱ፣ እና የሃይል መሳሪያ በሚጠቀሙበት ጊዜ አስተዋይነት ይጠቀሙ።
2.4 የመሳሪያ አጠቃቀም እና እንክብካቤ
- የኃይል መሣሪያውን አያስገድዱ. ለትግበራዎ ትክክለኛውን የኃይል መሣሪያ ይጠቀሙ።
- ማናቸውንም ማስተካከያዎችን ከማድረግዎ, መለዋወጫዎችን ከመቀየርዎ ወይም የኃይል መሳሪያዎችን ከማጠራቀምዎ በፊት የባትሪውን መያዣ ከኃይል መሳሪያው ያላቅቁት.
- ስራ ፈት የኤሌክትሪክ መሳሪያዎችን ህጻናት በማይደርሱበት ቦታ ያከማቹ እና የኃይል መሳሪያውን ወይም እነዚህ መመሪያዎችን የማያውቁ ሰዎች የኃይል መሣሪያውን እንዲሠሩ አይፍቀዱ.
- የኃይል መሳሪያዎችን እና መለዋወጫዎችን ይንከባከቡ. የሚንቀሳቀሱ ክፍሎችን አለመገጣጠም ወይም ማሰር፣የክፍሎቹ መሰባበር እና የኃይል መሣሪያውን አሠራር ሊጎዳ የሚችል ማንኛውንም ሁኔታ ያረጋግጡ።
2.5 የባትሪ መሣሪያ አጠቃቀም እና እንክብካቤ
- በአምራቹ በተጠቀሰው ባትሪ መሙያ ብቻ ይሙሉ. ለአንድ የባትሪ ጥቅል ተስማሚ የሆነ ቻርጀር ከሌላ የባትሪ ጥቅል ጋር ሲጠቀሙ የእሳት አደጋ ሊፈጥር ይችላል።
- የኃይል መሳሪያዎችን በተለየ በተዘጋጁ የባትሪ ጥቅሎች ብቻ ይጠቀሙ። ሌላ ማንኛውንም የባትሪ ጥቅሎችን መጠቀም የአካል ጉዳት እና የእሳት አደጋን ይፈጥራል።
- የባትሪ ጥቅል ጥቅም ላይ በማይውልበት ጊዜ እንደ የወረቀት ክሊፖች፣ ሳንቲሞች፣ ቁልፎች፣ ጥፍር፣ ብሎኖች ወይም ሌሎች ትንንሽ የብረት ነገሮች ከአንዱ ተርሚናል ጋር ግንኙነት ሊፈጥሩ ከሚችሉ ሌሎች የብረት ነገሮች ያርቁ። የባትሪ ተርሚናሎችን አንድ ላይ ማጠር ማቃጠል ወይም እሳት ሊያስከትል ይችላል።
- በአሰቃቂ ሁኔታዎች ውስጥ ፈሳሽ ከባትሪው ሊወጣ ይችላል; ግንኙነትን ያስወግዱ. ግንኙነቱ በድንገት ከተከሰተ በውሃ ያጠቡ። ፈሳሽ ዓይኖችን የሚነካ ከሆነ, በተጨማሪ የሕክምና እርዳታ ይፈልጉ. ከባትሪው የሚወጣ ፈሳሽ ብስጭት ወይም ማቃጠል ሊያስከትል ይችላል።
3. አካላት ተካትተዋል
Your FLEX 24V Brushless Cordless 1/2-Inch Hammer Drill Kit (FX1271T-2B) includes the following items:
- FLEX 24V Brushless Cordless 1/2-Inch Hammer Drill
- (1) FLEX 24V 2.5Ah Lithium-Ion Battery (FX0111-1)
- (1) FLEX 24V 5.0Ah Lithium-Ion Battery (FX0121-1)
- FLEX 160W Fast Charger
- ረዳት እጀታ
- መያዣ

Figure 2: The FLEX Advantage highlights the included 2.5Ah and 5.0Ah Lithium-Ion batteries, emphasizing their power, runtime, and fast charging capabilities.
4. ማዋቀር እና የመጀመሪያ አጠቃቀም
4.1 ባትሪውን መሙላት
- Connect the 160W Fast Charger to a standard power outlet.
- ወደ ቦታው ጠቅ እስኪያደርግ ድረስ የባትሪውን ጥቅል ወደ ቻርጅ መሙያው ያንሸራትቱ።
- The charger's indicator lights will show the charging status. A fully charged battery will be indicated by a solid green light.
- አንዴ ሙሉ ኃይል ከሞላ በኋላ ባትሪውን ከኃይል መሙያው ላይ ያስወግዱት።
4.2 ባትሪውን መጫን
- Align the battery pack with the battery port on the base of the drill handle.
- ባትሪውን ደህንነቱ በተጠበቀ ሁኔታ እስኪቆለፍ ድረስ ወደ ፖርት ውስጥ ያንሸራትቱት። በስራ ወቅት ድንገተኛ መውረድን ለመከላከል ሙሉ በሙሉ መቀመጡን ያረጋግጡ።
- To remove the battery, press the release button(s) on the sides of the battery pack and slide it out.
4.3 ረዳት እጀታውን በማያያዝ
For improved control and safety, especially during high-torque applications or hammer drilling, attach the auxiliary handle.
- ረዳት እጀታውን ይፍቱ clamp በተቃራኒ ሰዓት አቅጣጫ በማዞር.
- Slide the handle over the front of the drill body, positioning it to your preferred angle.
- የ clamp by rotating it clockwise until the handle is securely fastened.

Figure 3: The drill with the auxiliary handle attached, providing enhanced control and stability, particularly when the anti-kickback feature engages.
4.4 Installing Drill Bits or Accessories
- ለደህንነት ሲባል መሰርሰሪያው መጥፋቱን እና ባትሪው መወገዱን ያረጋግጡ።
- Grip the rear collar of the 1/2-inch full-metal ratcheting chuck and rotate the front collar counter-clockwise to open the chuck jaws.
- የመቆፈሪያውን ቢት ወይም መለዋወጫ ሙሉ በሙሉ ወደ ቹክ መንጋጋ ውስጥ ያስገቡ።
- Rotate the front collar clockwise to tighten the chuck jaws firmly around the bit. The ratcheting mechanism will provide an audible click when securely tightened.
- Gently pull on the bit to ensure it is properly secured.

Figure 4: Detail of the 1/2-inch full-metal ratcheting chuck, designed for secure bit retention and durability.
5. የአሠራር መመሪያዎች
5.1 ማብራት / ማጥፋት እና ፍጥነት መቆጣጠር
- ቀስቅሴ መቀየሪያ፡- Squeeze the trigger switch to turn the drill on. Release it to turn the drill off.
- ተለዋዋጭ ፍጥነት The trigger switch is pressure-sensitive, allowing for variable speed control. Pressing the trigger further increases the speed.
- ወደፊት/ተገላቢጦሽ መራጭ፡ Located above the trigger, push the selector left for forward rotation (drilling/driving) and right for reverse rotation (removing screws). Center position locks the trigger for safety.
5.2 Gear Selection (2-Speed)
The drill features a 2-speed gearbox for optimal performance across various applications.
- ማርሽ 1 (ዝቅተኛ ፍጥነት፣ ከፍተኛ ቶርኬ): Slide the gear selector switch to position '1'. Ideal for driving screws, drilling large holes, or applications requiring maximum torque.
- ማርሽ 2 (ከፍተኛ ፍጥነት፣ ዝቅተኛ ቶርኬ): Slide the gear selector switch to position '2'. Suitable for fast drilling of smaller holes in wood or metal.
NOTE: Always ensure the drill is stopped before changing gear settings to prevent damage to the gearbox.
5.3 Mode Selection (Drill, Drive, Hammer Drill)
Rotate the collar behind the chuck to select the desired operating mode:
- የመቆፈሪያ ሁነታ (የመቆፈሪያ አዶ)፦ For drilling holes in wood, metal, and plastics.
- Drive Mode (Screw Icon): For driving screws. The clutch settings (numbered ring) allow you to adjust the torque to prevent over-driving screws or damaging materials.
- የመዶሻ መሰርሰሪያ ሁነታ (የመዶሻ አዶ)፦ For drilling into masonry, brick, and concrete. This mode combines rotary action with a hammering motion.
5.4 ቱርቦ ሁነታ
The Turbo Mode button, located on top of the drill, provides an immediate increase in speed for faster results when needed.
- የሚለውን ይጫኑ ቱርቦ button during operation to engage maximum speed.
- Release the button to return to the previously selected speed setting.

Figure 5: The Turbo Mode button, when pressed, provides increased speed for rapid task completion.
5.5 Anti-Kickback Feature
The drill is equipped with an advanced anti-kickback braking technology. If the drill bit binds during operation, the system will detect the sudden rotational force and rapidly stop the motor to reduce the risk of kickback and potential injury.
5.6 የተቀናጀ የ LED መብራት
An LED light is integrated into the drill to illuminate the work area, improving visibility in dimly lit conditions. The light activates when the trigger is pressed.

Figure 6: The integrated LED light provides illumination for improved visibility in dark work environments.
5.7 Drilling into Masonry (Hammer Drill Mode)
When drilling into masonry, brick, or concrete:
- Select Hammer Drill Mode.
- Ensure the auxiliary handle is securely attached and held firmly with both hands.
- Use appropriate masonry drill bits.
- Apply steady, firm pressure to the drill, allowing the hammering action to break up the material.

Figure 7: The FLEX hammer drill in action, demonstrating its capability to drill into tough materials with 1,400 in-lbs of torque.
6. ጥገና
6.1 ጽዳት
- ማንኛውንም ጽዳት ወይም ጥገና ከማድረግዎ በፊት ሁልጊዜ የባትሪውን ጥቅል ያላቅቁ።
- ከአየር ማናፈሻ ክፍተቶች አቧራ እና ፍርስራሽ ለማጽዳት ለስላሳ ብሩሽ ወይም የተጨመቀ አየር ይጠቀሙ።
- የመሳሪያውን መኖሪያ በማስታወቂያ ይጥረጉamp ጨርቅ. ኃይለኛ ኬሚካሎችን ወይም ሻካራ ማጽጃዎችን አይጠቀሙ.
- የሹክ መንጋጋዎቹ ንፁህ እና ከቆሻሻ የፀዱ መሆናቸውን ለማረጋገጥ ንፁህ አድርገው ይያዙ።
6.2 ማከማቻ
- Store the tool, batteries, and charger in a cool, dry place, away from direct sunlight and moisture.
- Ensure batteries are partially charged (not fully depleted or fully charged for long-term storage) before storing.
- Store the tool in its carrying case to protect it from damage.
7. መላ መፈለግ
| ችግር | ሊሆን የሚችል ምክንያት | መፍትሄ |
|---|---|---|
| ቁፋሮ አይጀምርም። | ባትሪ አልተሞላም ወይም በአግባቡ አልተጫነም። Forward/Reverse selector in center (locked) position. | ባትሪውን ይሙሉት እና ደህንነቱ በተጠበቀ ሁኔታ መጫኑን ያረጋግጡ። Move selector to forward or reverse position. |
| በሚሠራበት ጊዜ የኃይል ማጣት. | የባትሪ ክፍያ አነስተኛ ነው። ከመጠን በላይ መጫን ጥበቃ ነቅቷል. | ባትሪውን እንደገና ይሙሉ. በመሳሪያው ላይ ያለውን ግፊት ይቀንሱ፤ እንዲቀዘቅዝ ይፍቀዱለት። |
| ቢት በቺክ ውስጥ ይንሸራተታል። | ቻክ በበቂ ሁኔታ አልተጣበቀም። Chuck jaws are dirty or worn. | ሹካውን በጥብቅ አጥብቀው ይዝጉ። ንጹህ ቺክ መንጋጋዎች። ችግሩ ከቀጠለ, ቹክ ምትክ ያስፈልገዋል. |
| ከመጠን በላይ ንዝረት ወይም ድምጽ. | Damaged or bent drill bit. የተበላሹ አካላት. | Replace drill bit. Check for loose screws or parts. If problem persists, discontinue use and contact service. |
8. ዝርዝሮች
| ባህሪ | ዝርዝር |
|---|---|
| የሞዴል ቁጥር | FX1271T-2B |
| ጥራዝtage | 24 ቮልት |
| የቻክ መጠን | 1/2-ኢንች |
| Chuck type | Full-Metal Ratcheting |
| ከፍተኛው Torque | 1400 ኢንች ፓውንድ |
| ከፍተኛው የማዞሪያ ፍጥነት | 2500 ራፒኤም |
| የፍጥነት ብዛት | 2 |
| የባትሪ አቅም (ተካትቷል) | 2.5 Ah, 5.0 Ah Lithium-Ion |
| Charger Type (Included) | 160 ዋ ፈጣን ኃይል መሙያ |
| ልዩ ባህሪያት | Turbo Mode, Anti-Kickback, LED Light, Brushless Motor |
| የእቃው ክብደት | 15.37 ፓውንድ (ኪት) |
| የምርት ልኬቶች | 7.2"L x 4"W x 10"H (Tool) |
| የመቆፈር አቅም (እንጨት) | 2 ኢንች |
| የቁፋሮ አቅም (ብረት) | 2 ኢንች |
9. ዋስትና እና ድጋፍ
9.1 FLEX Limited Lifetime Warranty
This FLEX tool is protected by the FLEX Limited Lifetime Warranty. To qualify for this warranty, you must register your new FLEX tool, battery, or charger within 30 days of purchase through December 31, 2025. Registration can be completed at registermyFLEX.com.
Please refer to the official FLEX website or your product packaging for full terms and conditions of the warranty.
9.2 የደንበኛ ድጋፍ
For technical assistance, replacement parts, or warranty claims, please contact FLEX customer support. Contact information can typically be found on the FLEX official webጣቢያ ወይም በምርት ማሸጊያዎ ላይ።
When contacting support, please have your model number (FX1271T-2B) and purchase date available.


