1. መግቢያ
This manual provides essential information for the safe and efficient operation of your Pretul DESI-36P2 3.6V Cordless Screwdriver. Please read it thoroughly before first use and keep it for future reference. This compact cordless screwdriver is designed for light-duty fastening tasks, featuring a two-position handle and an integrated LED work light.

ምስል 1፡ Pretul DESI-36P2 Cordless Screwdriver. This image shows the screwdriver in its straight configuration, highlighting its compact design and yellow and black color scheme.
2. የደህንነት መረጃ
የእሳት፣ የኤሌክትሪክ ንዝረት እና የግል ጉዳት አደጋን ለመቀነስ የኤሌክትሪክ መሳሪያዎችን ሲጠቀሙ ሁልጊዜ መሰረታዊ የደህንነት ጥንቃቄዎችን ይከተሉ።
- የሥራ አካባቢ ደህንነት; የስራ ቦታዎን ንፁህ እና በደንብ ያብሩት። የተዝረከረኩ ወይም ጨለማ ቦታዎች አደጋዎችን ይጋብዛሉ።
- የኤሌክትሪክ ደህንነት; የኤሌክትሪክ መሳሪያዎችን ለዝናብ እና እርጥብ ሁኔታዎች አያጋልጡ. ውሃ ወደ ሃይል መሳሪያ መግባቱ የኤሌክትሪክ ንዝረት አደጋን ይጨምራል።
- የግል ደህንነት; ነቅተው ይቆዩ፣ ምን እየሰሩ እንደሆነ ይመልከቱ፣ እና የሃይል መሳሪያ በሚጠቀሙበት ጊዜ አስተዋይነት ይጠቀሙ። በሚደክሙበት ጊዜ ወይም በአደንዛዥ እጽ፣ በአልኮል ወይም በመድሃኒት ተጽእኖ ስር እያሉ የኃይል መሳሪያ አይጠቀሙ።
- የመሳሪያ አጠቃቀም እና እንክብካቤ; የኃይል መሣሪያውን አያስገድዱ. ለትግበራዎ ትክክለኛውን የኃይል መሣሪያ ይጠቀሙ። በተሰራበት ፍጥነት ስራውን በተሻለ እና ደህንነቱ የተጠበቀ ያደርገዋል።
- የባትሪ እንክብካቤ በአምራቹ በተጠቀሰው ባትሪ መሙያ ብቻ ይሙሉ. ለአንድ የባትሪ ጥቅል ተስማሚ የሆነ ቻርጀር ከሌላ የባትሪ ጥቅል ጋር ሲጠቀሙ የእሳት አደጋ ሊፈጥር ይችላል።
3. የምርት ክፍሎች እና ባህሪያት
Familiarize yourself with the parts of your Pretul DESI-36P2 cordless screwdriver.
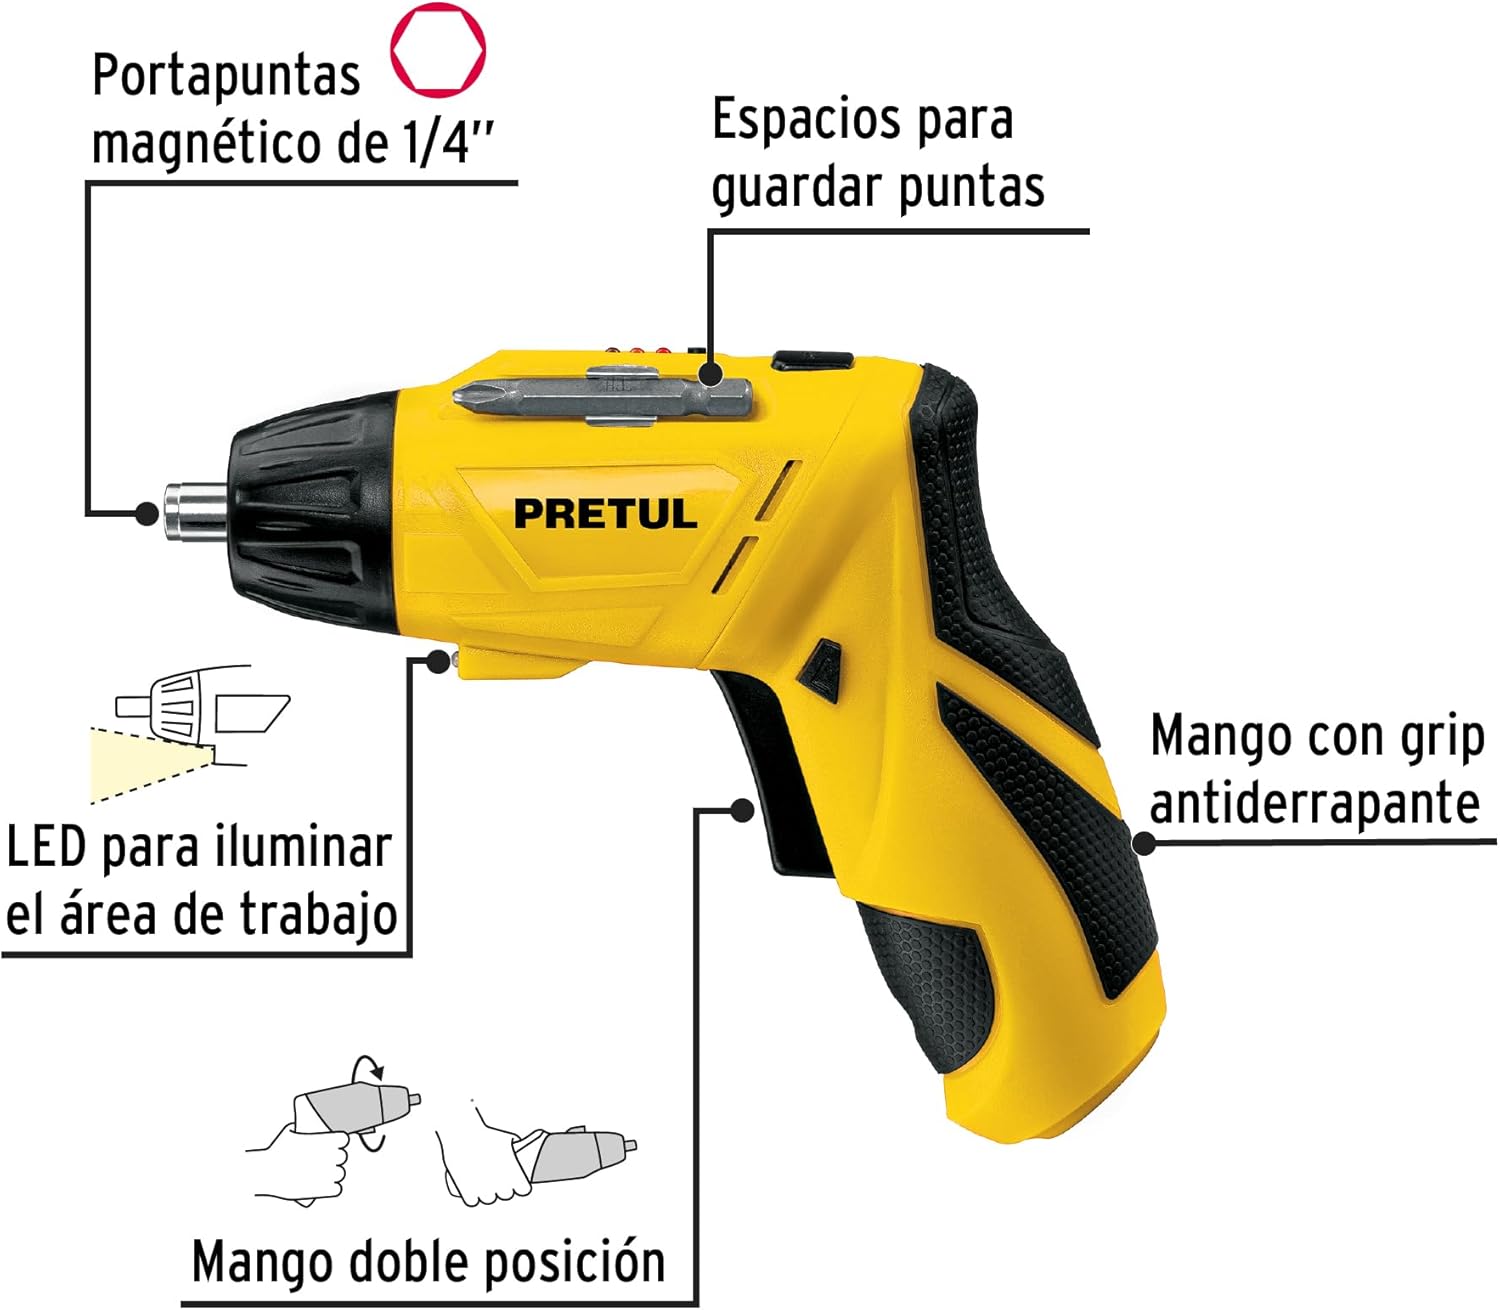
ምስል 2፡ Key features of the Pretul DESI-36P2. This diagram illustrates the magnetic 1/4" bit holder, bit storage slots, anti-slip grip handle, LED work light, and the two-position handle mechanism.
- Magnetic 1/4" Hex Bit Holder: Securely holds screwdriver bits for quick changes.
- Bit Storage Slots: Conveniently located on the tool for storing extra bits.
- Anti-slip Grip Handle: በሚሠራበት ጊዜ ምቹ እና ደህንነቱ የተጠበቀ አያያዝን ይሰጣል።
- የ LED የስራ ብርሃን; Illuminates the work area for improved visibility in dimly lit spaces.
- ባለ ሁለት አቀማመጥ እጀታ፡ Allows the screwdriver to be used in a straight or pistol-grip configuration for versatility and access in tight spaces.
- ወደፊት/ተገላቢጦሽ መቀየሪያ፡- Controls the direction of rotation for tightening and loosening screws.
- የኃይል ቁልፍ፡- ዊንዲውሩን ያነቃቃል።
4. ማዋቀር
4.1 የመጀመሪያ ደረጃ መሙላት
Before first use, fully charge the screwdriver's internal battery. Connect the charger to a standard electrical outlet and then to the charging port on the screwdriver. The charging indicator (if present) will show the charging status. Disconnect the charger once the battery is fully charged.
4.2 የማሽከርከር ቢትስ ማያያዝ
- Select the appropriate 1/4" hex screwdriver bit for your task.
- Insert the bit firmly into the magnetic bit holder at the front of the screwdriver until it is securely seated.
- To remove a bit, simply pull it out from the holder.
4.3 የእጅ መቆጣጠሪያ አቀማመጥን ማስተካከል
The screwdriver features a two-position handle for enhanced versatility:
- የሽጉጥ መያዣ፡ Standard configuration for most tasks.
- ቀጥ ያለ አያያዝ; For reaching into confined spaces. To change the handle position, firmly grasp the handle and the body of the screwdriver, then pivot the handle until it locks into the desired position.
5. የአሠራር መመሪያዎች
5.1 ማብራት / ማጥፋት
Press and hold the power button to activate the screwdriver. Release the button to stop operation. The LED work light will activate when the power button is pressed.
5.2 የማዞሪያ አቅጣጫን መምረጥ
Use the forward/reverse switch, typically located near the trigger, to select the desired rotation direction:
- ወደፊት ለመሽከርከር (የማጥበቂያ ዊንጮችን) ወደ ግራ የሚወስደውን ማብሪያ / ማጥፊያ ይጫኑ።
- ወደ ኋላ ለመዞር (ዊንጮችን የሚፈቱ) ማብሪያ / ማጥፊያውን ወደ ቀኝ ይጫኑ።
- Ensure the switch is in the center position to lock the tool and prevent accidental activation.
5.3 ማሰሪያ ብሎኖች
- Ensure the correct bit is installed and the rotation direction is set to forward.
- Place the bit onto the screw head, applying gentle pressure.
- Press the power button to start driving the screw. Release the button once the screw is fully seated or the desired torque is reached.
5.4 የሚፈታ ብሎኖች
- Ensure the correct bit is installed and the rotation direction is set to reverse.
- Place the bit onto the screw head, applying gentle pressure.
- Press the power button to start loosening the screw. Release the button once the screw is free.
6. ጥገና
መደበኛ ጥገና ጥሩ አፈፃፀምን ያረጋግጣል እና የመሳሪያዎን ዕድሜ ያራዝመዋል።
- ማጽዳት፡ የመሳሪያውን የአየር ማስገቢያ ክፍተቶች ግልጽ እና ከቆሻሻ ነጻ ያድርጉ. ለስላሳ ይጠቀሙ, መamp ውጫዊውን ለማጽዳት ጨርቅ. ኃይለኛ ኬሚካሎችን ወይም ሻካራ ማጽጃዎችን አይጠቀሙ.
- ቢት ያዥ፡ Periodically inspect the bit holder for wear or damage. Clean any accumulated dust or metal shavings.
- የባትሪ ማከማቻ; Store the screwdriver in a cool, dry place away from direct sunlight and extreme temperatures. For long-term storage, ensure the battery is partially charged (around 50%).
- ምርመራ፡- Regularly check for loose screws, damaged cords (if applicable), or any other conditions that may affect safe operation.
7. መላ መፈለግ
If you encounter issues with your screwdriver, refer to the following common problems and solutions:
| ችግር | ሊሆን የሚችል ምክንያት | መፍትሄ |
|---|---|---|
| ስክሪፕድራይቨር አይበራም። | ባትሪ ተለቅቋል። | ባትሪውን ሙሉ በሙሉ ኃይል ይሙሉ። |
| ስክሪፕድራይቨር ኃይል የለውም። | ባትሪ ዝቅተኛ ነው። | ባትሪውን እንደገና ይሙሉ. |
| Bit slips from screw head. | የተሳሳተ የቢት መጠን ወይም የተሸከመ ቢት። | Use the correct bit size; replace worn bits. |
| Handle does not lock into position. | Not fully pivoted. | Ensure the handle is fully pivoted until it clicks into place. |
እነዚህን መፍትሄዎች ከሞከሩ በኋላ ችግሩ ከቀጠለ የደንበኛ ድጋፍን ያነጋግሩ።
8. ዝርዝሮች
Technical specifications for the Pretul DESI-36P2 Cordless Screwdriver.

ምስል 3፡ Dimensions of the Pretul DESI-36P2. This image shows the screwdriver with measurements indicating a length of 17.5 cm and a height of 13 cm.
| ባህሪ | ዝርዝር መግለጫ |
|---|---|
| የሞዴል ቁጥር | DESI-36P2 (26402) |
| የምርት ስም | ፕሪቱል |
| የኃይል ምንጭ | ባትሪ |
| ባትሪ ቁtage | 3.6 ቮልት |
| ፍጥነት | 230 ራፒኤም |
| ቶርክ | 3E+1 Pound-inches (approximately 30 in-lbs) |
| ቢት መያዣ | 1/4" Hex Magnetic |
| ቁሳቁስ | ፕላስቲክ, ብረት |
| መጠኖች (ሰከን x) | 17.5 cm x 13 cm (approximate, based on image) |
| ክብደት | 530 ግ (0.53 ኪግ) |
| የተካተቱ አካላት | 5 Phillips bits 1" (PH1, PH2, PH3), Charger, 2 Phillips bits 2" (PH1, PH2), 1/4" Magnetic extension |
9. ዋስትና እና ድጋፍ
The Pretul DESI-36P2 Cordless Screwdriver comes with a የ 1 ዓመት ዋስትና ከተገዛበት ቀን ጀምሮ. ለዋስትና ጥያቄዎች እባክዎ የግዢ ማረጋገጫዎን ያቆዩ።

ምስል 4፡ Product packaging showing the included components and a "1 year warranty" seal.
For technical support, service, or warranty inquiries, please contact Pretul customer service through their official channels or the retailer where the product was purchased.


