1. የደህንነት መረጃ
Please read and understand all safety instructions before installing or using the MONTECH HS02 PRO PC Case. Failure to follow these instructions may result in damage to the product, personal injury, or voiding of the warranty.
- የኤሌክትሪክ ደህንነት; Ensure all power components are properly grounded and connected. Disconnect power before performing any installation or maintenance.
- አያያዝ፡ The case contains tempered glass panels. Handle with care to prevent breakage. Avoid dropping or subjecting the case to strong impacts.
- የአየር ማናፈሻ; Ensure adequate airflow around the case to prevent overheating. Do not block ventilation openings.
- አካባቢ፡ Operate the case in a dry, stable environment. Avoid extreme temperatures, humidity, and direct sunlight.
- ልጆች እና የቤት እንስሳት; Keep the product and its components out of reach of children and pets. Small parts can be a choking hazard.
2. የጥቅል ይዘቶች
Verify that all items listed below are present in your package. If any items are missing or damaged, please contact Montech customer support.
- MONTECH HS02 PRO ATX Mid-Tower PC Case
- የመለዋወጫ ሣጥን (ዊንጮች፣ ዚፕ ታይቶች፣ ስቶዶፍስ፣ ወዘተ)
- የተጠቃሚ መመሪያ (ይህ ሰነድ)
- Pre-installed GF120 V2 ARGB Fans (5x)
3. ምርት አብቅቷልview
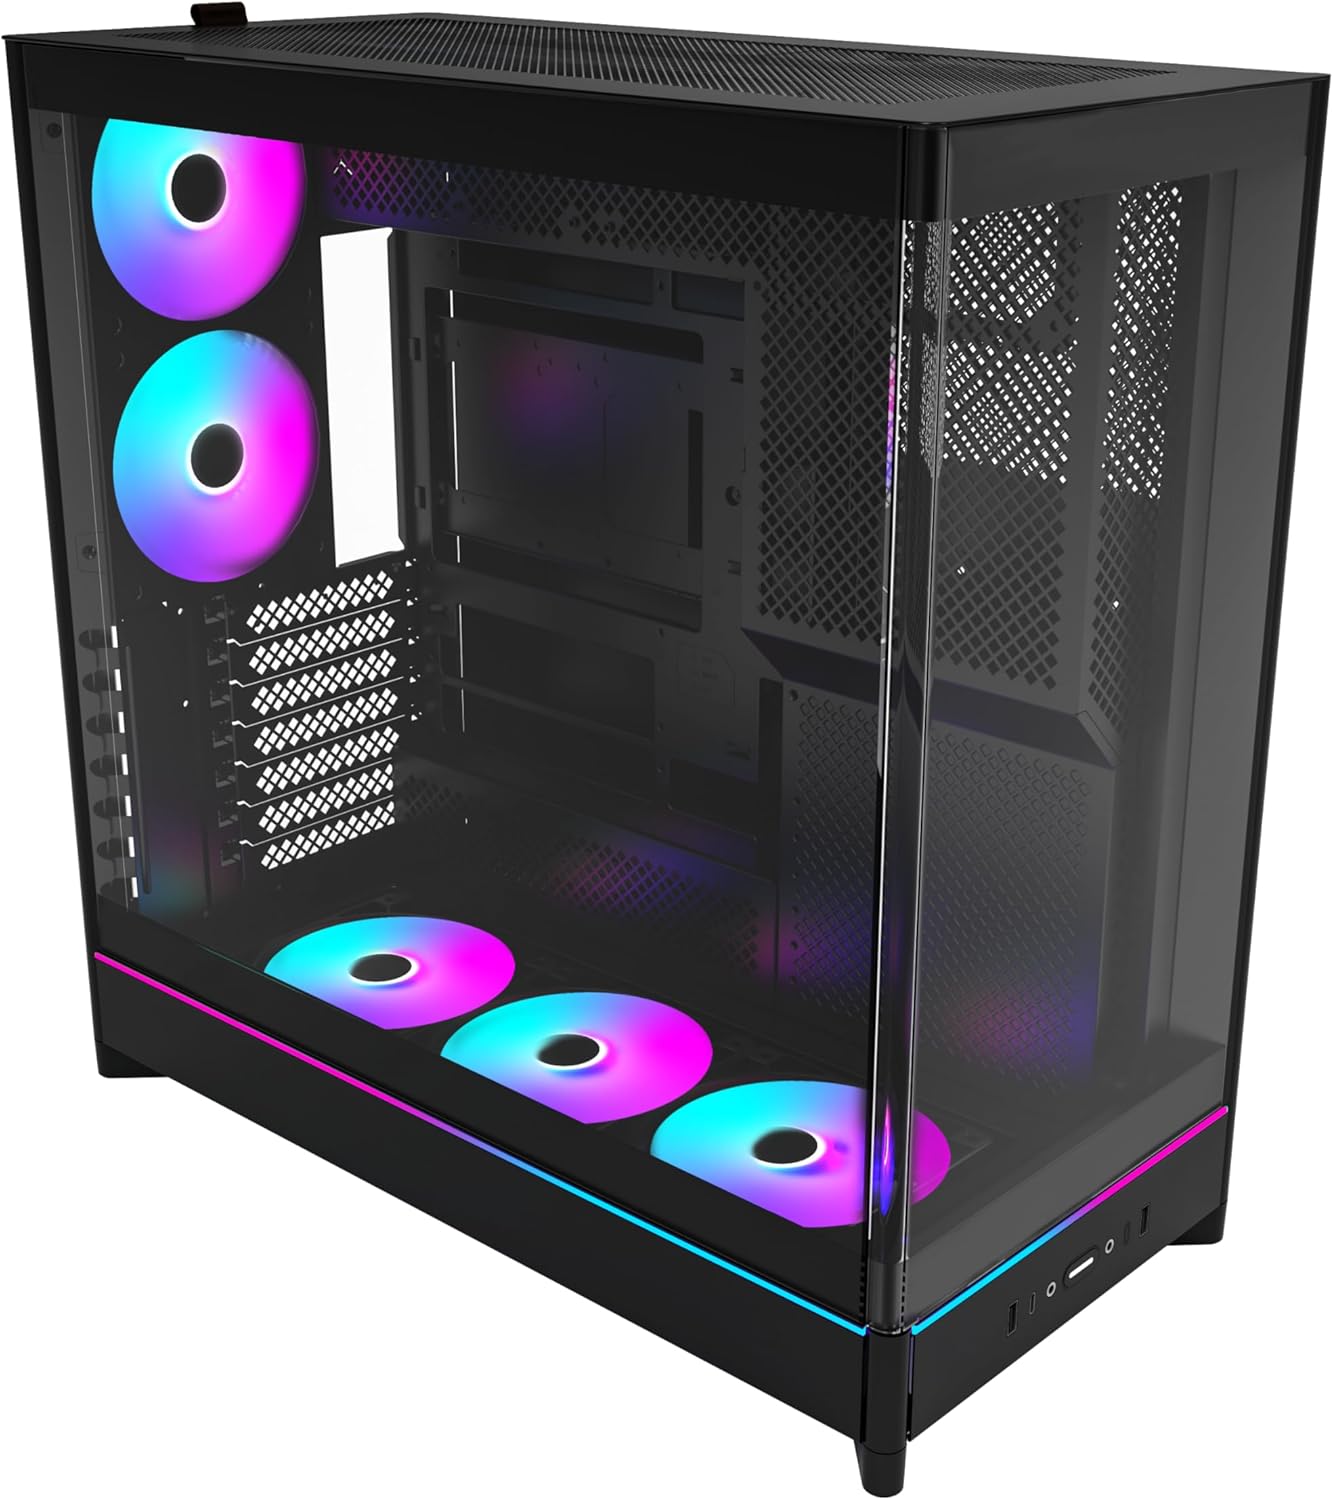
The MONTECH HS02 PRO is a high-airflow ATX mid-tower PC case designed for optimal thermal performance and aesthetic appeal. It features a unique reversible layout and a sturdy curved tempered glass front panel.
ቁልፍ ባህሪዎች
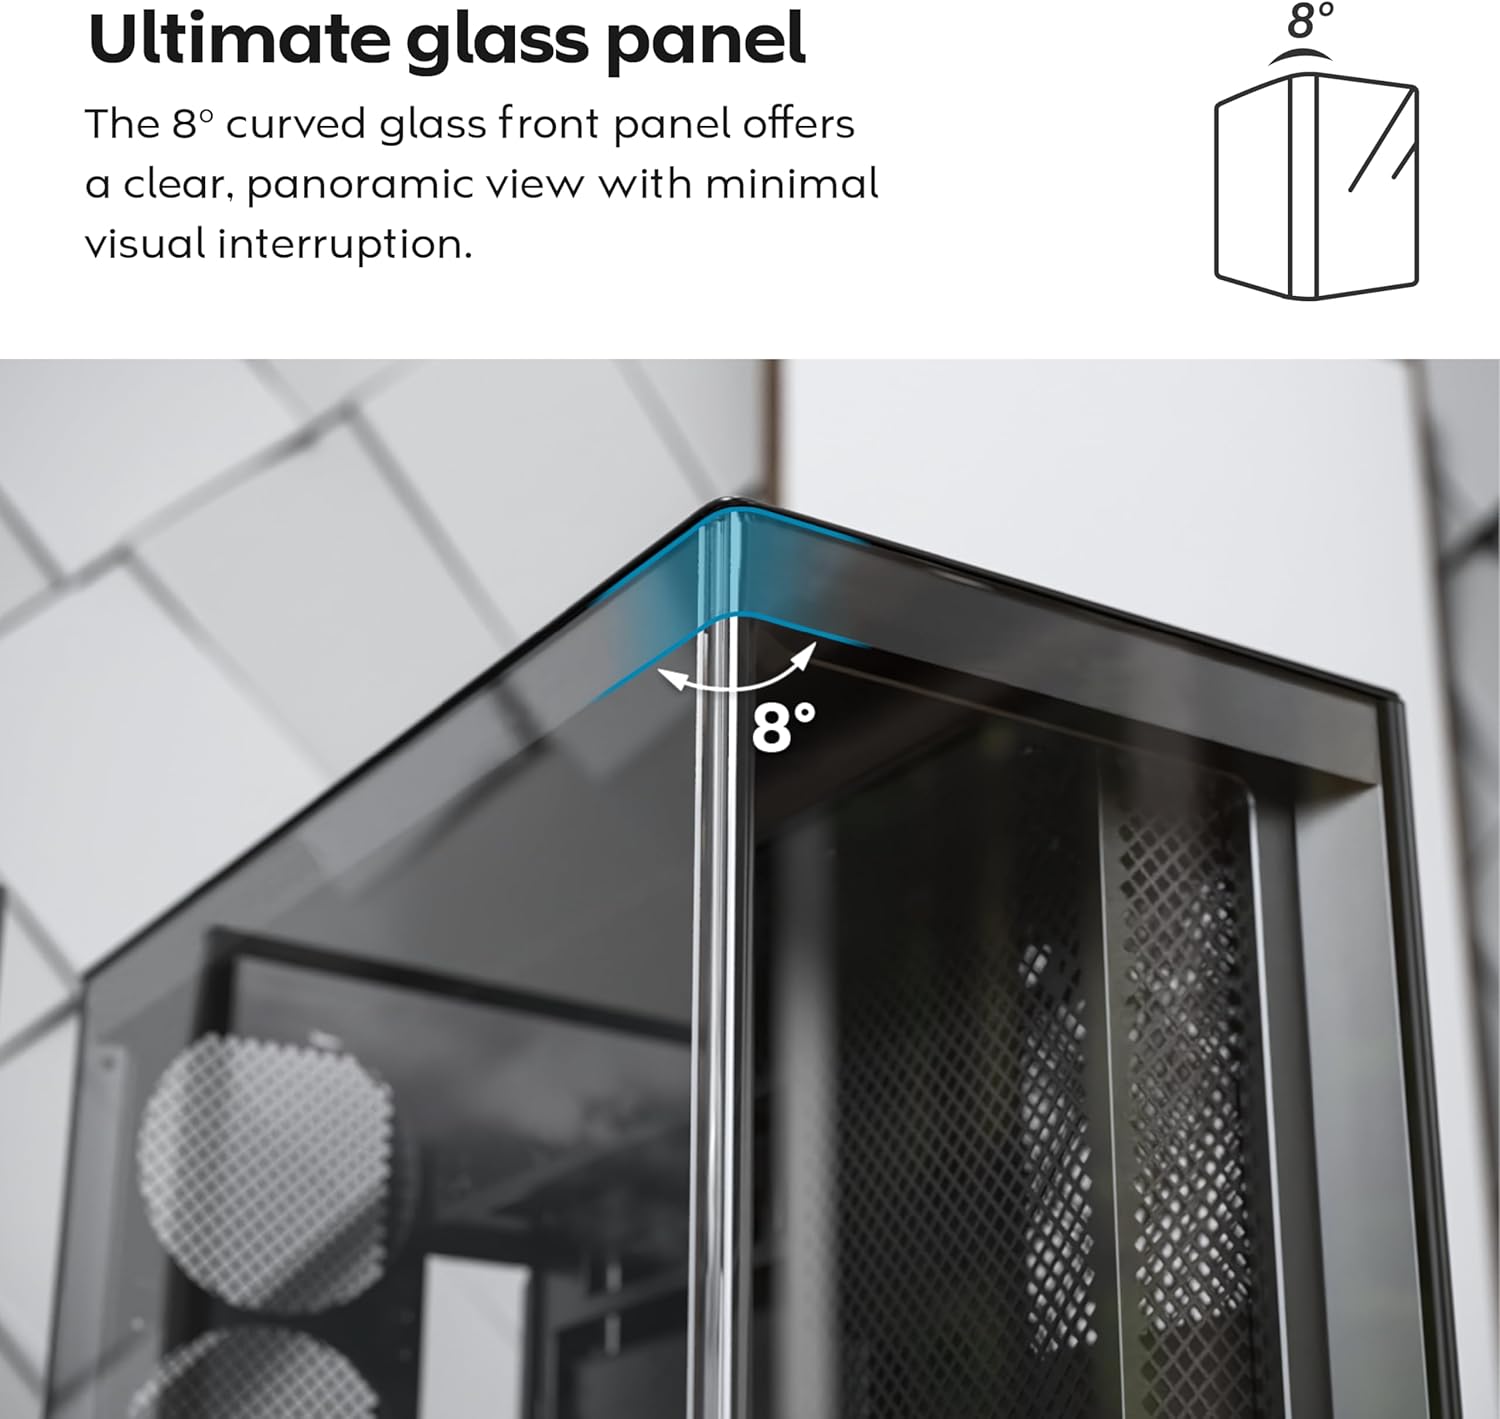
- 8-Degree Curved Glass Panel: The front tempered glass panel features a subtle 8-degree curved edge, offering a distinctive and refined view of the interior with minimal visual distortion.
- ሊቀለበስ የሚችል ንድፍ; A top-down reversible layout allows the entire setup to be positioned on either the left or right side, showcasing your build from your preferred angle.
- Vertical Ventilation: Bottom air intake and top exhaust create a natural chimney effect for efficient heat dissipation.
- አቀባዊ ጂፒዩ ዝግጁ፦ Rotatable PCIe slots enable an instant vertical GPU setup without requiring an extra holder or stand.
- የመታጠቢያ ገንዳ ዲዛይን፡ የታችኛው ማራገቢያ እና የእናትቦርድ አቀማመጥ ንፁህ እና ያልተዘጋ ጎንን ይይዛሉ view.
- ቀድሞ የተጫነ የARGB PWM አድናቂዎች፡ Comes with 5 pre-installed GF120 V2 ARGB fans, fully syncable with motherboard lighting control.
- ለጀርባ-ተያያዥ እናት ሰሌዳ ዝግጁ፡ መደበኛ እና የኋላ ግንኙነት ያላቸውን ማዘርቦርዶች ይደግፋል፣ MSI Project Zero፣ ASUS BTF እና ሌሎችንም ጨምሮ።
- Ampየማከማቻ አቅም፡- Supports multiple storage drives (HDD/SSD) for flexible and expandable storage options.
አካል መለየት፡


4. ማዋቀር እና መጫን
This section provides general guidelines for setting up your MONTECH HS02 PRO PC case. For detailed component-specific instructions, refer to your motherboard, GPU, and PSU manuals.
4.1 ጉዳዩን ማዘጋጀት
- ማሸግ፡ መያዣውን ከማሸጊያው በጥንቃቄ ያስወግዱት። ማንኛውም የመርከብ ጉዳት ካለ ያረጋግጡ።
- የፓነል ማስወገድ; Gently remove the tempered glass side panel and the rear metal side panel. The tempered glass panel is secured with toolless latches.
- መለዋወጫ ሳጥን፡ ሁሉንም አስፈላጊ ብሎኖች እና የመጫኛ ሃርድዌር የያዘውን የመለዋወጫ ሳጥኑን በመያዣው ውስጥ ያግኙ።
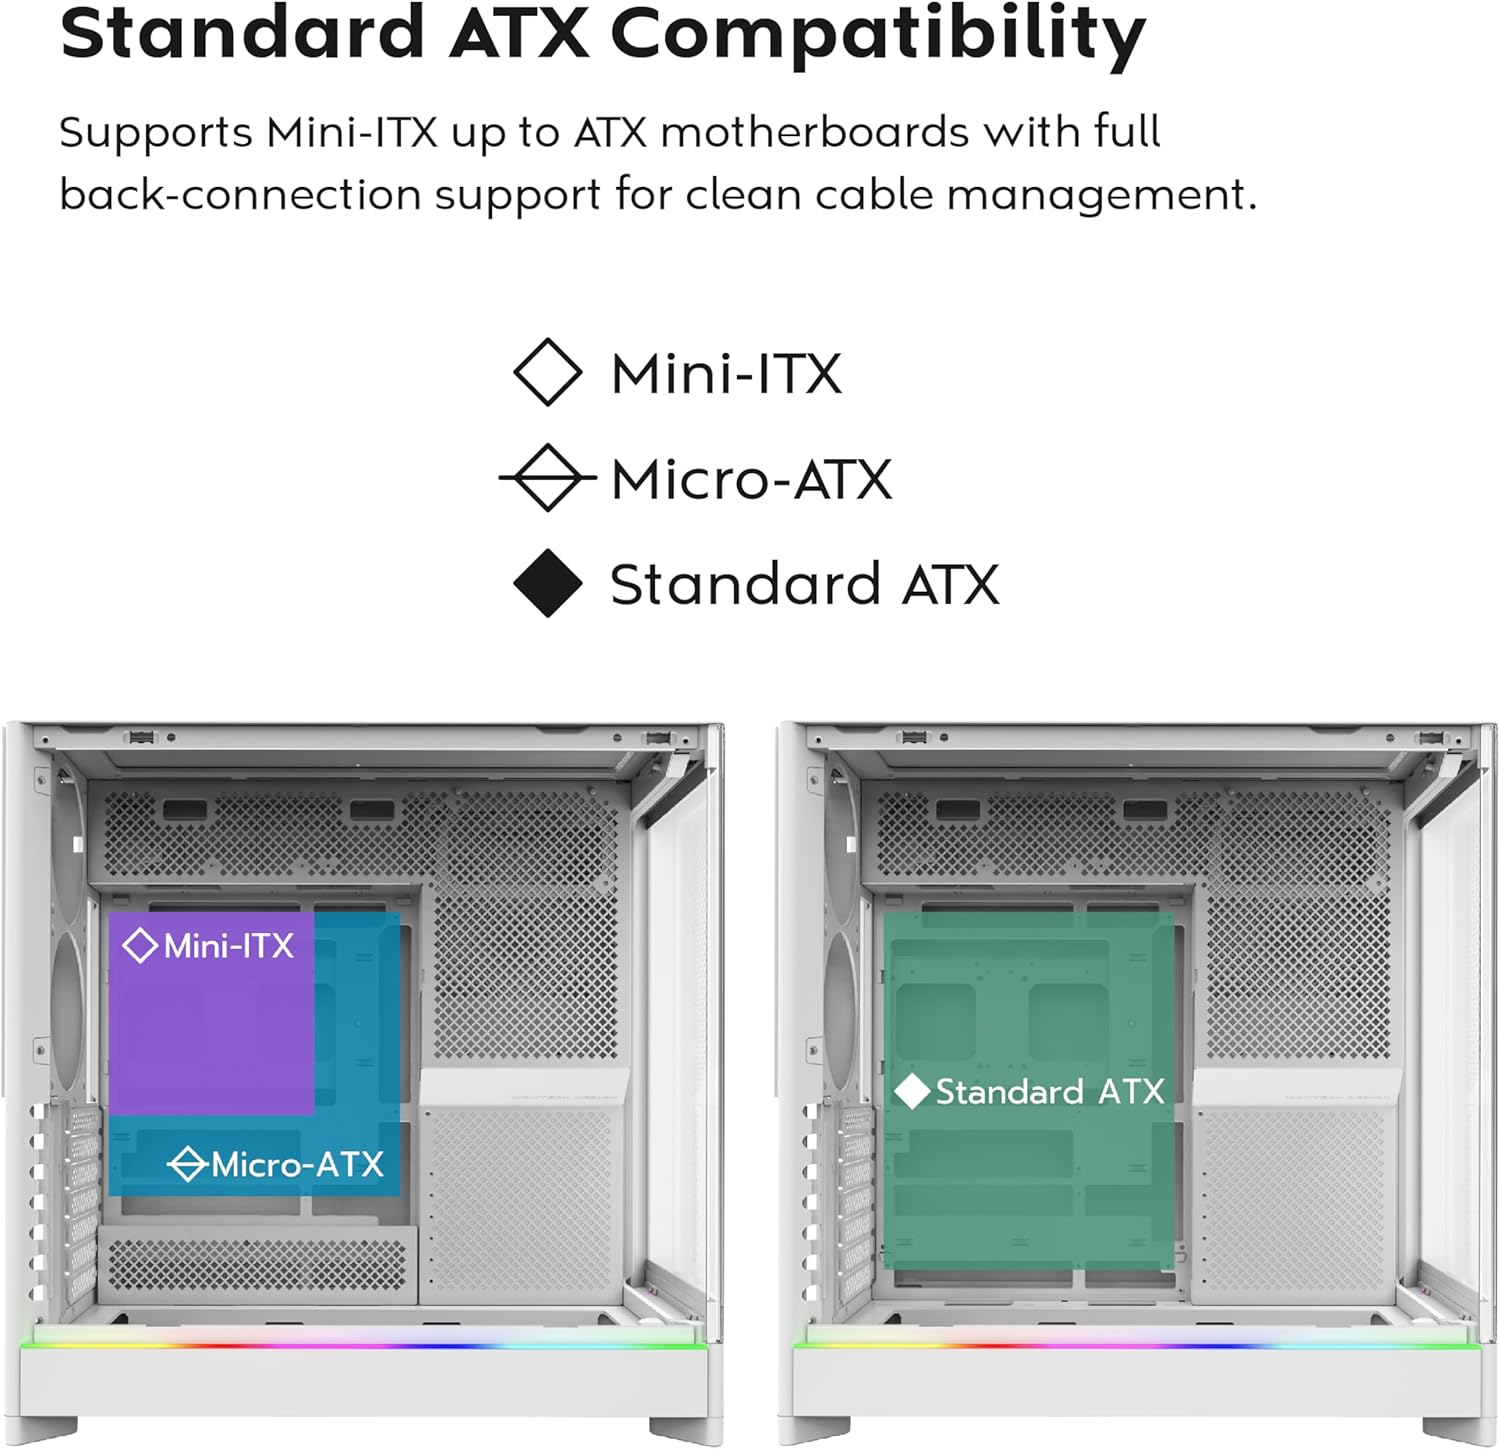
4.2 የማዘርቦርድ ጭነት
- Standoffs: Ensure the correct standoffs are installed for your motherboard form factor (Mini-ITX, Micro-ATX, or ATX). Adjust if necessary.
- የግፊት/ውስጥ መከላከያ፡ Install your motherboard's I/O shield into the rear opening of the case.
- መጫን፡ Carefully align your motherboard with the standoffs and gently lower it into place. Secure it with the provided screws.
- Back-Connect Motherboards: If using a back-connect motherboard, ensure proper alignment with the designated cutouts for cable routing.
4.3 የኃይል አቅርቦት አሃድ (PSU) መጫኛ
- መጫን፡ The PSU mounts at the bottom of the case. Slide the PSU into its designated bay from the rear.
- ማስጠበቅ፡ PSUን ከኋላ በኩል ባሉት ብሎኖች ያስጠብቁት።
- ኬብሊንግ Route necessary power cables through the cable management cutouts to the motherboard and other components.
4.4 የማከማቻ ድራይቭ መጫኛ (ኤችዲዲ/ኤስኤስዲ)
- Drive Bays: Utilize the designated drive bays for 3.5" HDDs and 2.5" SSDs.
- መጫን፡ Secure drives using the provided screws or toolless mechanisms where applicable.
4.5 የግራፊክስ ካርድ (ጂፒዩ) ጭነት
- PCIe ማስገቢያዎች: Remove the necessary PCIe slot covers.
- አግድም ጭነት: Insert the GPU into the primary PCIe slot on your motherboard and secure it with screws.
- Vertical Installation (Optional): The rotatable PCIe slots allow for vertical GPU mounting. Rotate the bracket and install your GPU vertically. A PCIe riser cable (not included) is required for vertical mounting.
4.6 Cooling System Installation (Fans/Radiators)
- አስቀድመው የተጫኑ አድናቂዎች; The case comes with 5 pre-installed ARGB PWM fans. Connect their power and ARGB cables to your motherboard or a fan controller.
- Additional Fans/Radiators: The case supports additional fans and radiators at the top, rear, and bottom. Refer to the specifications for supported sizes.
- AIO Cooler: Install your All-in-One (AIO) liquid cooler radiator and fans according to the cooler's instructions, utilizing the available mounting points.
4.7 የኬብል አስተዳደር
ተጠቀም ample space behind the motherboard tray and the cable management cutouts to route and secure cables. This improves airflow and aesthetics.
5. የአሠራር መመሪያዎች
Once all components are installed and secured, you can power on your system.
5.1 በማብራት ላይ
- ተያያዥ ነገሮች፡- Connect your monitor, keyboard, mouse, and other peripherals to your system.
- የኃይል ገመድ Connect the PSU power cable to a wall outlet and flip the PSU's power switch to the 'ON' position.
- የኃይል ቁልፍ፡- በመሳሪያው የፊት/የመቀየሪያ ፓነል ላይ የኃይል አዝራሩን ይጫኑ።
5.2 የፊት ግቤት/ውፅዓት ፓነል ተግባራት
- የዩኤስቢ 3.0 ወደቦች; ከዩኤስቢ 3.0 ጋር ተኳሃኝ የሆኑ መሳሪያዎችን ለማገናኘት።
- የዩኤስቢ ዓይነት-C ወደብ፡- For connecting USB Type-C compatible devices.
- ኦዲዮ ጃክ ፦ ለጆሮ ማዳመጫዎች ወይም ድምጽ ማጉያዎች.
- ማይክሮፎን ጃክ ማይክሮፎን ለማገናኘት.
- የኃይል ቁልፍ፡- ስርዓቱን ለማብራት ወይም ለማጥፋት።
- የ LED አዝራር፡- To cycle through the 29 ARGB lighting modes for the pre-installed fans and integrated light strip.
6. ጥገና
መደበኛ ጥገና የፒሲዎን ክፍሎች ጥሩ አፈፃፀም እና ረጅም ጊዜ እንዲኖር ይረዳል።
- አቧራ ማጽዳት; Periodically clean dust filters (top, bottom, front) to maintain optimal airflow. Use compressed air to remove dust from internal components.
- Glass Panel Cleaning: Use a soft, lint-free cloth and a non-abrasive glass cleaner to clean the tempered glass panels. Avoid harsh chemicals.
- የኬብል አስተዳደር የኬብል መስመሮችን በየጊዜው ይፈትሹ፤ ይህም የአየር ፍሰትን ወይም የአየር ማራገቢያ ምላጭን የሚያደናቅፍ መሆኑን ያረጋግጡ።
- የደጋፊዎች ምርመራ፡- Ensure all fans are spinning freely and quietly. Clean fan blades if dust buildup is significant.
7. መላ መፈለግ
This section addresses common issues you might encounter. For more complex problems, consult Montech customer support or a qualified technician.
የተለመዱ ጉዳዮች እና መፍትሄዎች:
| ችግር | ሊሆን የሚችል ምክንያት | መፍትሄ |
|---|---|---|
| ስርዓቱ አይበራም። | PSU switch off, power cables loose, faulty PSU/motherboard. | Ensure PSU switch is ON. Check all power connections (24-pin, CPU, GPU). Test PSU if possible. |
| አድናቂዎች አይሽከረከሩም ወይም RGB አይሰራም። | Fan cables disconnected, ARGB cables disconnected, faulty fan/controller. | Verify fan power and ARGB headers are securely connected to motherboard/controller. Use the LED button to cycle modes. |
| ደካማ የአየር ፍሰት ወይም ከፍተኛ ሙቀት. | Dust buildup, obstructed vents, incorrect fan orientation. | Clean dust filters and internal components. Ensure fans are oriented correctly for intake/exhaust. Check for cable obstructions. |
| የፊት ግቤት/ውፅዓት ወደቦች አይሰሩም። | Front panel connectors loose or incorrectly connected to motherboard. | Refer to your motherboard manual to ensure all front panel headers (USB, audio) are correctly connected. |
8. ዝርዝሮች
Detailed technical specifications for the MONTECH HS02 PRO ATX Mid-Tower PC Case.
| ባህሪ | ዝርዝር መግለጫ |
|---|---|
| የሞዴል ስም | HS02 PRO Glass Black with Fans |
| የሞዴል ቁጥር | HS02PB |
| የጉዳይ ዓይነት | ማዕከላዊ ማማ |
| የማዘርቦርድ ተኳኋኝነት | ATX, Micro-ATX, Mini-ITX (with back-connect support) |
| ልኬቶች (LxWxH) | 32 x 52.4 x 58.8 ኢንች (በግምት. 81.3 x 133.1 x 149.4 ሴሜ) |
| የእቃው ክብደት | 24.2 ፓውንድ (በግምት 10.98 ኪግ) |
| የፊት ፓነል | Curved Tempered Glass (8-degree) |
| ቀድሞ የተጫኑ አድናቂዎች | 5x GF120 V2 ARGB PWM Fans |
| የማቀዝቀዣ ዘዴ | Air (Vertical Ventilation / Chimney Effect) |
| የኃይል አቅርቦት መጫኛ ዓይነት | የታችኛው ተራራ |
| የፊት I / O ወደቦች | 2x USB 3.0, 1x USB Type-C, Audio, Mic, Power Button, LED Button |
| የጂፒዩ ማጽዳት | Up to 420mm (supports vertical GPU with rotatable PCIe slots) |
| የማጠራቀሚያ ገንዳዎች | Multiple HDD/SSD support |
| ቀለም | ጥቁር |
9. ዋስትና እና ድጋፍ
የዋስትና መረጃ እና የቴክኒክ ድጋፍ ለማግኘት፣ እባክዎን ኦፊሴላዊውን ሞንቴች ይመልከቱ webጣቢያ ወይም በቀጥታ የደንበኛ አገልግሎታቸውን ያግኙ። ለዋስትና ጥያቄዎች የግዢ ማረጋገጫዎን ያስቀምጡ።
- የሞንቴች ኦፊሴላዊ Webጣቢያ፡ www.montechpc.com
- የደንበኛ አገልግሎት፡ የሚለውን ተመልከት website for contact details, including email and phone support.


