1. መግቢያ
This manual provides detailed instructions for the installation, operation, and maintenance of your TESmart HDMI KVM Switch 8 Port 8K@60Hz. Please read this manual thoroughly before using the device to ensure proper functionality and to prevent damage.
2. የጥቅል ይዘቶች
ከዚህ በታች የተዘረዘሩት ሁሉም እቃዎች በጥቅልዎ ውስጥ መያዛቸውን ያረጋግጡ። ማንኛቸውም እቃዎች ከጠፉ ወይም ከተበላሹ፣ እባክዎ የደንበኛ ድጋፍን ያግኙ።
- 1 x 8x1 HDMI KVM ማብሪያ/ማጥፊያ
- 8 x KVM Cables (HDMI + USB, 5ft each)
- 1 x IR የርቀት መቆጣጠሪያ (የ AAA ባትሪዎች አልተካተቱም)
- 1 x IR ተቀባይ ገመድ
- 1 x ዲሲ 12 ቪ የኃይል አስማሚ
- 2 x Rack-ears
- 1 x የተጠቃሚ መመሪያ
- 1 x 3-Pin Connector (for RS232)
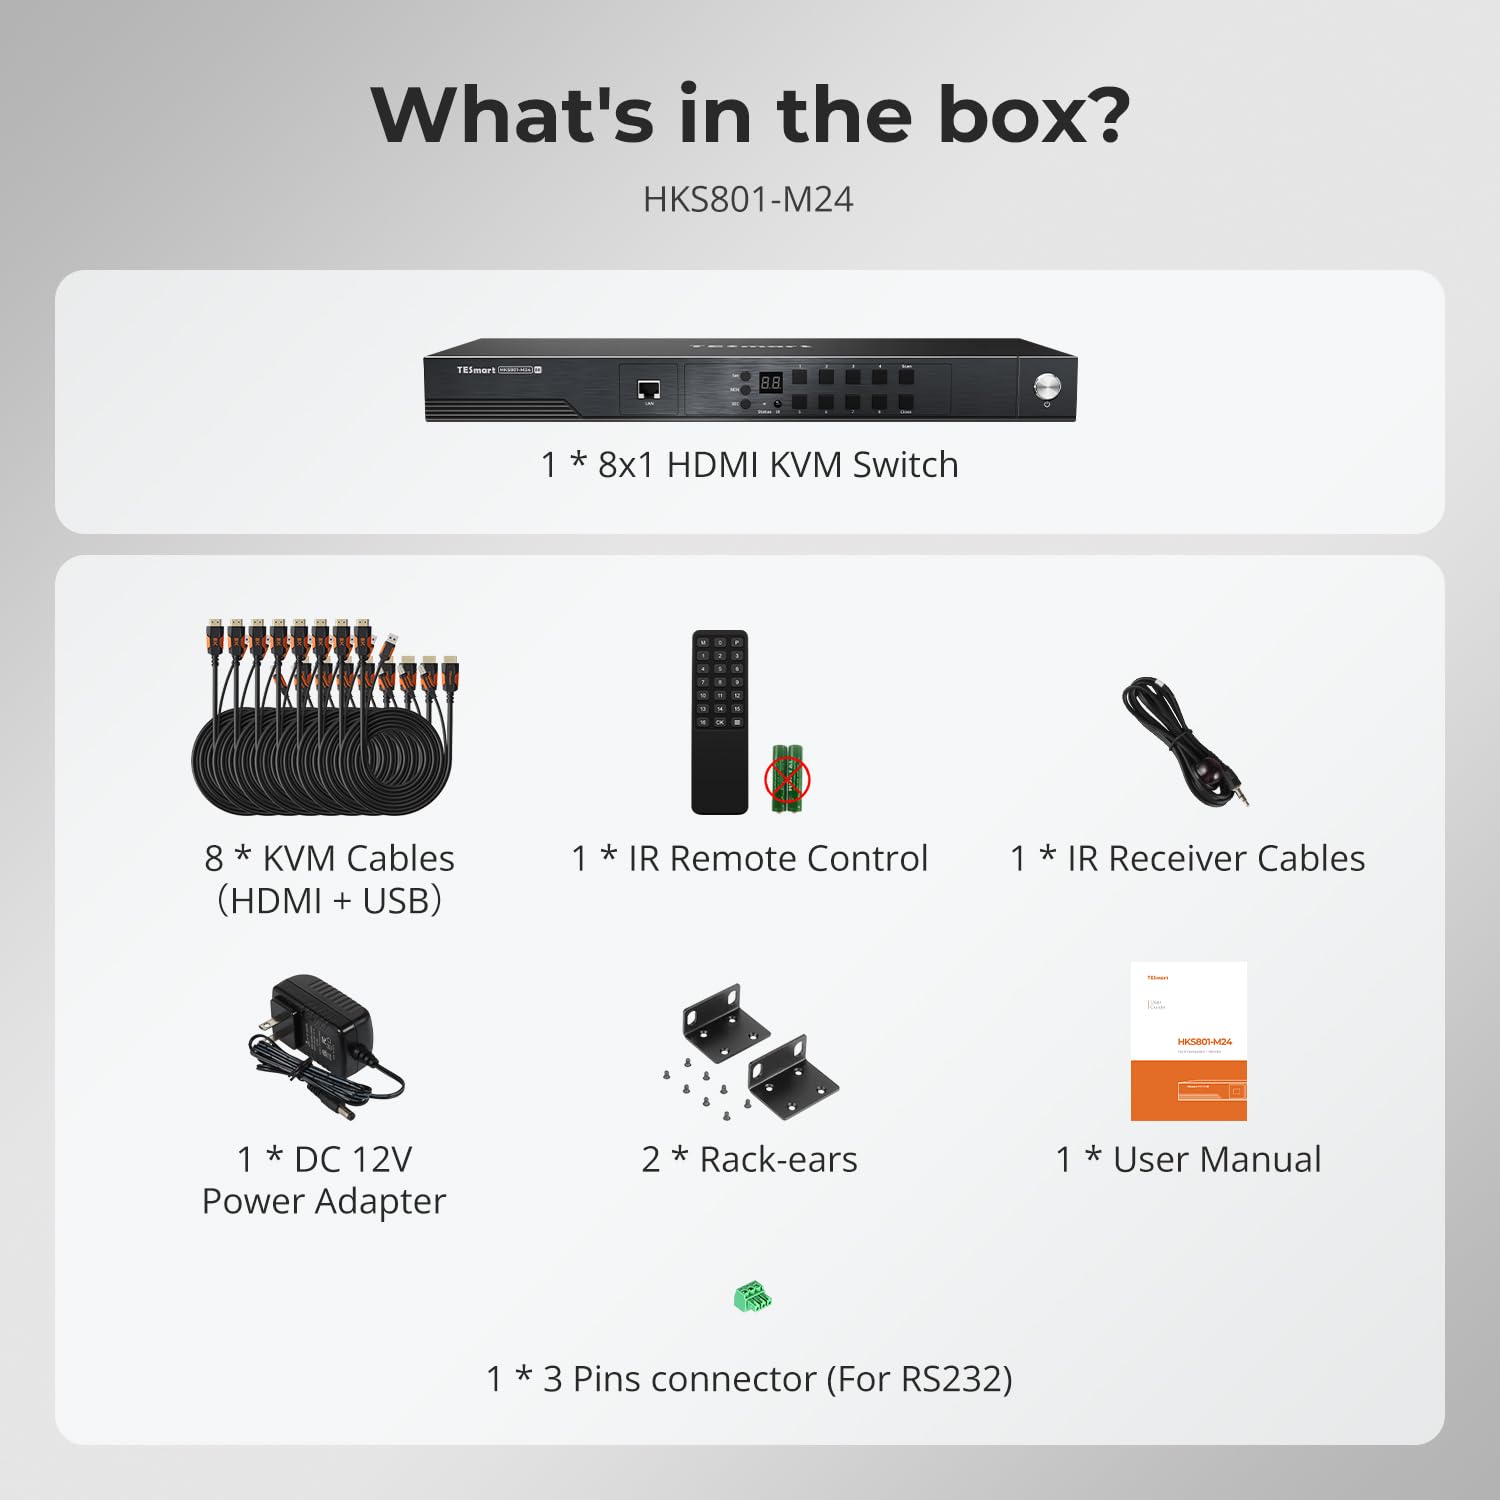
Image: All components included in the TESmart HDMI KVM Switch package.
3. የምርት ባህሪዎች
- 8-Port HDMI KVM Switch: Connects up to 8 HDMI-enabled computers to a single monitor, keyboard, and mouse console.
- 8ኬ@60Hz ጥራት፡ Supports ultra-high-definition resolutions up to 7680x4320 at 60Hz.
- ዩኤስቢ 3.0 መገናኛ፡ Features two standard USB 3.0 ports for connecting additional peripherals like barcode scanners or USB hard drives.
- የኢዲአይዲ ኢሙሌተር፡ Integrated EDID emulators ensure correct display information is maintained across all input ports, preventing display setting changes during switching.
- በርካታ የመቀየሪያ ዘዴዎች፡ Offers flexible control via IR remote, front panel buttons, keyboard hotkeys, mouse wheel, RS232 commands, and IP control.
- Auto Switching & Auto Detect Mode: Supports automatic switching between connected computers at specified intervals and automatically detects active devices.
- ይሰኩ እና ይጫወቱ፡ Requires no special software installation and supports hot-swapping of devices.
- Rackmount ንድፍ: Includes rack-ears for easy installation into standard server racks.
4. ማዋቀር እና መጫን
የKVM ማብሪያ / ማጥፊያዎን ለማዋቀር የሚከተሉትን ደረጃዎች ይከተሉ
- መሣሪያዎችን ማጥፋት; Ensure all computers and the monitor are powered off before beginning the installation.
- ተያያዥ ሞኒተር፡ Connect your monitor to the HDMI OUTPUT port on the KVM switch using an HDMI cable.
- የቁልፍ ሰሌዳ እና መዳፊት ያገናኙ፡ Connect your USB keyboard and mouse to the dedicated K/M USB ports on the KVM switch.
- ኮምፒተሮችን ማገናኘት; For each computer (up to 8), connect an HDMI cable from the computer's HDMI output to an HDMI INPUT port (PC 1-8) on the KVM switch. Simultaneously, connect a USB cable from the computer's USB port to the corresponding USB INPUT port (PC 1-8) on the KVM switch. Use the provided KVM cables for optimal performance.
- የግንኙነት ኃይል; Plug the DC 12V power adapter into the KVM switch and then into a power outlet.
- አብራ፡ Power on the KVM switch, then power on your monitor, and finally power on your connected computers.

Image: Connection diagram for the TESmart 8-port KVM switch.

Image: Comprehensive connection overview including optional RS232, LAN, and USB device connections.
5. የአሠራር መመሪያዎች
የTESmart KVM ማብሪያ / ማጥፊያ በተገናኙ ኮምፒውተሮች መካከል ለመቀያየር በርካታ ዘዴዎችን ያቀርባል፡
5.1 የመቀየሪያ ዘዴዎች
- የፊት ፓነል አዝራሮች፡- Press the numbered buttons on the front panel to switch directly to the corresponding PC input.
- IR የርቀት መቆጣጠሪያ፡- Use the included IR remote control to switch inputs. (Requires 2x AAA batteries, not included).
- የቁልፍ ሰሌዳ ቁልፍ ቁልፎች: Specific key combinations allow for quick switching without moving your hand from the keyboard. Refer to the full user manual for specific hotkey commands.
- የመዳፊት ጎማ መቀያየር፦ Scroll the mouse wheel to switch between inputs.
- የRS232 መቆጣጠሪያ Connect via RS232 for serial command control.
- የአይፒ ቁጥጥር፡- Control the KVM switch over a network using IP commands.

ምስል፡ አልቋልview of the six available switching methods.
5.2 Auto Detect Mode
The KVM switch can automatically detect when a connected PC becomes active and switch to its input. This eliminates the need for manual switching when a computer is powered on.

Image: Auto Detect Mode functionality.
5.3 ራስ ቅኝት ሁነታ
In Auto Scan Mode, the KVM switch cycles through all connected active inputs at a user-defined interval (e.g., 5 seconds to 1 hour). This is useful for monitoring multiple systems.

Image: Auto Scan Mode for monitoring multiple devices.
5.4 ኢዲአይዲ ኢሚሊሽን
The built-in EDID emulators ensure that your computers always receive correct display information, preventing issues like desktop icon rearrangement, screen flicker, or resolution changes when switching between inputs or when a computer is disconnected.

Image: EDID Emulation prevents display issues during switching.
5.5 የመቆለፊያ ተግባር
The KVM switch includes a lock function to prevent accidental input changes. Press the [0/Close] button on the front panel to turn off the HDMI display and disable hotkeys and remote control functions. Press it again to re-enable the display and controls.
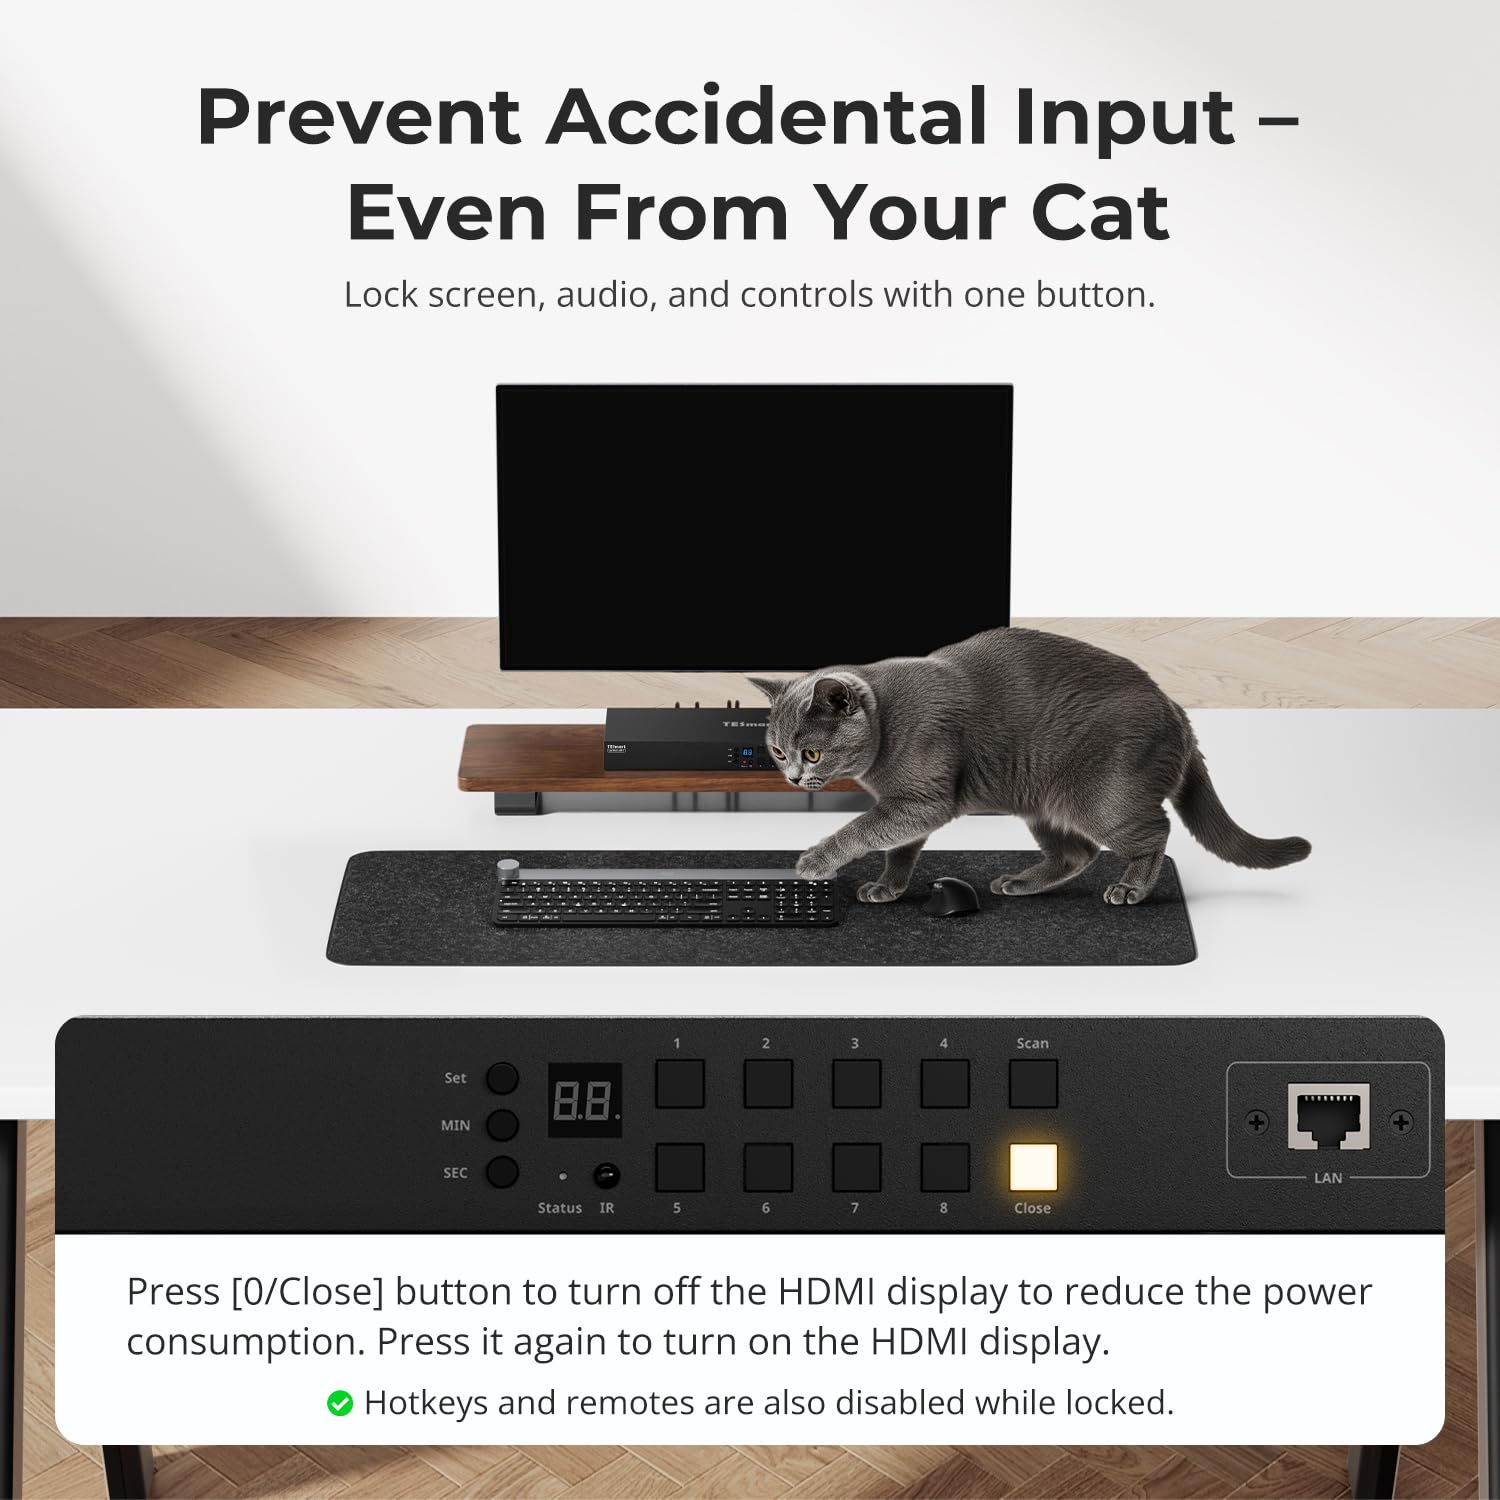
Image: Using the lock function to prevent unintended input.
6. ጥገና
የKVM መቀየሪያዎን ረጅም ዕድሜ እና ጥሩ አፈጻጸም ለማረጋገጥ እነዚህን የጥገና መመሪያዎች ይከተሉ፡
- ማጽዳት፡ የመሳሪያውን ውጫዊ ክፍል ለማጽዳት ለስላሳና ደረቅ ጨርቅ ይጠቀሙ። ፈሳሽ ማጽጃዎችን ወይም መሟሟቶችን ከመጠቀም ይቆጠቡ።
- የአየር ማናፈሻ; የKVM ማብሪያ / ማጥፊያው በቂ የአየር ዝውውር እንዳለው ያረጋግጡ። የአየር ማናፈሻ ክፍተቶችን አይዝጉ።
- አካባቢ፡ Operate the device within the specified temperature range (up to 40°C). Avoid extreme temperatures, humidity, and direct sunlight.
- የኬብል አስተዳደር Keep cables organized and free from kinks or excessive tension to prevent damage to connectors and ports.
- የጽኑዌር ዝማኔዎች ፦ የአምራቹን ያረጋግጡ webአፈጻጸምን ሊያሻሽሉ ወይም ባህሪያትን ሊጨምሩ የሚችሉ ማንኛውንም የሚገኙ የጽኑዌር ዝማኔዎችን በየጊዜው ለማግኘት ድህረ ገጽ።
7. መላ መፈለግ
በKVM ማብሪያዎ ላይ ችግሮች ካጋጠሙዎት የሚከተሉትን የተለመዱ ችግሮች እና መፍትሄዎች ይመልከቱ፡
- ምንም ማሳያ/ምልክት የለም፡
- ሁሉም የኤችዲኤምአይ እና የዩኤስቢ ኬብሎች ከ KVM ማብሪያ / ማጥፊያው እና ከኮምፒውተሮች/ሞኒተር ጋር ደህንነቱ በተጠበቀ ሁኔታ መገናኘታቸውን ያረጋግጡ።
- Verify the KVM switch is powered on and the correct input is selected.
- Try connecting the computer directly to the monitor to confirm the computer's video output is functional.
- ሞኒተሩ በትክክለኛው የግብዓት ምንጭ ላይ መዋቀሩን ያረጋግጡ።
- የቁልፍ ሰሌዳ/አይጥ ምላሽ የማይሰጥ፡
- Ensure the keyboard and mouse are connected to the dedicated K/M USB ports on the KVM switch.
- Try connecting the keyboard and mouse directly to the computer to verify functionality.
- Some specialized gaming or multimedia keyboards/mice may require pass-through mode. Refer to the full manual for enabling this feature.
- Slow Switching Time:
- Switching times can vary depending on the connected devices and their display handshake processes. High-resolution or high-refresh-rate devices (e.g., PS5 at 4K 120Hz HDR) may experience longer switching delays (up to 5 minutes in some cases).
- For other devices, typical switching time is 5-10 seconds.
- Display Issues with High-Performance Devices (e.g., PS5):
- Devices requiring 4K 120Hz HDR VRR may be particularly sensitive to HDMI signal integrity.
- Ensure high-quality HDMI 2.1 certified cables are used.
- Consider simplifying the setup by connecting the KVM switch directly to the display, rather than through an A/V receiver, if experiencing signal drops or resolution degradation.
- If green lines or signal loss occur, try adjusting display settings on the source device to a lower resolution or refresh rate as a test.
- Audio Issues (e.g., Dolby Atmos):
- This KVM switch may not support certain advanced audio formats like Dolby Atmos. Verify audio compatibility with your specific setup.
- Control Software Issues:
- If experiencing difficulties with official control software for advanced settings (e.g., disabling the beep sound), check the TESmart website for updated software or drivers.
- Some users have reported success with third-party applications for controlling TESmart KVM switches; however, use such software at your own discretion.
8. ዝርዝሮች
| ባህሪ | ዝርዝር መግለጫ |
|---|---|
| የሞዴል ቁጥር | HKS801-M24-USBK |
| የክወና ሁነታ | ጠፍቷል |
| የአሁኑ ደረጃ አሰጣጥ | 3 Amps |
| ኦፕሬቲንግ ቁtage | 12 ቮልት |
| የማገናኛ አይነት | ኤችዲኤምአይ ፣ ዩኤስቢ 3.0 |
| የንጥል መጠኖች (L x W x H) | 17.32 x 5.9 x 1.8 ኢንች |
| የእቃው ክብደት | 4.22 ፓውንድ |
| ቁሳቁስ | ብረት |
| ቀለም | ጥቁር |
| ዋትtage | 36 ዋት |
| የላይኛው የሙቀት ደረጃ | 40 ዲግሪዎች ሴልሲየስ |
| የአለም አቀፍ ጥበቃ ደረጃ | IP30 |
| ተስማሚ መሣሪያዎች | Computers, servers, DVR/NVR, laptops, USB devices, HDMI 2.1 compatible devices |
9. ዋስትና እና ድጋፍ
TESmart products are designed for reliability and performance. For specific warranty information, please refer to the warranty card included with your product or visit the official TESmart website. For technical support, troubleshooting assistance, or to inquire about replacement parts, please contact TESmart customer service through their official channels.


